Competition glider quick setup instructions – HITEC Eclipse 7 Pro User Manual
Page 47
45
5. Now it’s time to select the wing type. Select 2WNG for
models with two aileron servos, and 4WNG for models
with two ailerons and two
flaps. Press the Up arrow
until you see the word
“WING” in the upper right
of the display. The wing
type in the lower left will be
flashing.
.
6. Press the Down arrow once. This gets you into the
model name mode (note that the words “MODEL” and
“NAME” appear in the upper left of the display).
7. Now you can select four letters to identify your model.
With the first of the four letters flashing, press the Data
+Increase or -Decrease key to change the letter that is
displayed. Stop when the first letter is the one you want.
8. Press the Right Cursor key once to get to the second
letter. Repeat the previous step to choose the second
letter.
9. Repeat two more times to fill out the remaining two
letters. If you like, you can hit the right cursor button one
more time and select a number between 0 and 999 for
further identification. It can be handy to use this to store
the plane’s channel number.
10. Press the Up arrow until to get you into the
Timer menu (TIME). If you want, you can use the Data
+Increase or -Decrease keys to select the amount of
time you want the stopwatch to count down.
11. This completes the initial part of the setup. Now,
we’ll go ahead and customize the GLID settings for your
model. Switch transmitter power OFF.
12. Turn the transmitter on. When you do, you will find
that channels 1 and 5 act as ailerons. Channels 6 and
7 will only move when the flap knob (VR1) is moved.
13. Now check that each servo moves the proper direction.
Move the aileron, elevator, and rudder sticks. Be
sure that the channels go the proper direction. If not, go
to the Reversing menu (REV) by hitting the Down arrow.
Follow the procedures in the ACRO setup example, for
details.
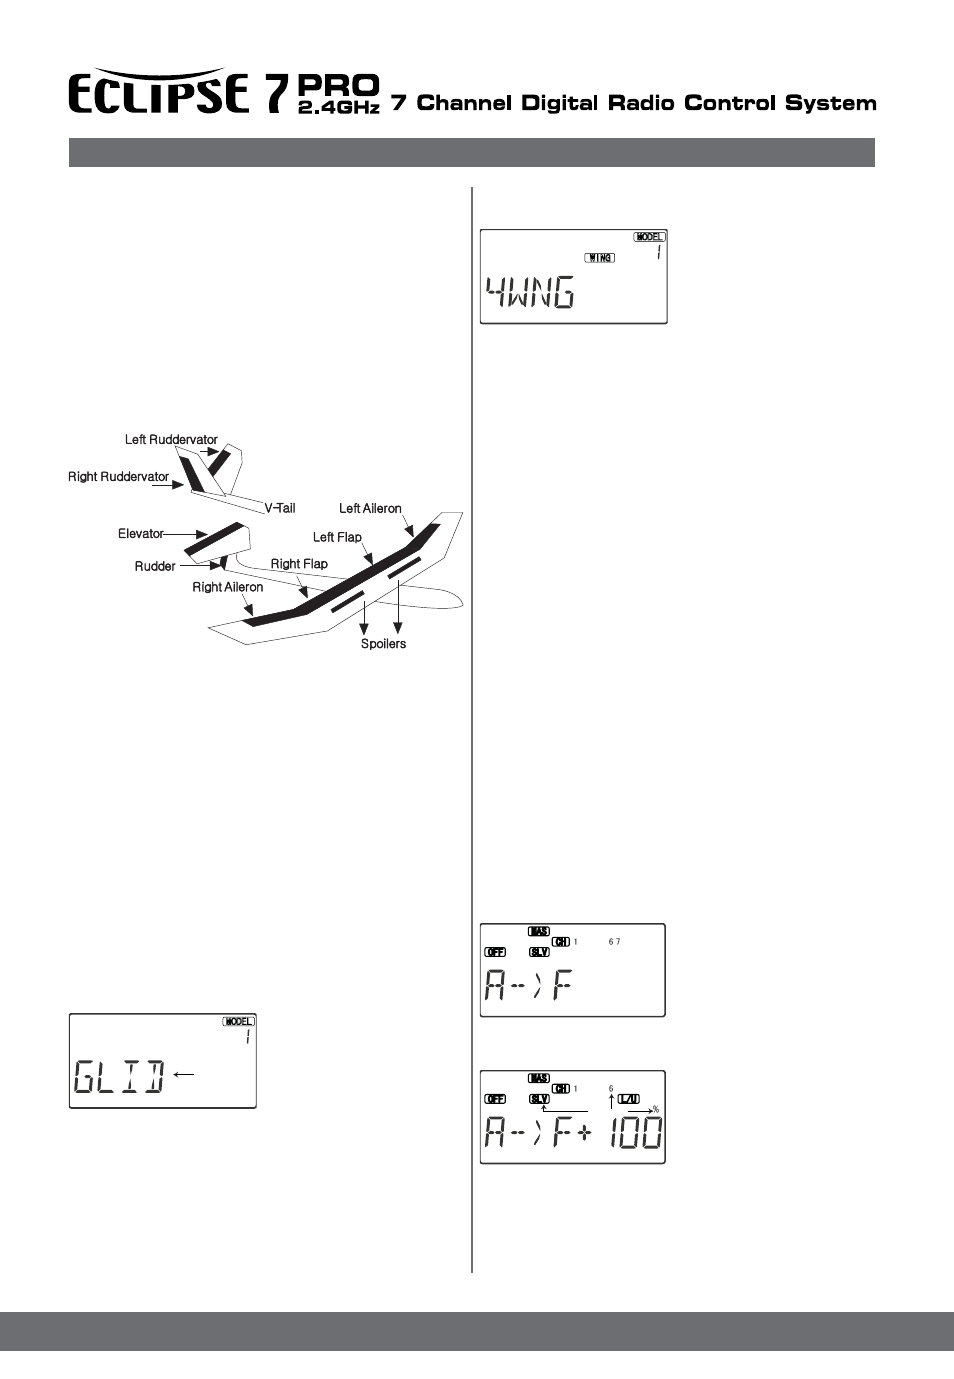
14. (4WNG only) Move to
A ->F by pressing the Up
Down Edit buttons.
Activate it by pressing the
Active/Inhibit (Clear) key (‘On’ or
‘Off’ will be flashing
depending on the position of the Flt condition switch:
forward is on).
15. (4WNG only) Next,
move the aileron stick and
be sure that both flaps
move the same directions
as the ailerons. If they do, move
on to the next step. If
they don’t, reverse them in the REV menu. Check again
that the flaps now move with the ailerons.
16. (4WNG only) Reduce the rate that the ailerons mix
to the flaps by pressing the Cursor Right key until the
percent sign flashes. You can independently set the up
Competition Glider Quick Setup Instructions
The following example shows how the Eclipse 7 PRO may be
programmed for the “typical” high-performance six-servo
sailplane, shown below. Six servos are used for right and left
ailerons, right and left flaps, elevator, and rudder.
If the model happens to have a V-tail, all the functions are
the same, except for the response of the two tail controls.
The channel 3 output on the receiver toggles with Elevator
D/R switch and may be used for motor on/off. If you are
programming a model with two wing servos, skip the steps
labeled “4WNG only.” Your model’s settings will be depend-
ent on the setup and linkages. Ask an experienced pilot for
assistance setting up.
1. Before you begin, be sure that all of your aileron and
flap servos are plugged into the proper receiver channels:
CH1 - Right aileron
CH2 - Elevator
CH3 - Motor on/off or spoiler
CH4 - Rudder
CH5 - Left Aileron
CH6 - Right Flap (4WNG only)
CH7 - Left Flap (4WNG only)
2. Enter the SETUP mode by turning on the transmitter
while pressing the two Up Down Edit buttons simultaneously.
You will be in the model setup (MSEL) menu.
3. Make sure you’re in a clear memory. If necessary, use
the Cursor Right button to move to a new model memory.
The selected model memory is indicated by the MODEL
numeral
flashing . Power down if you’ve
chosen a new memory, then power up as in previous step.
4. Press the Up arrow until
the word GLID appears,
flashing on and off. If it
does, you’re ready to
proceed on to the next step.
If not, press the Left or Right
Cursor keys until it
appears. You must press both Data keys to “Save” the
setting; when you do this, there will be two beeps. This is
how you select the type of model you wish to use.
WARNING: selecting a different model type will erase the
settings in the model memory. BE SURE you’re in the
correct model memory before selecting a new model type,
or you might accidentally erase a model you’re using!
(The other memories will not be affected.)
Flashing
Flashing