Helicopter setup instructions – HITEC Eclipse 7 Pro User Manual
Page 59
57
120˚ 140˚ 180˚ only
Press both
Edit/Display key
reversing function [REV] to reverse channels as necessary to
get proper throw directions.
12. If you’re using 120’ ,140’or
180’ swash types, please use the swashplate (SWAH)
menu, page 61, to adjust these responses.
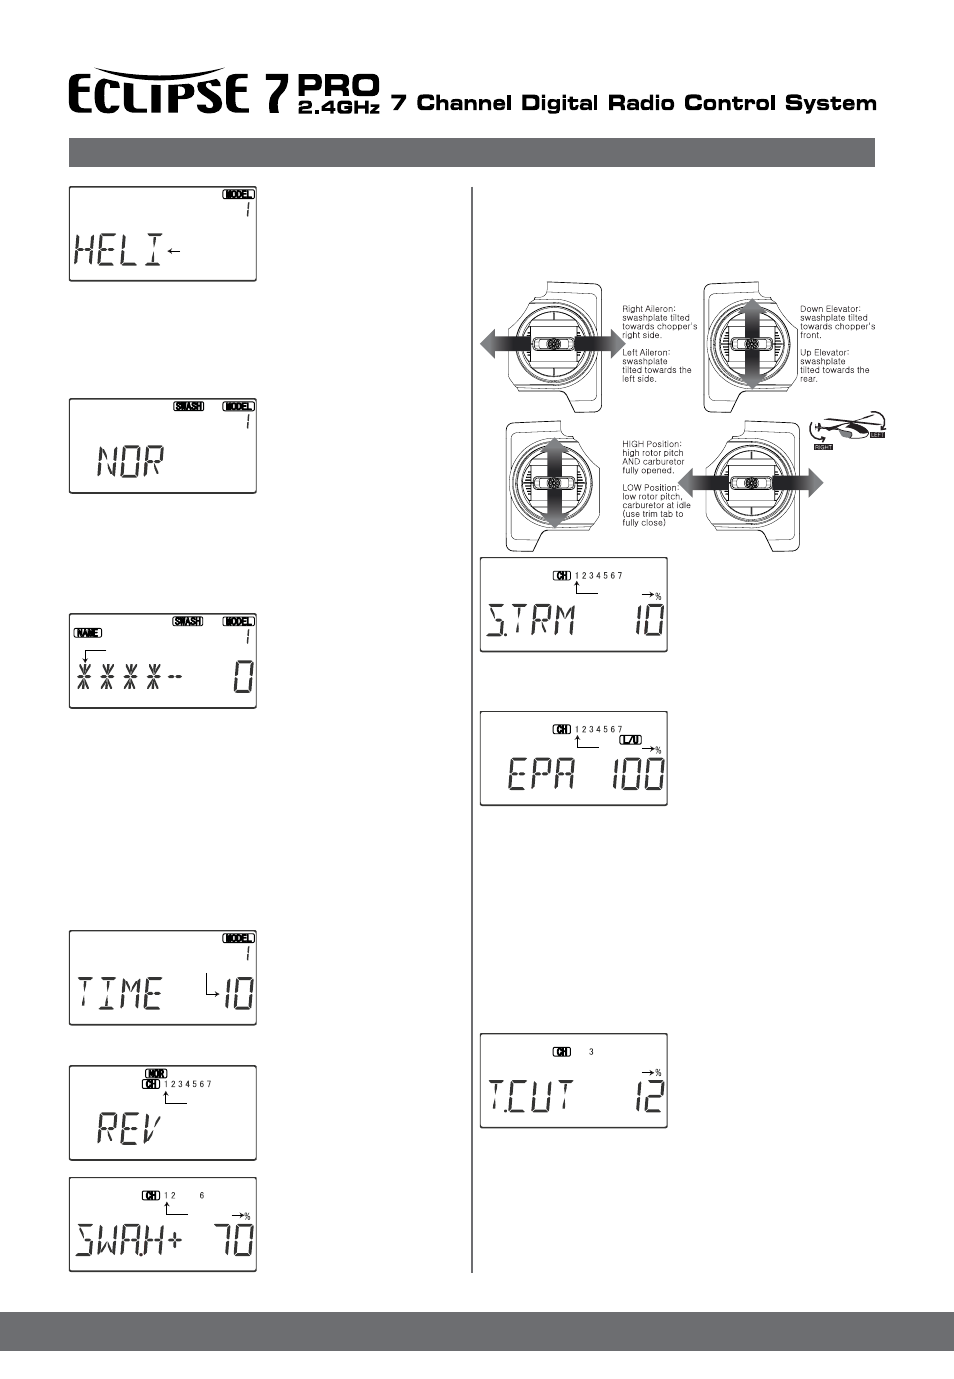
Right Cursor keys until HELI
appears. You must press
both Data keys to “Save”
the setting. This is how
you select the type of model
you wish to use, either
ACRO, HELI, or GLID.
WARNING: selecting a different model type will erase the
settings in the model memory. BE SURE you’re in the
correct model memory before selecting a new model type,
or you might accidentally erase a model you’re using.
4. Swash Type. Now it’s
time to select the swash
type. Select NOR for helis
with independent aileron,
elevator, and pitch servos;
120’ for models using 120
swashplates;
140’ for models using 140 swashplates and 180’ for
models with 180 swashes. Press the Down arrow until you
see the word “SWASH” in the upper right of the display.
The swash type in the lower left will be flashing.
You must press both Data keys to save the swash type.
5. Name your model.
Press the Down arrow once.
This gets you into the
model name mode (note
the words MODEL and
NAME in the upper left of the
display).
6. Now you can select four letters to identify your model.
With the first of the four letters flashing, press the Data
+Increase or -Decrease keys to change the letter that is
displayed. Stop when the first letter is the one you want.
7. Press the Right Cursor key once to get to the second
letter. Repeat Step 5 to choose the second letter.
8. Repeat the previous steps two more times to fill out
the remaining two letters. If you like, you can hit the
right cursor button one more time and select a number
between 0 and 999 for further identification.
9. Set the stopwatch.
Press the UP arrow four times.
This gets you into the
Timer menu (TIME). Use
the Data Increase and
Decrease keys to select the
amount of time you want the
stopwatch to count down. This is handy to keep track of
engine running time so you don’t run out of gas.
10. This completes the initial
part of the setup. Now, we’ll
go ahead and customize the
settings for your model.
Switch transmitter power OFF.
11. Servo Directions.
Switch transmitter power
back on and check the
proper direction of throw
for each servo. Use the
Helicopter Setup Instructions
RIGHT
LEFT
RIGHT
LEFT
DOWN
UP
LOW
HIGH
13. Servo Neutrals. First,
be sure the hovering pitch
and hovering throttle knobs
are centered. Set up all
linkages so that all servos
are as close to mechanical neutral as possible. Then, use
the Subtrim (STRM) window to make fine adjustments on
the servo neutrals.
14. Servo Travel. Use the
EPA command to limit
servo travels to prevent
binding.
15. Collective Pitch. The collective pitch angle
(controlled by CH6 on a conventional helicopter) should
vary from -2 to +10 with full stick motion, depending on
the flight condition. We recommend setting the hovering
pitch (pitch with throttle stick at center) to +4.5 . Adjust
servo arms and EPA values to get the desired travel at
the end points, measuring with a pitch meter.
16. Engine travel. On the regular display menu, enter a
value of -25% for throttle trim. Use the EPA menu to set
up the carburetor pushrod so that at full throttle there is
no binding, and so the engine idles smoothly at low
throttle.
17. Throttle Cut. Enter the
throttle cut (T.CUT) menu
and enter a value of -25%
or so. Press the Cut button
and be sure that the carburetor
fully closes, which will shut off
the engine. Don’t pick too large a number, or binding may occur.
Flashing
Flashing
Flashing
Flashing
Flashing
Flashing
Flashing
Flashing