Project 138 reflection detector – Elenco Snap Circuits® Deluxe Sound & Light Combo User Manual
Page 75
-74-
Project 136
Motor Power
Project 137
More Motor Power
!
WARNING:
Moving parts. Do not
touch the fan or motor during
operation.
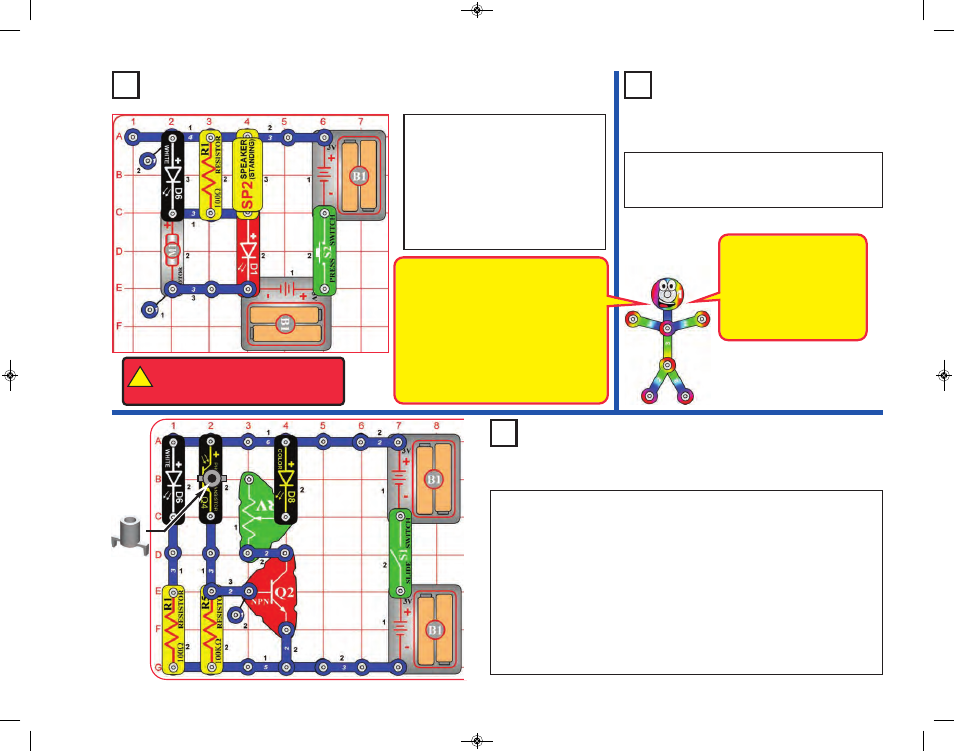
Project 138
Reflection Detector
Build the circuit as shown, push the
press switch (S2), and look at the
brightness of the red LED (D1). Try it
three ways: with no fan on the motor,
with the glow fan on the motor, and
keeping the motor from spinning with
your fingers. When the motor is
spinning, you will hear noise from the
speaker (SP2).
Use the preceding circuit but replace the red LED
(D1) with the color LED (D8), see how it
compares to the red LED.
Build the circuit as shown and turn on the switch (S1). Place the mounting
base over the phototransistor (Q4). Set the lever on the adjustable resistor
(RV) all the way toward the NPN transistor (Q2). Move the circuit into a dimly
lit room, so that the color LED (D8) is off.
Place a mirror directly over the white LED (D6) and photo-transistor (Q4), or
hold it facing a wall mirror. When enough light from the white LED reaches
the phototransistor, the color LED will turn on, indicating that a reflection has
been detected.
The mounting base is used to block direct light from the white LED to the
phototransistor, and to shield the phototransistor from room light. If your room
is very dark, you may get better results by placing the mounting base over
the white LED instead of the phototransistor.
The motor needs a lot of electricity to
start spinning, but needs less the faster
it is spinning. When kept from spinning
by your fingers, the motor sucks up all
the electricity, leaving none to light the
red LED. With the fan on the motor, the
LED gets enough electricity to light.
When the motor is spinning without the
fan, the LED gets lots of electricity and is
bright.
The color LED needs more
electricity to light than the
red LED. The motor “noise”
that you hear on the
speaker can also confuse
the color LED and disrupt
its color pattern.
SCC-350_Manual_Part_B.qxp 7/25/14 2:05 PM Page 19