KMC Controls HPO-5202 User Manual
Installation guide, Mounting linkage to valve
Installation Guide
Linkages for MEP-5000 and MEP-1200 Actuators
HPO-5201 and 5202
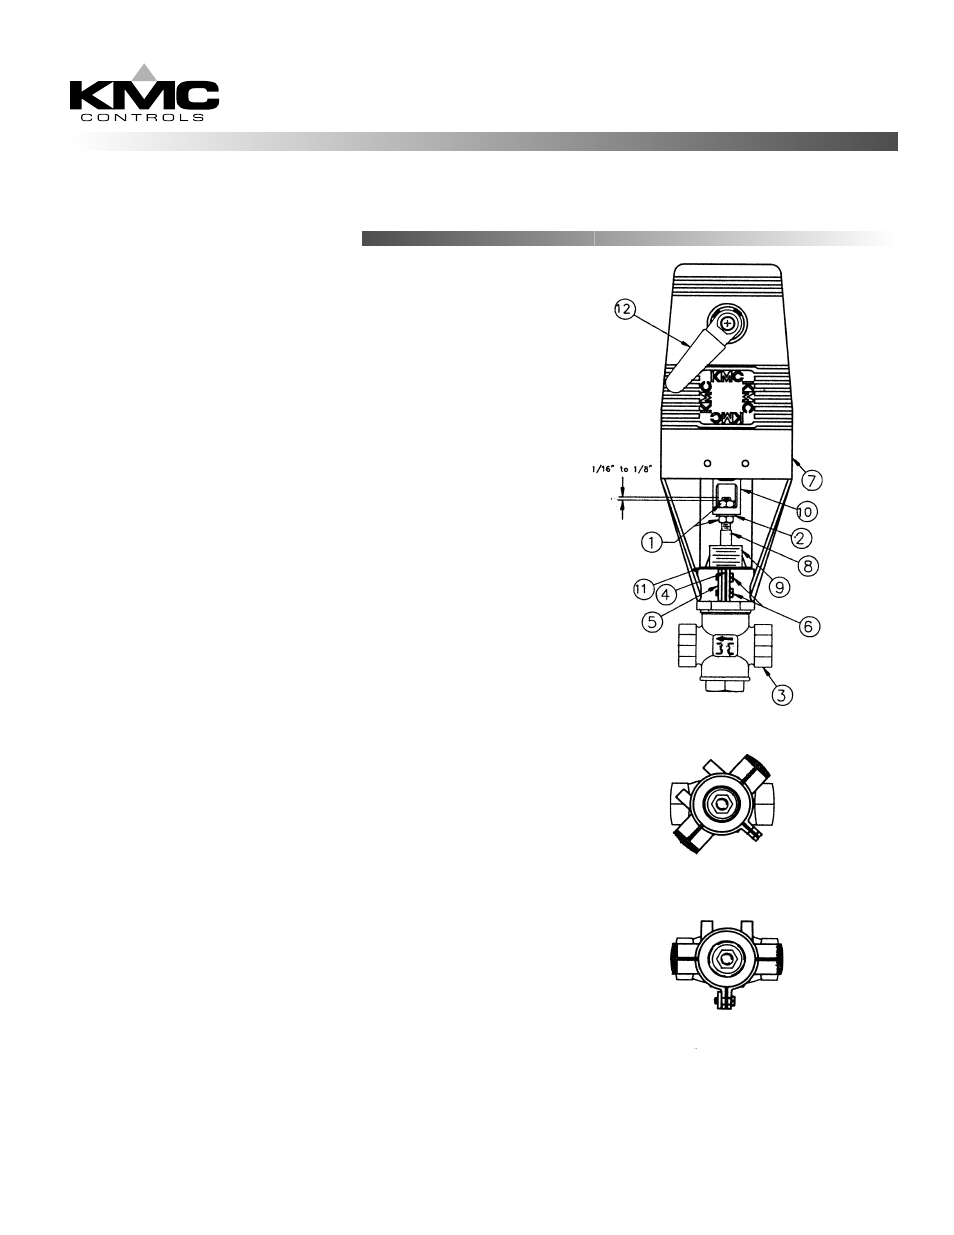
Mounting Linkage to Valve
1. Thread nut (1) onto valve stem (8) approximately 1".
2. Place flat washer (2) on top of nut (1).
3. Screw linkage (7) onto valve bonnet (9) until base of
linkage contacts the base of valve bonnet.
4. Rotate linkage to the position shown in FIG. 2.
NOTE: To properly position the linkage on the valve and
prevent the flange on the bonnet adaptor (11) from pulling
into the base of linkage, use a flat screwdriver to spread
the tabs apart slightly.
5. Gently tap the base of linkage housing, around the bonnet
adaptor (11), with a rubber mallet to properly seat the
housing against the adaptor.
6. Assemble washer plate (4) and threaded plate (5)
onto the housing tabs with 2 screws (6). Tighten the tab
screws (6) evenly until snug against the tabs.
7. Rotate the linkage to align it with the valve ports as shown
in FIG. 3.
8. Evenly torque the tab screws (6) to 25-30 in-lbs.
9. Face the lever (12) and rotate it counterclockwise until the
connecting rod (10) contacts the lower valve stem nut (1).
10. Thread the upper valve stem nut (1) onto the valve stem (8)
until 1/16" to 1/8" of valve stem is visible above the nut (1).
11. Rotate the lever (12) clockwise to lift the connecting rod
(10) up and around the upper valve stem nut flats (1).
12. Hold the connecting rod (10) with a wrench to keep it from
twisting and tighten the lower valve stem nut (1) against
the connecting rod.
13. Rotate the lever (12) until valve stem is in the full up
position.
14. Loosen the set screws on the lever (12). Reposition the
lever so that the end of the handle is just inside the left
side of the linkage housing. Tighten the 2 set screws on
lever.
Proceed to actuator mounting instructions.
FIG. 1
FIG. 2
FIG. 3