Adjustments and calibration, Rotation setup and override, Caution – KMC Controls CEP-4000 Series User Manual
Page 3
CEP-4000 Series
3
Installation Guide
Rotation Setup and Override
If desired, the rotation direction can be reversed by
swapping the red and blue motor wires according to
the following table:
Adjustments and Calibration
Each CEP-4000 is calibrated to its SSE series sensor at
the factory. No further calibration is needed. If the
units are replaced or become mismatched, complete
the following steps to recalibrate the controller and
sensor.
1.
Follow steps 1 and 3 under the Wiring section.
Connection of the thermostat is not necessary.
2. Connect the voltmeter “+” to CEP terminal 2 and
“–” to CEP terminal 4.
3. Ensure zero airflow in the duct or remove the
sensor from the duct and place it in a horizontal
position with
zero airflow.
4. Wait 5 minutes for the CEP and SSE units to
stabilize.
5. Access the trimpot through the slot in the CEP-
4000’s side. The slot is normally covered by a
label and is on the sensor/thermostat connection
side (see illustration below).
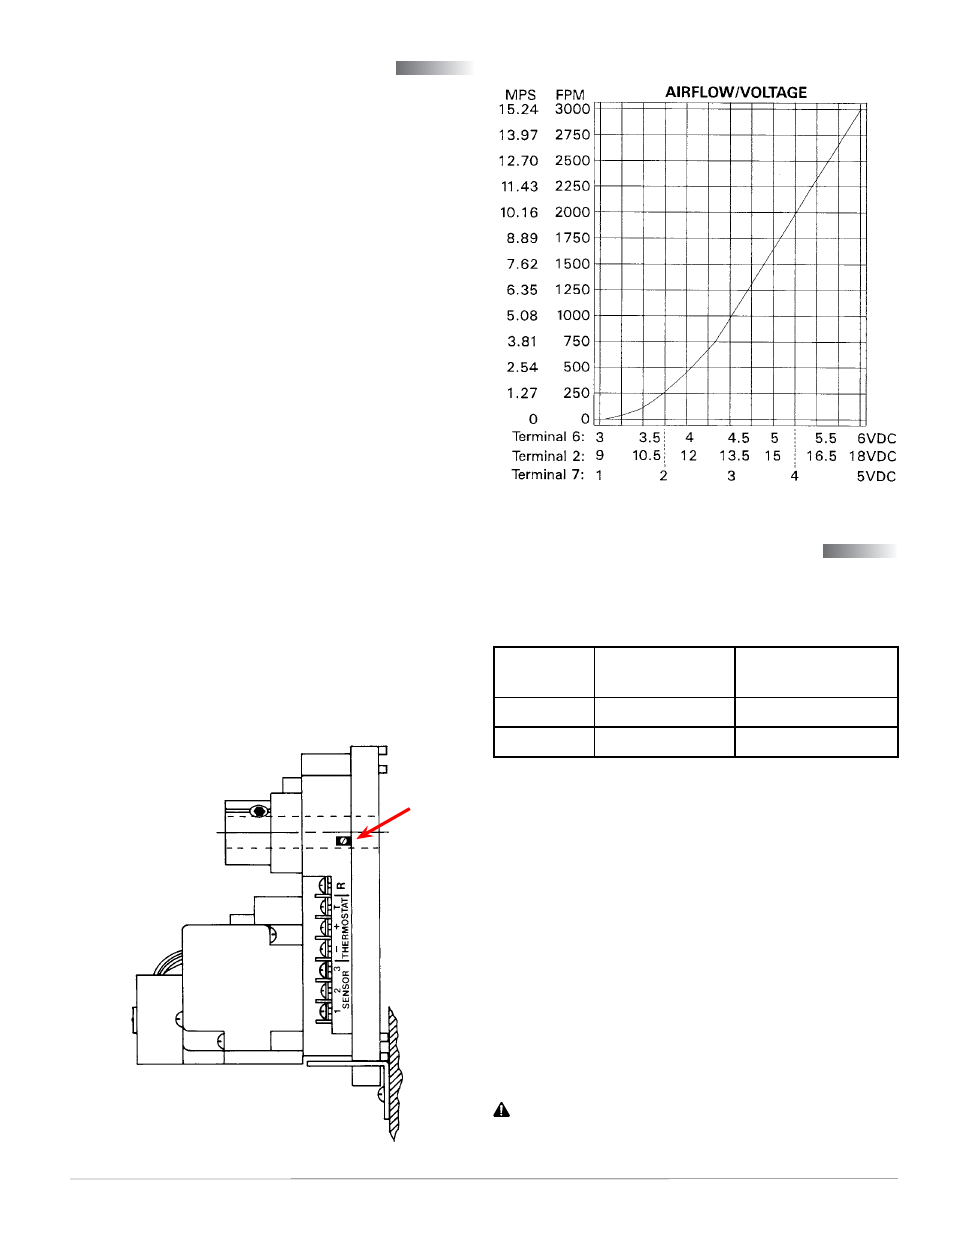
6. Adjust the trimpot until the voltmeter reads 9
volts. When the adjustment is made, the voltage
will immediately overshoot and then stabilize.
This reestablishes the baseline. (See the CEP-4000
Airflow vs. Voltage chart.)
7. Wait an additional 5 minutes for the CEP and SSE
units to stabilize.
8. Readjust if necessary.
Rotation
to Close
Motor Wire to
Terminal 12
Motor Wire to
Terminal 14
CCW
Red
Blue
CW
Blue
Red
CAUTION
Do not short terminals 12 and 14, 4 and 5, or 2
and 4.
CEP-4000 Trim Potentiometer
NOTE: Motor wires must remain connected to
terminal screws (11, 12, and 14) due to
components beneath terminals.
CEP-4000 Airflow vs. Voltage
To manually drive the controller/damper open or
closed (with 24 VAC on terminals 9 and 10), remove
the wiring to terminal 6, and temporarily jumper
terminal 6 to:
• Terminal 5 (9.1 VDC) = Open
• Terminal 4 (– VDC) = Closed
NOTE: Full rotation may take five to six minutes
because the actuator rotates at 18° per
minute. A magnetic slip-clutch inside the
actuator allows motor to continue running
even when end-stops have been reached.