Cep-4703v valve mounting, Cep-4703v valve, Caution – KMC Controls CEP-4703V User Manual
Page 2
CEP-4703/4703V
2
Installation Guide
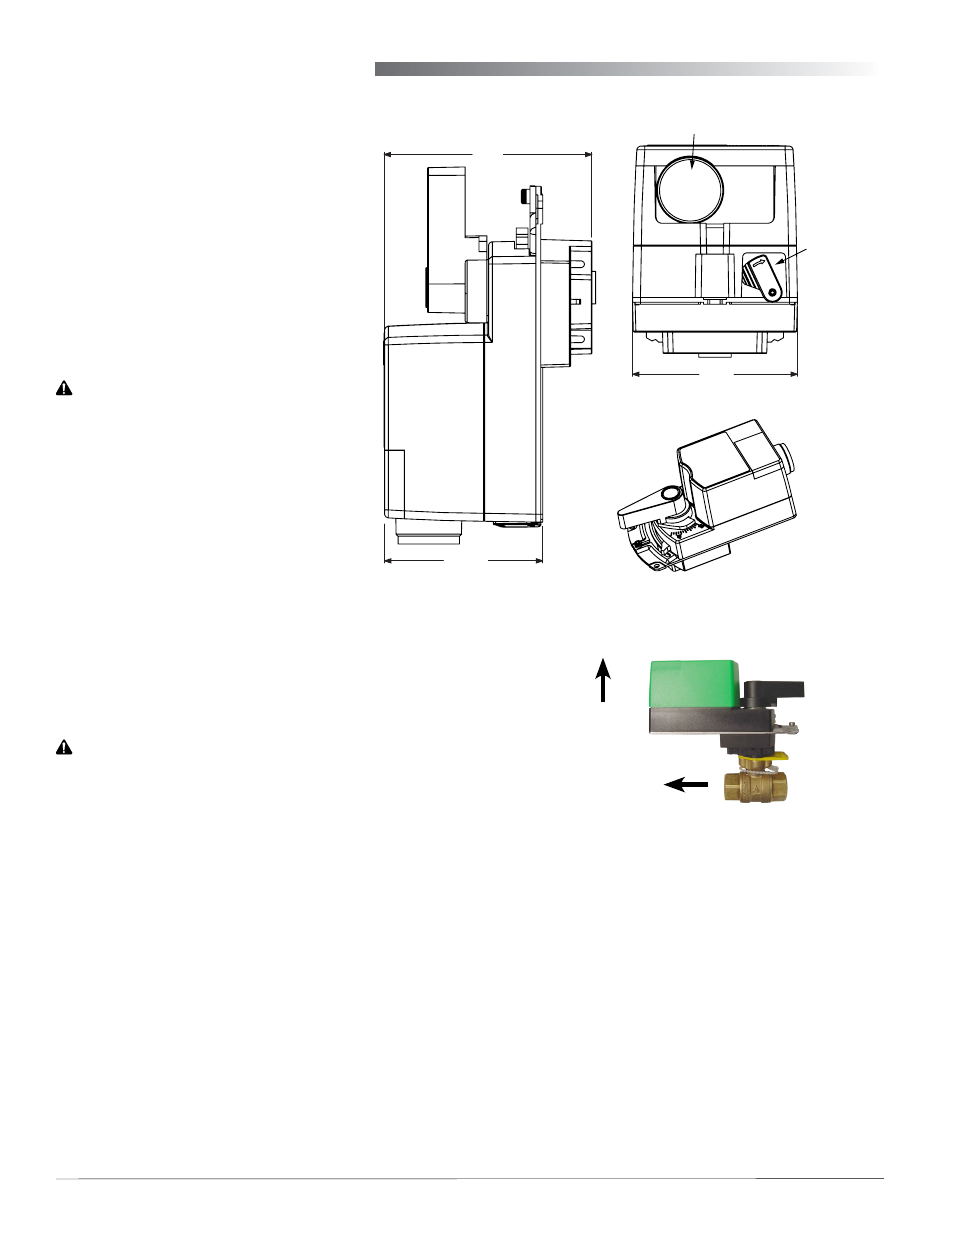
CEP-4703V Valve Mounting
3.437
[87.3]
1.568 [40]
2.6
[66]
[63.5]
2.5
2.5
[63.3]
3.28
[83.2]
2.6
[66]
CEP-4703
CEP-4703V
Removable conduit fitting
with 1/2" NPS threaded hole
Gear
disengagement
lever
Override input (remembers
position and closes valve on
no call
for heat or cool)
Cold water LAT sensor or
hot water setpoint resistor
Cold water setpoint
resistor or hot water
LAT sensor
Sensitivity
adjustment
Terminals
(under cover)
NOTE: To assemble a quick-mount
“V” actuator on a valve
body, see the
on the
KMC web site.
1. Clean the lines upstream from the
valve. Remove any debris larger
than 0.06" (0.015 mm).
2. Align the valve’s flow indicator
with the system flow.
3. Mount the valve so the actuator is
positioned over the valve body.
CAUTION
To prevent condensation from dripping
onto the actuator housing, mount the
valve with the actuator in the upright
position or, at most, at a 45° angle.
4. Seal valves with approved pipe
sealant.
5. Using two wrenches, secure the
valve to the pipe. Torque should
not exceed 75 ft-lb. (102 N
•
m).
6. Eliminate air from the system to
keep the valves full of fluid during operation.
NOTE: If the system experiences large amounts of
debris, steps should be taken to keep the
system clean.
UP
SYSTEM FLOW
ACTION:
Full CW = Valve Closed (System Off)
Full CCW = Valve Open (System On)
CAUTION
Using mineral oil lubricants or other incompatible
substances in system fluids may damage EPDM
rubber seals in valves. Before using any lubricant or
additive in a water or ethylene glycol base, consult
the substance manufacturer for compatibility with
EPDM (Ethylene Propylene Diene Monomer).
VFB-43 Series Valve Body
CEP-4703V Actuator