Kohler Command Pro CV980 User Manual
Page 95
Section 9
Inspection and Reconditioning
9
9.3
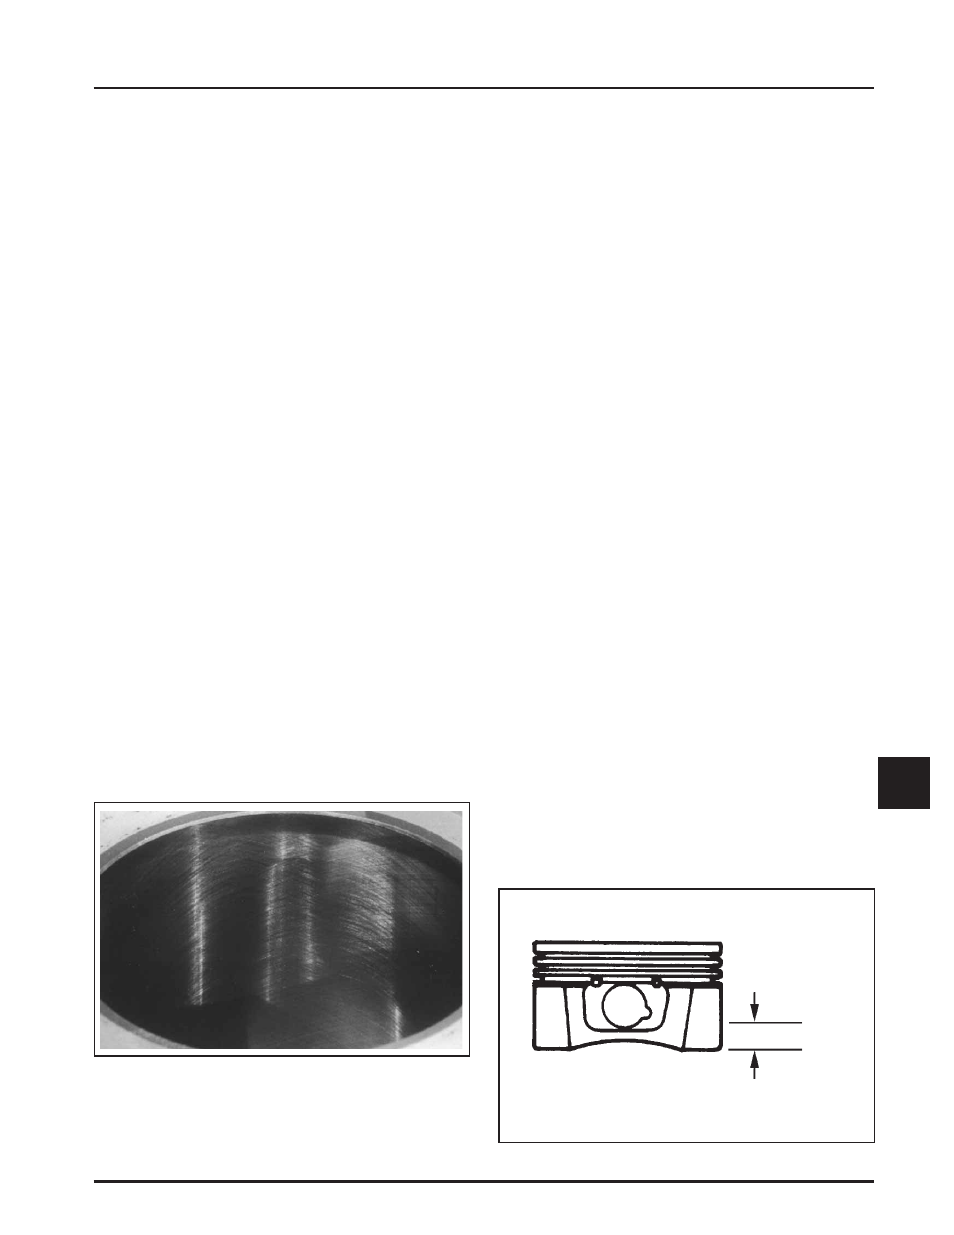
11 mm (0.433 in.)
Measure 11 mm above the
Bottom of Piston Skirt at
Right Angles to Piston Pin
accomplished at a drill speed of about 250 RPM and
ŜŖȱȱȱǯȱĞȱȱȱȱȱ
hone, proceed as follows:
ȱ ŗǯȱ ȱȱȱȱȱĞȱǰȱȱ
so the stones are in contact with the cylinder
ǯȱȱȱȱȱĴȬȱȱȱ
recommended.
2. With the lower edge of each stone positioned
even with the lowest edge of the bore, start drill
and honing process. Move the hone up and down
ȱ£ȱȱȱȱȱȱĴȱ
ridges. Check the size frequently.
DZȱ ȱȱȱȬȱȱ
exacting tolerances. When oversizing a
cylinder, it should be machined exactly
0.25 mm (0.010 in.) or 0.50 mm (0.020 in.)
over the new diameter (Section 1). The
ȱ£ȱ
ȱȱ
ȱ ȱȱęȱ¢ǯ
3. When the bore is within 0.064 mm (0.0025 in.) of
the desired size, remove the coarse stones and
replace them with burnishing stones. Continue
with the burnishing stones until the bore is
within 0.013 mm (0.0005 in.) of the desired size
ȱȱȱęȱȱǻŘŘŖȬŘŞŖȱǼȱȱ
ȱȱȱȱȱęȱ£ǯȱȱȱ
should be observed if honing is done correctly.
The crosshatch should intersect at approximately
ŘřǚȬřřǚȱěȱȱ£ǯȱȱĚȱȱȱȱ
cause the rings to skip and wear excessively,
and too steep an angle will result in high oil
consumption. See Figure 9-3.
Figure 9-3. Cylinder Bore Crosshatch after Honing.
ȱ Śǯȱ Ğȱ£ǰȱȱȱȱȱǰȱ
taper, and size. Use an inside micrometer,
telescoping gauge, or bore gauge to take
measurements. The measurements should be
taken at three locations in the cylinder – at the
ǰȱǰȱȱĴǯȱ ȱȱ
should be taken (perpendicular to each other) at
each of the three locations.
Clean Cylinder Bore After Honing
Proper cleaning of the cylinder walls following boring
and/or honing is very critical to a successful overhaul.
ȱȱĞȱȱȱ¢ȱȱȱ¢ȱ
ȱȱȱȱȱȱȱȱȱĞȱȱ
rebuild.
ȱęȱȱȱȱ ¢ȱȱȱ
thorough scrubbing with a brush and hot, soapy
water. Use a strong detergent that is capable of
breaking down the machining oil while maintaining
a good level of suds. If the suds break down during
cleaning, discard the dirty water and start again
with more hot water and detergent. Following the
scrubbing, rinse the cylinder with very hot, clear
water, dry it completely, and apply a light coating of
engine oil to prevent rusting.
Measuring Piston-to-Bore Clearance
Before installing the piston into the cylinder bore, it
is necessary that the clearance be accurately checked.
ȱȱȱĞȱǰȱȱȱȱȱȱ
ȱ ȱęǰȱȱȱ ȱ¢ȱ
result.
NOTE: Do not use a feeler gauge to measure piston-
to-bore clearance – it will yield inaccurate
measurements. Always use a micrometer.
Use the following procedure to accurately measure
the piston-to-bore clearance:
1. Use a micrometer and measure the diameter of
the piston 11 mm (0.433 in.)ȱȱȱĴȱȱ
the piston skirt and perpendicular to the piston
pin. See Figure 9-4.
Figure 9-4. Measuring Piston Diameter.