Preventing the drum trigger chosen for, Editing from being switched (trig lock), P. 15 – Roland TM-6 Pro Drum Trigger Module User Manual
Page 15: Igger lock (p. 15), Igger lock settings (p. 15), Choosing a drum trigger to edit, Example drum trigger connections and settings, Trigger settings (trig), Choosing by hitting a drum trigger, Using the trigger buttons to choose a drum trigger
15
Trigger Settings (TRIG)
4
Select the drum trigger that you want to
edit.
You can also use the cursor buttons to select this.
5
Press the [–] [+] buttons to specify the
trigger type.
6
Press the [EXIT] button several times to
return to the KIT screen.
Choosing a drum trigger to edit
Choosing by hitting a drum trigger
To edit the settings for a drum trigger, strike that drum
trigger to select it.
To select the rim of a drum trigger, strike the rim.
Using the trigger buttons to choose a drum
trigger
You can also use the trigger buttons to select the
drum trigger (trigger input number) for editing.
If you press the [RIM] button to make it light, the rim
side of the drum trigger is selected.
If the rim side is selected, the [RIM] button is lit.
Preventing the Drum Trigger Chosen for
Editing from Being Switched (Trig Lock)
You can prevent the drum trigger chosen for editing from
being switched even if you strike a different drum trigger.
This “trigger lock” function is convenient when you want
to edit the settings in the context of a phrase that you’re
playing.
1
In the TRIGGER SETUP screen (p. 14), select
“LOCK” and press the [ENTER] button.
2
Use the [–] [+] buttons to specify “LOCK.”
When trigger lock is enabled, the currently selected
trigger input number blinks. You can also change the
drum trigger chosen for editing by pressing a trigger
button.
3
Press the [EXIT] button several times to
return to the KIT screen.
MEMO
You can also turn on trigger lock by holding down the
[ENTER] button and pressing the [TRIG] button.
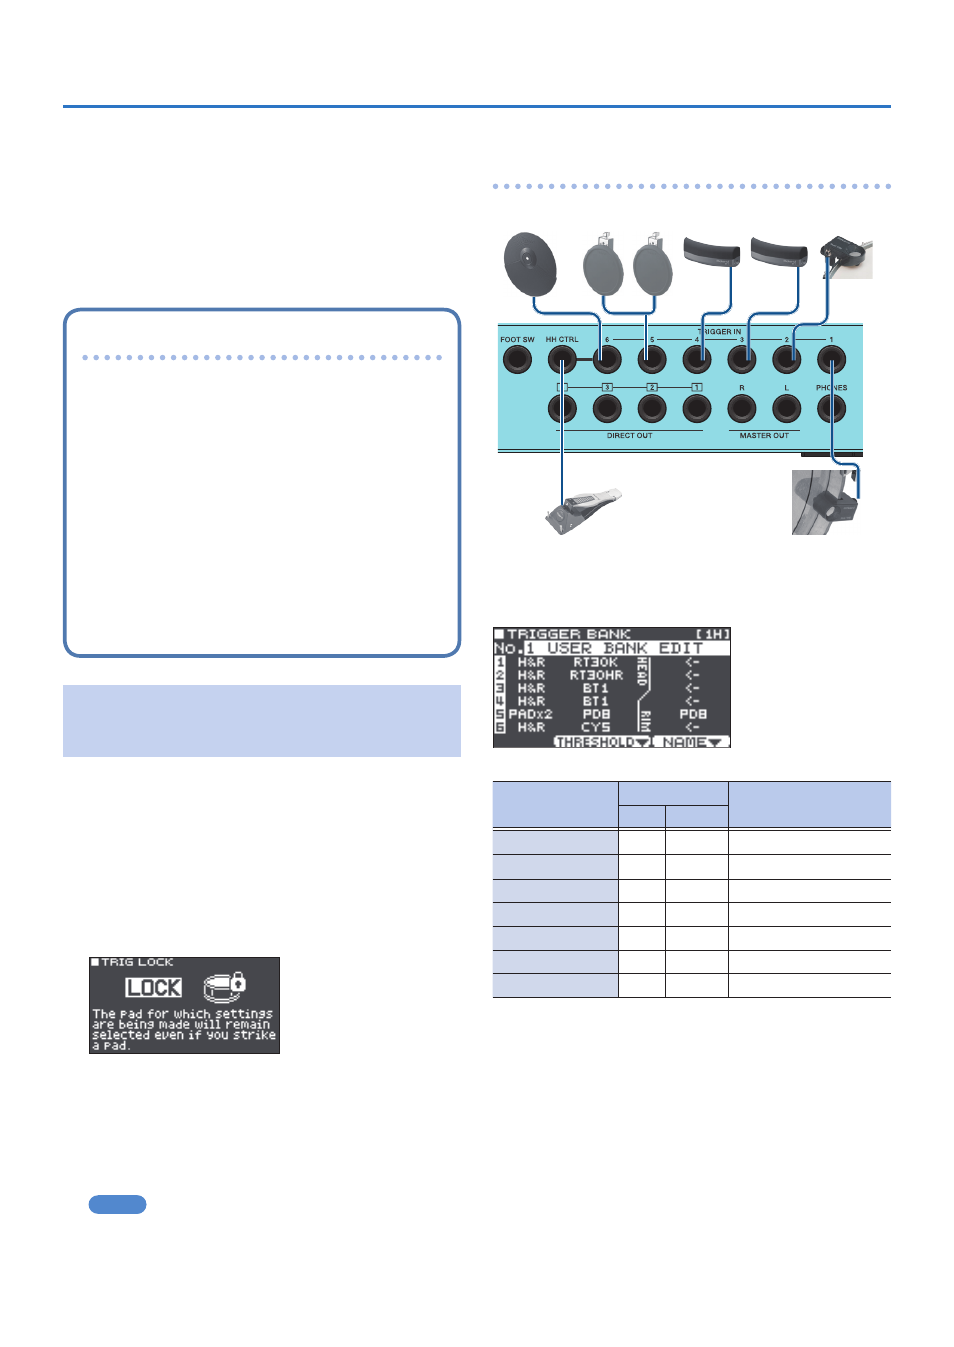
Example drum trigger connections and
settings
RT-30HR
RT-30K
FD-8
CY-5
BT-1
PD-8
TRIGGER BANK screen (p. 14)
Jack
Input
Trigger type
#
Type
TRIGGER IN 1
1
H&R
RT30K
TRIGGER IN 2
2
H&R
RT30HR
TRIGGER IN 3
3
H&R
BT1
TRIGGER IN 4
4
H&R
BT1
TRIGGER IN 5 (*1)
5
PADx2
PD8 (Head), PD8 (Rim)
TRIGGER IN 6
6
H&R
CY5
HH CTRL (*2)
–
–
–
*1: In the above example of drum trigger connections and
settings, the TRIGGER IN 5 jack’s input type is set to
“PADx2,” and two drum triggers are connected to one
TRIGGER IN jack. In this case, connect the appropriate
connection cable (stereo phone plug
#
phone plugs x2:
sold separately) to the TRIGGER IN 5 jack.
*2: This supports only instruments of the hi-hat category.