P. 2-31, Stamp page/date, Stamping the page number – Pitney Bowes RISO ComColor Printer User Manual
Page 109
2-31
Copying Functions
2
ComColor Series User’s Guide 03
Stamp Page/Date
Stamp the page number and date on the header or footer.
● The page number and date cannot be stamped
together in the same position.
● The page number and date cannot be stamped
on slip sheet paper or cover paper. (p. 2-40
"Add cover", p. 2-41 "Collate/slip sheet")
● When using this with "Multi-up", the page number
and date are stamped on each page of the copy
paper, not on the original page. However, when
using "Booklet", the page number and date are
stamped on each page after the booklet is created.
● Specifying the reproduction ratio does not affect
the stamped size of the page number and date.
●
Stamping the Page Number
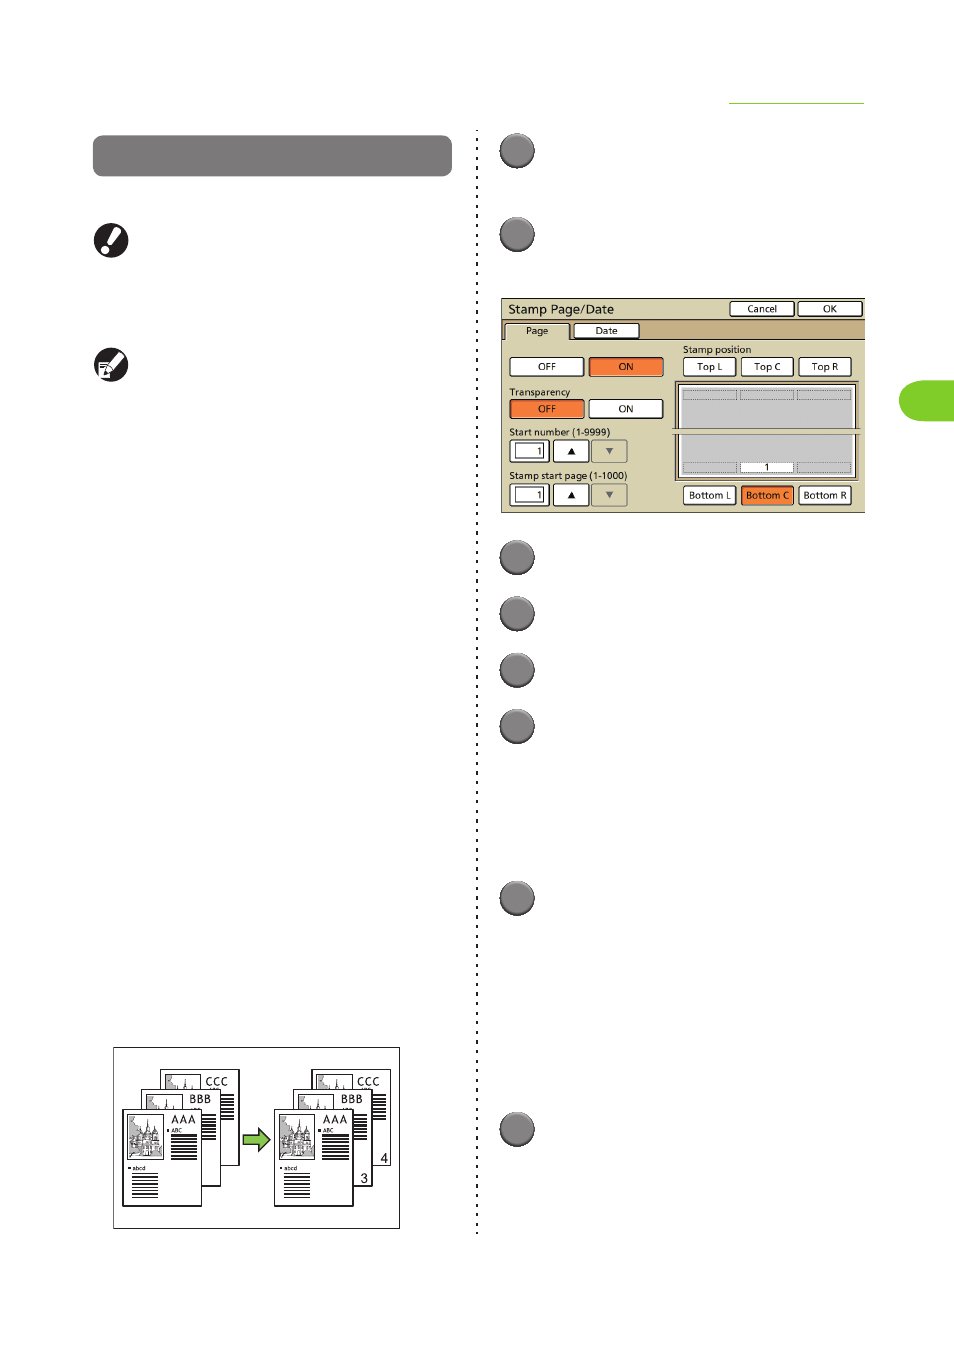
Stamp the page number on the header or footer.
■ Stamp position
[Top L], [Top C], [Top R], [Bottom L], [Bottom C],
[Bottom R]
■ Transparency
[OFF]
Remove images in the stamp area to create a white
space, and stamp the page number in that white space.
[ON]
Stamp page number on top when the stamp area and
images overlap.
■ Start number
Specify the initial number to stamp (1 to 9999).
■ Stamp start page
Specify the initial page to stamp (1 to 1000).
Example: When the stamp start page has been set to
[2] and the stamp start number has been set to [3]
1
Press [Functions] on the copy
mode screen.
2
Press [Stamp Page/Date].
The [Page] screen is displayed.
3
Press [ON].
4
Select the stamp position.
5
Select the transparency.
6
Specify the start number.
Use [S] and [T] to enter a number between 1
and 9999. You cannot enter "0".
• You can also enter the number using the
numeric keys.
• To clear the fields, press the [Clear] key.
7
Specify the stamp start page.
Use [S] and [T] to enter a number between 1
and 1000. You cannot enter "0".
• You can also enter the number using the
numeric keys.
• To clear the fields, press the [Clear] key.
To not stamp on the cover, set "Stamp start page"
to "2" (For duplex printing, set this to "3"
depending on the case).
8
Press [OK].
The settings are confirmed and the previous
screen is displayed.