J--------- j p – Carrier 38AH044-134 User Manual
Page 40
Attention! The text in this document has been recognized automatically. To view the original document, you can use the "Original mode".
Check Compressor Oil Level — After adjusting the
refrigerant charge, allow each circuit to run fully loaded for
20 minutes. Running oil level should be */s to
'/3
up on the
sight glass. Stop the compressors at the field power supply
disconnect and check the crankcase oil level. Add oil only if
necessary to bring the oil into view in the sight glass. If oil
is added, run the circuit for an additional 10 minutes, then
stop and check oil level. If the level remains low, check the
piping system for proper design for oil return; also, check
the system for leaks.
If the initial check shows too much oil (too high in the
sight glass) remove oil to proper level. See Preliminary Oil
Charge for proper procedure for adding and removing oil.
When the above checks are complete, repeat the proce
dure with the unit operating at minimum load conditions.
UNITS 38AH044-084,124, AND 134 — For this minimum
load check, run the lead compressor of each refrigeration cir
cuit fully unloaded with the lag compressor not operating.
Unload the compressor(s) by turning the control set point
adjustment nut counterclockwise until the adjustment nut
stops. The unloader is now at 0 psig (0 kPag) set point. If
electrically actuated unloaders are installed, energize the so
lenoid to unload the compressor. Recheck the compressor
oil level as described in Check Compressor Oil Level above.
Return unloader to original setting after checks are
complete.
UNITS 38AH094,104 — For this minimum load check, the
lead compressor (Al, Bl) of each refrigeration circuit is un
loaded. See Table 15. The lag compressor (A2, B2 [38AH104
only]) of each refrigeration circuit must not be operating.
Unload the compressor(s) by turning the control set point
adjustment nut counterclockwise until the adjustment nut stops.
The unloader is now at 0 psig (0 kPag) set point. If electri
cally actuated unloaders are installed, energize the solenoid
to unload the compressor.
Return unloader to original setting after checks are
complete.
Final Checks — Ensure all safety controls are operat
ing, control panel covers are on, and the service panels are
in place.
ALL OUTDOOR FANS MUST BE OPERATING
CIRCUIT A
CIRCUIT В
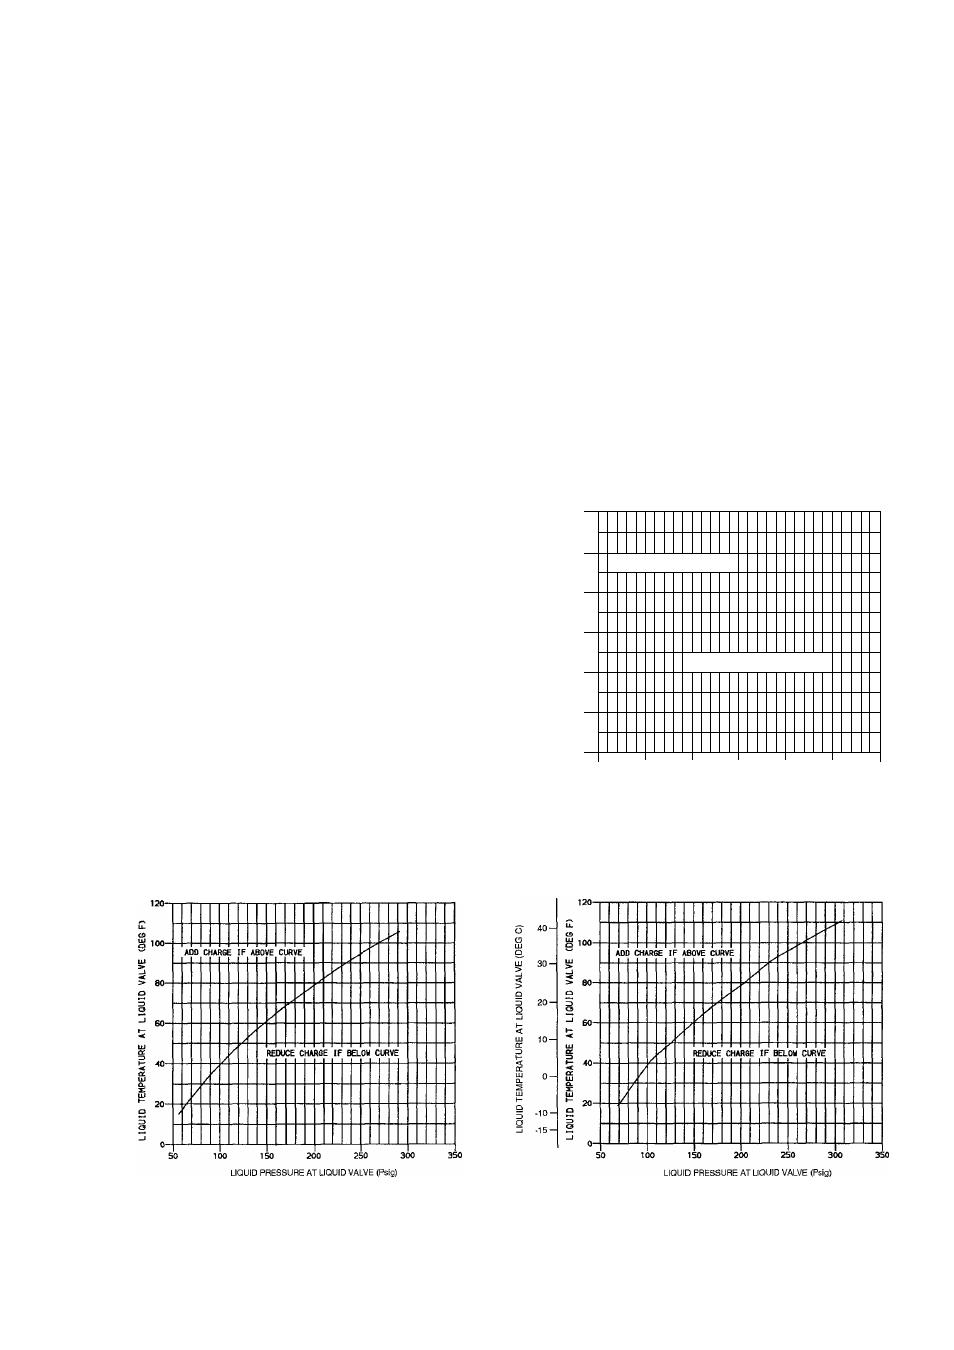
ADD CHARGE IF ABOVE CURVE
L
/
/-
/
REDUCE CHARGE tF вО-ОМ CURVE
100
150
200
250
300
LIQUID PRESSURE AT LIQUID VALVE (Psig)
1000
1500
2000
LIQU ID PRESSURE AT LIQUID VALVE (kPag)
5 -10-
О
□
-15-
I 01 1H
\k E II •
S V
;u
IV
/
¿
tE Ki Ж
c
и
1 IF
1 ■L
(
VE
/
T
100
150
200
250
300
LIQUID PRESSURE AT LIQUID VALVE (Psig)
~1
I
I
I
500
1000
1500
2000
LIQUID PRESSURE AT LIQUID VALVE (kPag)
Fig, 30 — Charging Chart — Unit 38AH044; 50/60 Hz — Duai Circuit
ALL OUTDOOR FANS MUST BE OPERATING
CIRCUIT A
CIRCUIT В
-
10
-
-
15
*
—j--------- j------------1
p
500
1000
1500
2000
LIQUID PRESSURE AT LIQUID VALVE (kPag)
_T_
500
1000
1500
2000
LIQUID PRESSURE AT LIQUID VALVE (kPag)
Fig. 31 — Charging Chart — Unit 38AH054; 50/60 Hz — Dual Circuit
40