2 drive components, Figure 2a - removing filters from outside air hood, Permanent filters in the outside air hood – Reznor MAPS - A,B,C Users Manual User Manual
Page 7: Filters in an optional energy recovery module
Form O-MAPSIII&IV Cabinets A/B/C, P/N 257004R8, Page 7
Filter
Clamp
Filter
Filter
Wing Screw,
P/N 205707,
and Retainer,
P/N 205709
(2 each)
Filter
Filter
FIGURE 2A -
Removing Filters
from Outside
Air Hood
1" Permanent
Aluminum Filters
for Outside Air
Hood are listed by
Cabinet Size A, B, or C
(see cross-reference, page 6)
*A - (4) 16 x 20, P/N 101607
*B - (4) 16 x 25, P/N 101609
C - (3) 16 x 25, P/N 101609;
(6) 16 x 20,
P/N 101607
Cabinet Sizes A and B with Option AS16
Outside Air Hood
(Does not apply if
system includes
Option PE
power exhaust;
see below.)
Filter Clamps attach
with Wing Screws
P/N 205707
Filter
16x20x1
Filter
16x20x1
Filter
16x20x1
Filter
16x25x1
Filter
16x25x1
Filter
16x25x1
Filter
16x20x1
Filter
16x20x1
Filter
16x20x1
Inlet View
All Cabinet Size C with
either Outside Air Hood
Option AS16 or AS19
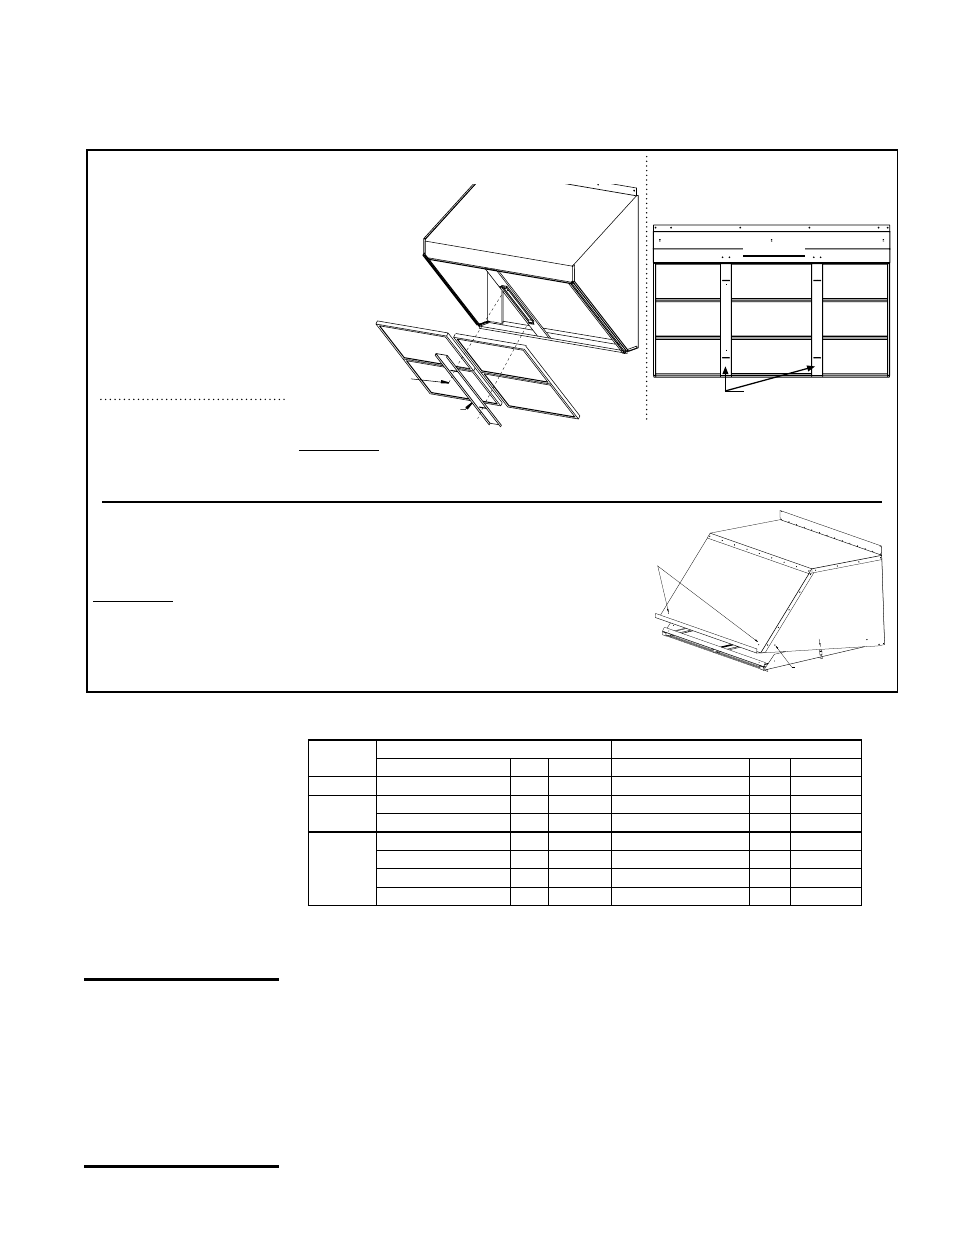
Instructions: Remove filters by loosening the wing screws and sliding the filter
clamp(s). Clean with soap and water, allow to dry, and replace. If it is more convenient
to keep an extra clean set of filters, quantities, filter sizes, and part numbers are listed.
* Apply only to Cabinet
Size A and B with outside
air hood Option AS16
.
DO NOT remove
this screw on
either side.
REMOVE one
screw on each side.
REMOVE
two
screws
on front.
FIGURE 2B - Removing Filters from Option AS19 Outside Air
Hood Installed on a Cabinet Size A or B with power exhaust
Option PE1 or PE2
Instructions: 1) Remove the four screws as illustrated. Lower the tray.; 2) Pull out
filters. Clean with soap and water. Allow to dry.; 3) Slide clean dry filters into tray.;
4) Re-position tray and replace screws.
1" Aluminum Filters:
**A - (4) 18 x 20, P/N 194903; **B - (4) 20 x 25, P/N 101610
** Apply only to Cabinet Size A and B with outside air hood Option AS19.
Permanent Filters in
the Outside Air Hood
If equipped with an outside air hood, there are 1" permanent, aluminum filters at the
entrance of the hood. The filters act as a moisture eliminator and bird screen. See
FIG-
URE 2A or 2B. When inspecting the inlet air filters, inspect the outside air hood filters.
If cleaning is needed, remove the filters, clean, rinse, dry and re-install.
Filters in an Optional
Energy Recovery
Module
If equipped with an energy recovery module (Option ER1A, ER1B, or ER1C), check
both inlet and exhaust filters. Replace as needed.
Cabinet
Size *
Inlet Air Filters (Merv 8)
Exhaust Air Filters (Merv 8)
Filter Type & Size
Qty
P/N
Filter Type & Size
Qty
P/N
A
Pleated 20x25x2
2
104113
Pleated 20x25x2
2
104113
B
Pleated 16x25x2
2
104112
Pleated 16x25x2
2
104112
Pleated 12x25x2
2
114320
Pleated 12x25x2
2
114320
C
Pleated 16x25x2
2
104112
Pleated 16x25x2
2
104112
Pleated 20x25x2
2
104113
Pleated 20x25x2
2
104113
Pleated 16x16x2
1
104109
Pleated 16x16x2
1
104109
Pleated 16x20x2
1
104110
Pleated 16x20x2
1
104110
*See cross-reference of
MAPS
®
Models by Cabinet
Size A, B, or C on page 6.
3.2 Drive
Components
CAUTION: If the
blower is unused
for more than three
months, bearings
with a grease fitting
should be purged
with new grease
prior to startup.
Setscrews - Check all of the setscrews (bearing/blower hubs and pulleys). Torque pul-
ley setscrews a minimum of 110 in-lb to 130 in-lb maximum.
A bearing hub setscrew for a 1-3/8" to 1-3/4" shaft requires a 5/16" socket and a tight-
ening torque of 165 in-lbs.
Belts - Check belt for proper tension and wear. If needed, follow instructions to adjust
belt tension. Replace worn belts.
Bearings - Bearings with a grease fitting should be lubricated twice a year with a high
temperature, moisture-resistant grease. (Type NLGI-1 or -2 standard grease is recom-
mended.) Be sure to clean the grease fitting before adding grease. Add grease with a
handgun until a slight bead of grease forms at the seal. Be careful not to unseat the
seal by over lubricating.
NOTE: If unusual environmental conditions exist (tempera-
tures below 32°F or above 200°F; moisture; or contaminants), more frequent lubrica-
tion is required.
NOTE: If it is more convenient to keep an extra clean set of filters, filter sizes and part numbers are shown in the illustration.