Poly bed 4 x 2 brake system – Cub Cadet 4 x 2 Big Country - Poly Bed & Steel Bed User Manual
Page 45
Poly Bed 4 X 2 Brake System
41
•
Lift and safely support the back of the Big Coun-
try vehicle.
•
Remove the rear lug nuts using a 19 mm socket,
and lift off the rear wheels.
•
Release the parking brake, if applied.
2.4.
Verify the correct orientation of the brake arm on
the brake actuator cam: The clevis pin on the
brake lever should be visible just beyond the
brake drum when viewed from the side, with the
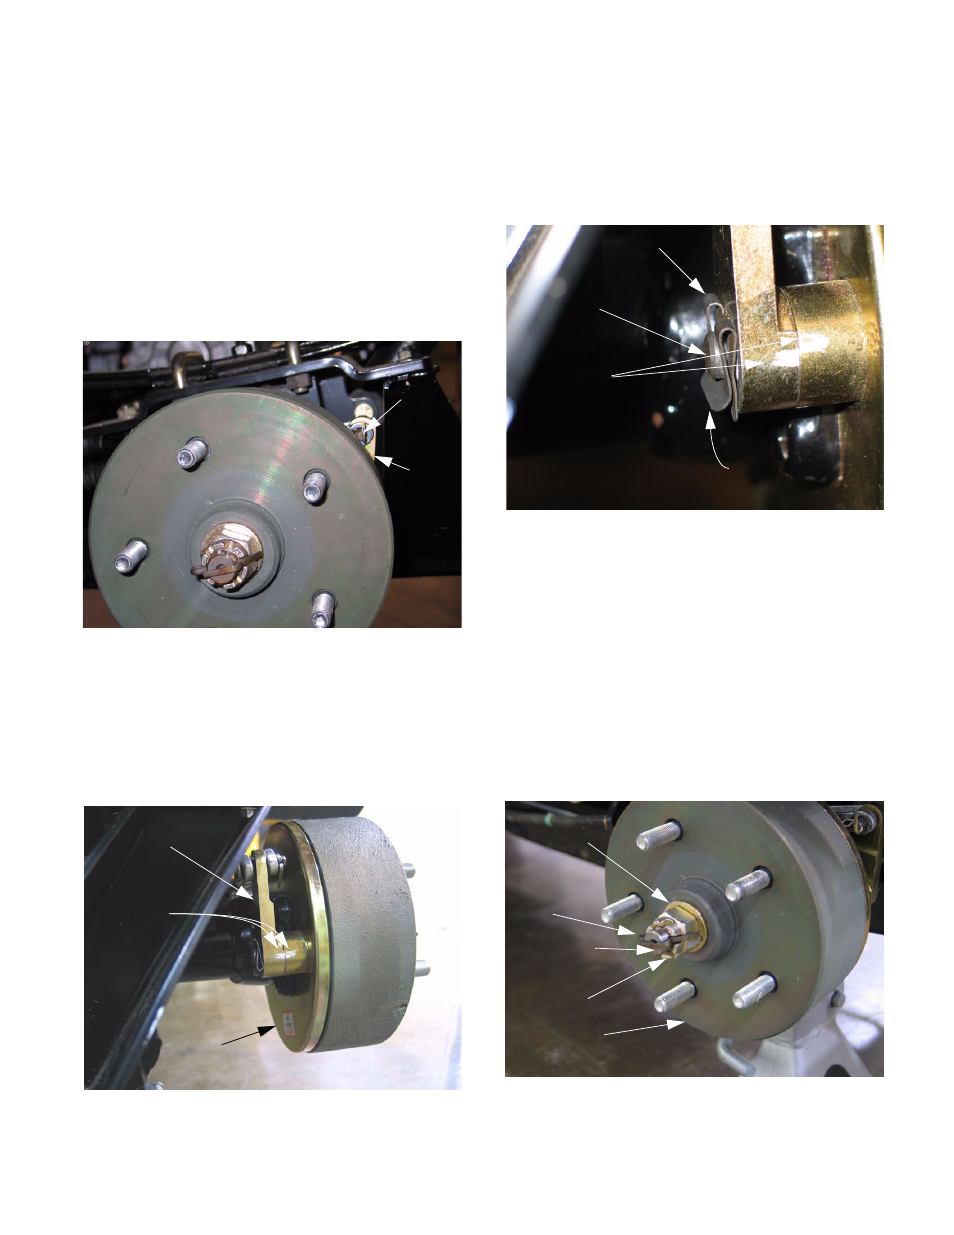
brakes released. See Figure 2.4.
2.5.
If the brake arms are not in this position, they
must be re-oriented: make an index mark with a
paint stick or marking pen across the brake lever
and the boss that it rests against brake backing
plate. This will establish the original posi-
tion. See Figure 2.5.
Figure 2.4
Brake arm
Clevis pin
Figure 2.5
Brake arm
(right side)
Brake
backing plate
Index mark
2.6.
Lift up on the curved lip of the locking clip to
release it from the groove in the brake acutator
cam.
2.7.
Slide the brake arm off of the splined end of the
brake actuator cam. See Figure 2.7.
2.8.
Rotate brake arm as needed, slide it back onto
the brake actuator cam, and reinstall the clip.
NOTE: It may be necessary to loosen the top
jam nut on the front end of the brake cable hous-
ing. This will provide additional slack to allow
brake actuator arm movement.
2.9.
To remove the brake drums:
2.10. Remove the cotter pins that secure the hub nuts.
2.11. Using a 27 mm wrench, remove the hub nuts
and washers. See Figure 2.11.
Figure 2.7
Locking clip
Curved lip
Brake acutator
cam
Index marks
(off-set after the
brake arm
is reoriented)
Figure 2.11
Brake drum
Washer
Hub nut
Axle shaft
Cotter pin