2 calibration gas, 3 compensation, Calibration gas -2 – Yokogawa Integral Oxygen Analyzer ZR202 User Manual
Page 103: Compensation -2

<9. Calibration>
9-2
IIM 11M12A01-04E
0.1
0.5
1
5
10
21.0
50
100
120
100
80
60
40
20
0
-20
-40
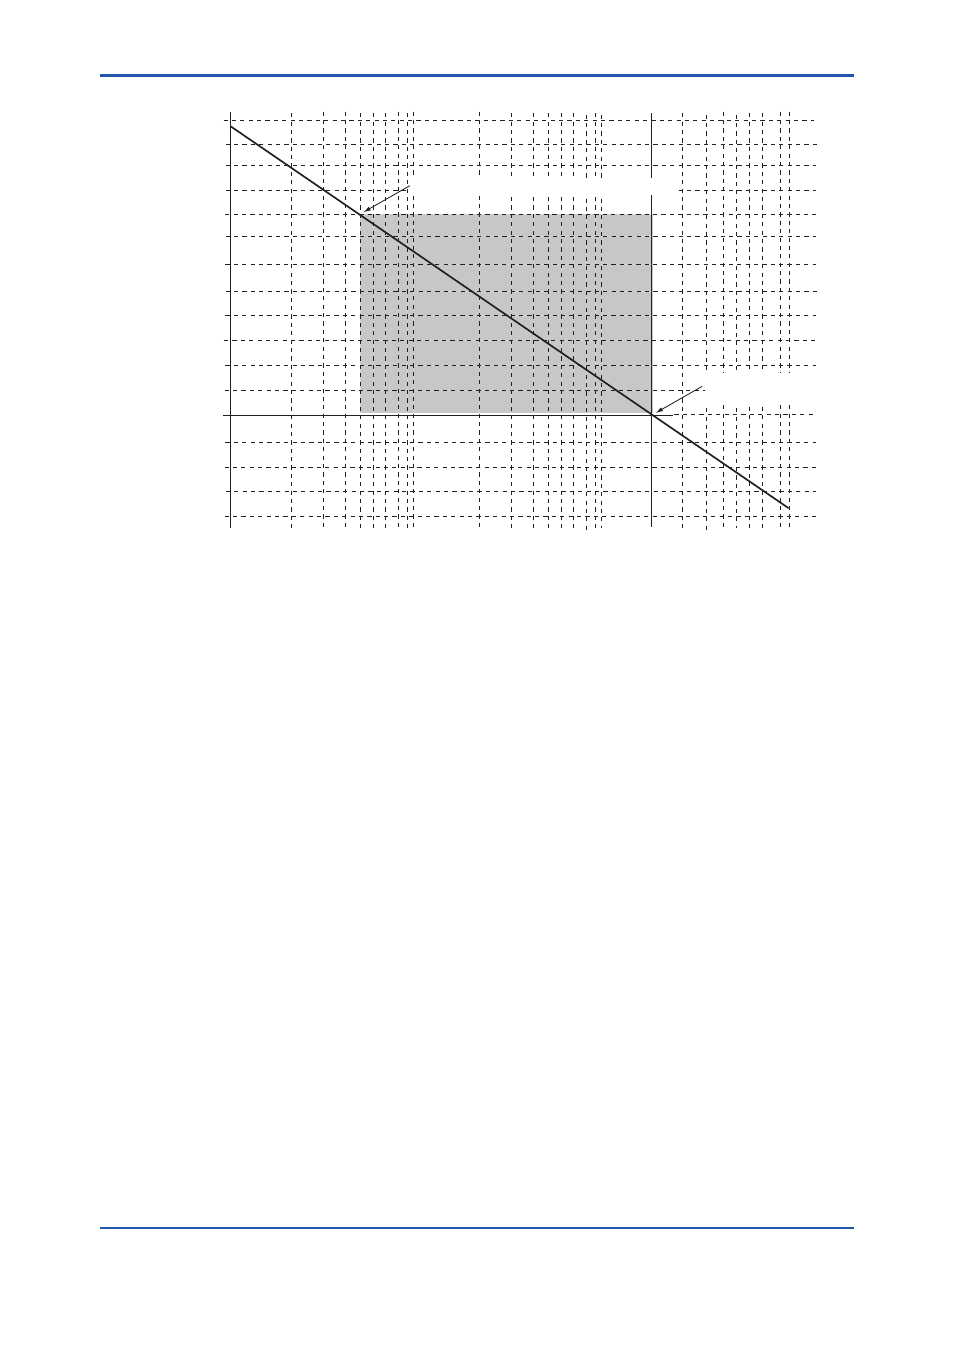
0.51 vol%O
2
,81.92mV(Zero origin of calibration)
21.0 vol%O
2
, 0mV
(Span origin of calibration)
Oxygen concentration (vol % O
2
)
Cell
voltage
(mV)
F9.1E.ai
Figure 9.1 Oxygen Concentration in a Measurement Gas vs. Cell Voltage (21 vol%O
2
Equivalent)
The measurement principles of a zirconia oxygen analyzer have been described above. However, the
relationship between oxygen concentration and the electromotive force of a cell is only theoretical.
Usually, in practice, a sensor shows a slight deviation from the theoretical value. This is the reason
why calibration is necessary. To meet this requirement, an analyzer calibration is conducted so that a
calibration curve is obtained, which corrects the deviation from the theoretical cell electromotive force.
9.1.2 Calibration Gas
A gas with a known oxygen concentration is used for calibration. Normal calibration is performed
using two different gases: a zero gas of low oxygen concentration and a span gas of high oxygen
concentration. In some cases, only one of the gases needs to be used for calibration. However, even if
only one of the gases is normally used, calibration using both gases should be done at least once.
The zero gas normally used has an oxygen concentration of 0.95 to 1.0 vol%O
2
with a balance of
nitrogen gas (N
2
). The span gas widely used is clean air (at a dew-point temperature below -20°C and
free of oily mist or dust, as in instrument air).
9.1.3 Compensation
The deviation of a measured value from the theoretical cell electromotive force is checked by the
method in Figure 9.2 or 9.3.
Figure 9.2 shows a two-point calibration using two gases: zero and span. Cell electromotive forces
for a span gas with an oxygen concentration p1 and a zero gas with an oxygen concentration p2 are
measured while determining the calibration curve passing between these two points. The oxygen
concentration of the sample gas is determined from this calibration curve. In addition, the calibration
curve corrected by calibration is compared with the theoretical calibration curve for determining the
zero correction ratio represented by B/A x 100 (%) on the basis of A, B and C shown in Figure 9.2 and
a span correction ratio of C/A x 100 (%). If the zero correction ratio exceeds the range of 100 ± 30% or
the span correction ratio becomes larger than 0 ± 18%, calibration of the sensor becomes impossible.
