Touch screen details, Xps-16 sharpener touch screen details, Point angle screen selector – Darex XPS-16 Operating Instructions User Manual
Page 19
19
Power up the XPS-16 sharpener
r
efer to informa-
tion on page 17
and connect vacuum system, for
details
r
efer to information on page 55
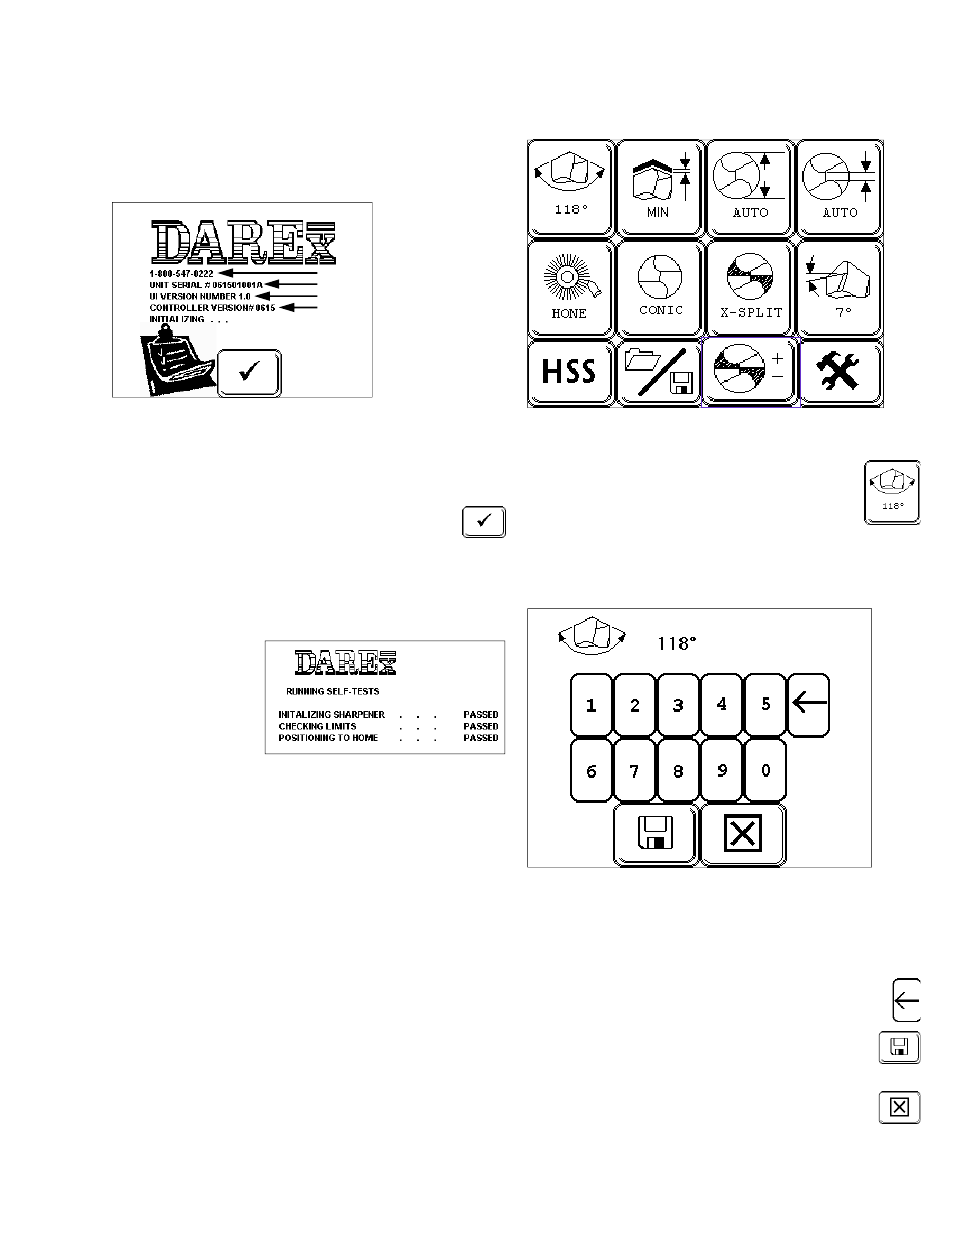
Self Test Initialization Screen
The initialization
screen displays
important infor-
mation. On the
first line you will
find the Darex
toll free phone
number, the 2
nd
line displays the
machine serial
#. The
3rd
line
has the current User Interface software version
followed by the Controller software version. This
information is necessary when updating your soft-
ware or for technical inquiries.
•
Remove the drill and touch the “check”
on the screen; the Self Test Initialization
program will begin. The machine will begin
initialization tests, checking sensors, verifying
limit positions, moving and parking the ma-
chine at home. After initialization is successful,
a screen will
flash listing
each test as
passed, then
immediately
transferring to
the Main Set-
up Screen.
•
If initialization is unsuccessful, the word
FAILED will appear, making continuation im-
possible. Power down machine, restart and re-
try initialization. If initialization fails again, Call
Darex for assistance.
XPS-16 SHARPENER TOUCH
SCREEN DETAILS
NOTE: If the touch screen remains idle for
longer than
6
minutes, the LCD backlight
and grinding wheel will shut down, how-
ever, the machine will remain powered up.
Lightly, touch anyplace on the face of the
LCD screen to activate the backlight.
Main Set-up Screen
Point Angle Screen Selector
•
Sharpen point angles of
*
118° to 150°.
Touch the “POINT ANGLE SCREEN”
Selector, the Point Angle Screen will
appear.
NOTE: Factory default is “118°”.
*
For 90° capabilities call Darex.
Point Angle Screen
•
Type in desired point angle degree.
NOTE: If you enter a point angle outside the
capability range of the sharpener, the set-
ting will default to the closest MIN/MAX
point angle degree.
•
Use the “BACKSPACE” button to erase in-
formation incorrectly entered.
•
Touch the “SAVE” button to store and
transfer the “New” information to the
Main Set-up Screen.
•
Selecting “CANCEL” will delete any
unsaved data, retrieving the most re-
cently saved information, transferring
you back to the Main Set-up Screen.
Touch Screen Details
Touch Screen Details