Keyboard, Realtime control knobs, Tempo knob and tap button – KORG Krome music workstasion 61key User Manual
Page 29
Playing Programs Using Controllers
25
When you write a Program or Combination, the on/off
status of the SW1 and SW2 buttons is saved.
For details, please see page 82.
Locking the Joystick
1. Using the standard factory sounds, select Program
C027: Semi Distortion Guitar.
To select a program, make sure that you are in Program
mode, and press the PROG BANK C button, numeric
key 2, 7, and then the ENTER button.
2. While holding down a key, move the joystick in
the –Y direction (toward yourself).
The tremolo effect will deepen.
3. While keeping the joystick in the –Y direction
(toward yourself), press the SW2 button. (The SW2
button LED will light up.)
When you press the button, its LED will light up, and
the modulation effect at this point will be maintained.
4. Release the joystick, and play the keyboard.
The modulation will stay the same as it was when SW2
was pressed. Even if you move the joystick toward
yourself, the sound will not change.
5. Press the SW2 button once again to release the
Lock function.
Keyboard
The KROME’s keyboard provides the following two
types of control.
Velocity
Velocity is a measure of how hard you play a note on
the keyboard. This can be used to modulate many
different aspects of the sound, such as volume,
brightness, or the character of the attack.
Note Number
Sounds can be programmed to change in character
based on the note being played.
As you play higher or lower on the keyboard, the note
number can modulate the timbre ‐ such as becoming
brighter as you play higher notes. Envelopes may also
become faster or slower; the volume may change; and
so on.
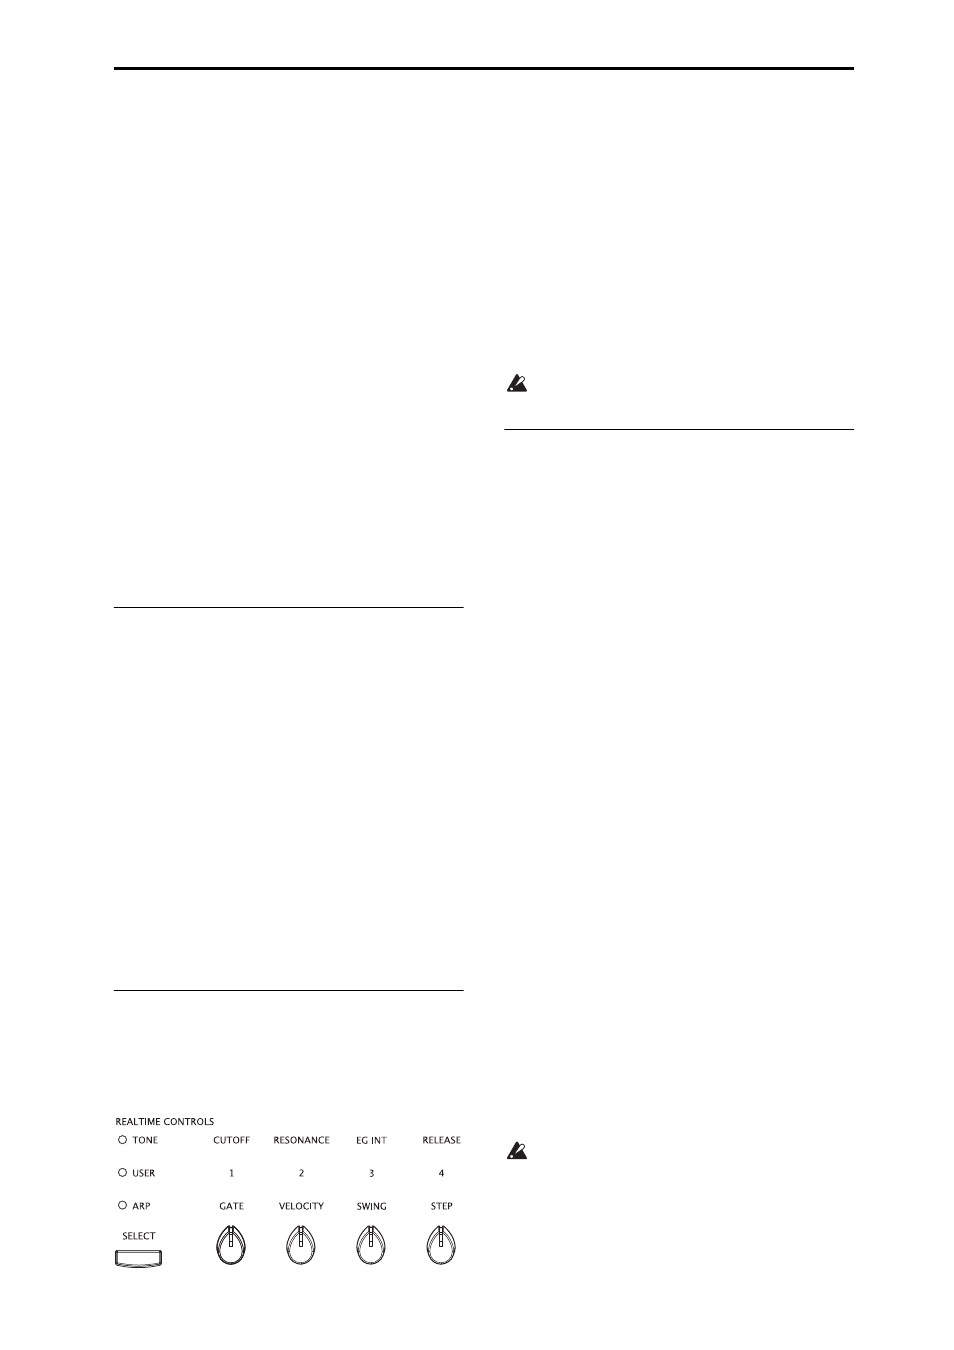
Realtime control knobs
The realtime controls consist of four knobs and the
SELECT button. These controls function as follows.
• You can apply modulation to sounds or edit them.
• You can control the arpeggiator.
1. Press the SELECT button to select the realtime
control function between TONE, USER, or ARP.
TONE, USER: Use the knobs to modify the sound or
effects (see page 28).
ARP: Use the knobs to control the arpeggiator (see
page 86).
You can freely switch between these functions without
losing your current edits.
2. Use knobs 1–4 to control the selected functions.
When you turn one of these knobs, that knob’s function
and value will appear in a popup.
(You can prevent this popup from appearing. See
page 111.)
There will be a slight amount of play when turning
the knob near its minimum or maximum positions.
TEMPO knob and TAP button
This adjusts the tempo for the KROME as a whole,
including:
• Arpeggiator
• Drum Track
• Songs in Sequencer mode
• Tempo‐synced LFOs
• Tempo‐synced (“BPM”) delay effects
TEMPO LED
The LED will blink at quarter‐note intervals of the
current tempo.
TEMPO knob
This knob adjusts the tempo. It’s a convenient way to
make continuous adjustments.
Note: If the Global P1: MIDI– MIDI Basic page MIDI
Clock parameter is set to External MIDI, External USB,
or if it is set to Auto and a clock is currently being
received via MIDI, then neither the TEMPO knob nor
the TAP button will have any effect.
TAP button
You can set the tempo of the Arpeggiator or Drum
Track function in Program, Combination, and
Sequencer modes by lightly pressing or tapping the
TAP button several times on the beat. In Sequencer
mode, you can control the song tempo in this way.
To enter the tempo, use your finger to gently tap the
TAP button. The tempo will be entered when you press
the button twice, but you should tap several times in
order to increase the precision. The average of the last
sixteen taps will be specified as the tempo.
During playback, lightly press the TAP button several
times at the desired tempo. The tempo will follow your
tapping in realtime. This is a convenient way to match
the tempo in realtime to the beat of a different source.
You can use tap tempo control whenever the
TEMPO knob can be used. For example in
Sequencer mode, tap tempo control will not be
available if you are playing a song where the
Tempo Mode setting is set to Auto. (See page 110
of the Parameter Guide)
Note: You can also use a foot switch connected to the
ASSIGNABLE FOOT SWITCH jack to control the tap