4) part names of the remote control, Part names of the remote control – NEC 40,000-Lumen 4K Laser Installation Projector User Manual
Page 29
12
1. Introduction
❹
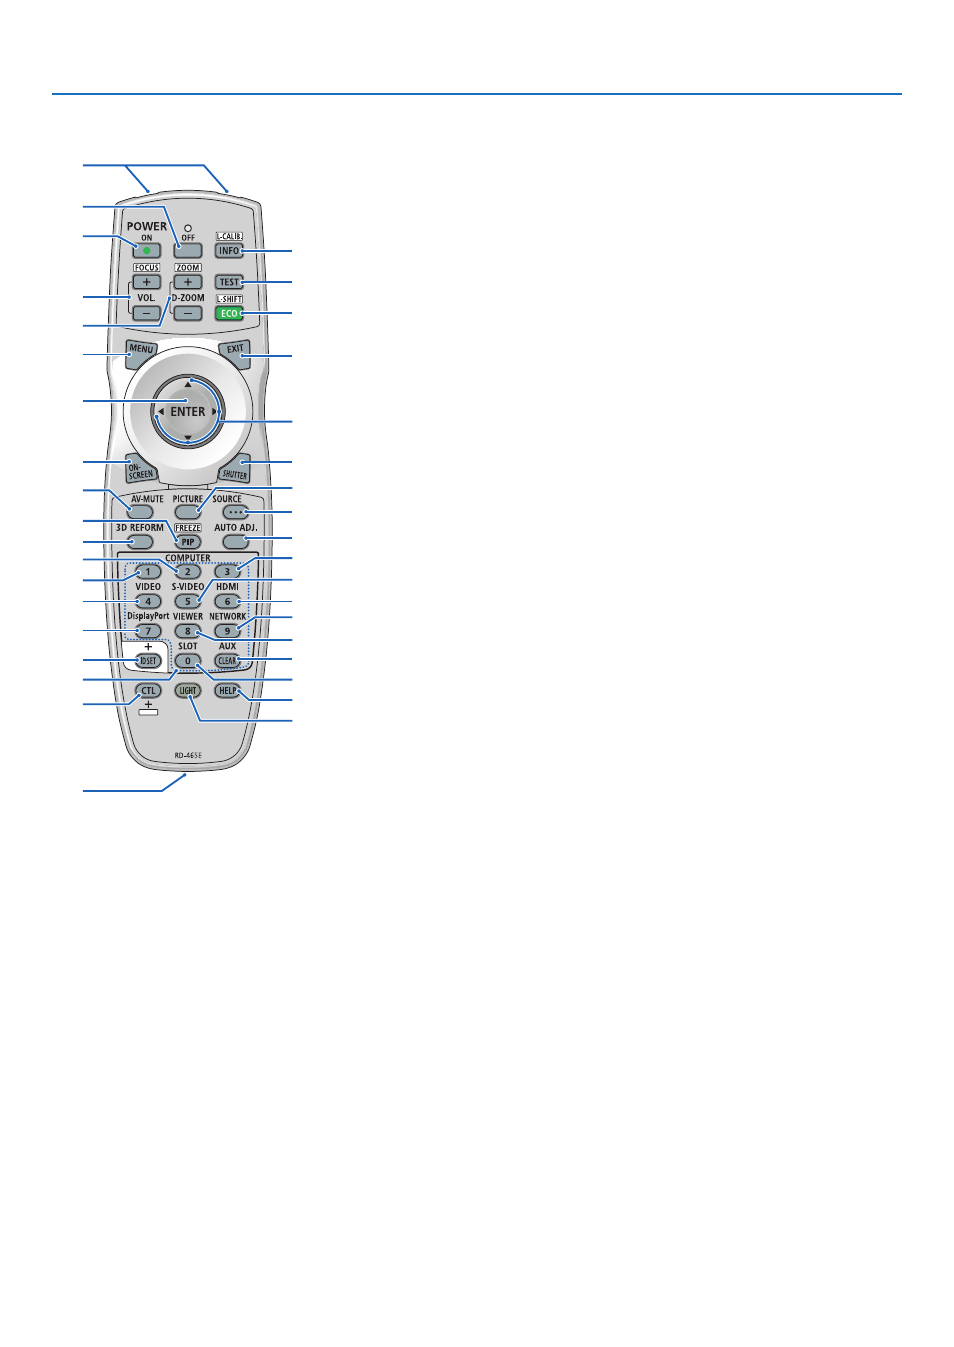
Part Names of the Remote Control
6. VOL./FOCUS +/− Buttons
(The VOL. button function cannot
be used with this series of projec-
tors.)
(
→
7. D-ZOOM/ZOOM +/− Buttons
(
→
)
8. TEST Button
(
→
)
9. ECO/L-SHIFT Button
(
→
)
10. MENU Button
(
→
11. EXIT Button
(
→
12. ENTER Button
(
→
13.
▲▼◀▶
Button
(
→
)
14. ON-SCREEN Button
(
→
15. SHUTTER Button
(
→
16. AV-MUTE Button
(
→
17. PICTURE Button
(
→
18. SOURCE Button
(
→
19. 3D REFORM Button
(
→
,
)
20. PIP/FREEZE Button
(
→
21. AUTO ADJ. Button
When projecting the HDMI, Dis-
playPort, HDBaseT, SDI or SLOT
screen, the conditions are auto-
matically adjusted to an optimum
state.
22, 23, 24. COMPUTER 1/2/3 But-
ton
(not available on this series of
projectors)
25. VIDEO Button
(not available on this series of
projectors)
1
3
4
6
14
10
12
16
20
7
2
5
8
9
11
15
18
17
13
21
19
25
28
33
23
22
36
24
30
26
29
35
27
31
37
34
32
26. S-VIDEO Button
(not available on this series of
projectors)
27. HDMI Button
(
→
28. DisplayPort Button
(
→
29. VIEWER Button
(not available on this series of
projectors)
30. NETWORK Button
(
→
31. SLOT Button
(
→
32. AUX Button
(
→
33. ID SET Button
(
→
34. Numeric (0 to 9/CLEAR) But-
tons
(
→
35. CTL Button
This button is used in conjunction
with other buttons, similar to a
CTRL key on a computer.
36. LIGHT Button
This button is used to turn on the
backlight for the remote control
buttons.
The backlight will turn off if no
button operation is made for 10
seconds.
37. HELP Button
(
→
1. Infrared Transmitter
(
→
page
2. Remote Jack
Connect a commercially available
remote cable here for wired opera-
tion. (
→
page
3. POWER ON Button
(
→
page
)
4. POWER OFF Button
(
→
page
)
5. INFO/L-CALIB. Button
Display the [SOURCE(1)] screen
of the on-screen menu.
(
→
page
[LENS CALIBRATION] of the lens
unit is carried out when you press
the CTL button at the same time.
(Applicable lens: L4K-11ZM/L4K-
15ZM/L4K-20ZM)
(
→
page
)