Changing default scan job settings – Epson EcoTank Photo ET-8500 Wireless Color All-in-One Supertank Printer User Manual
Page 146
146
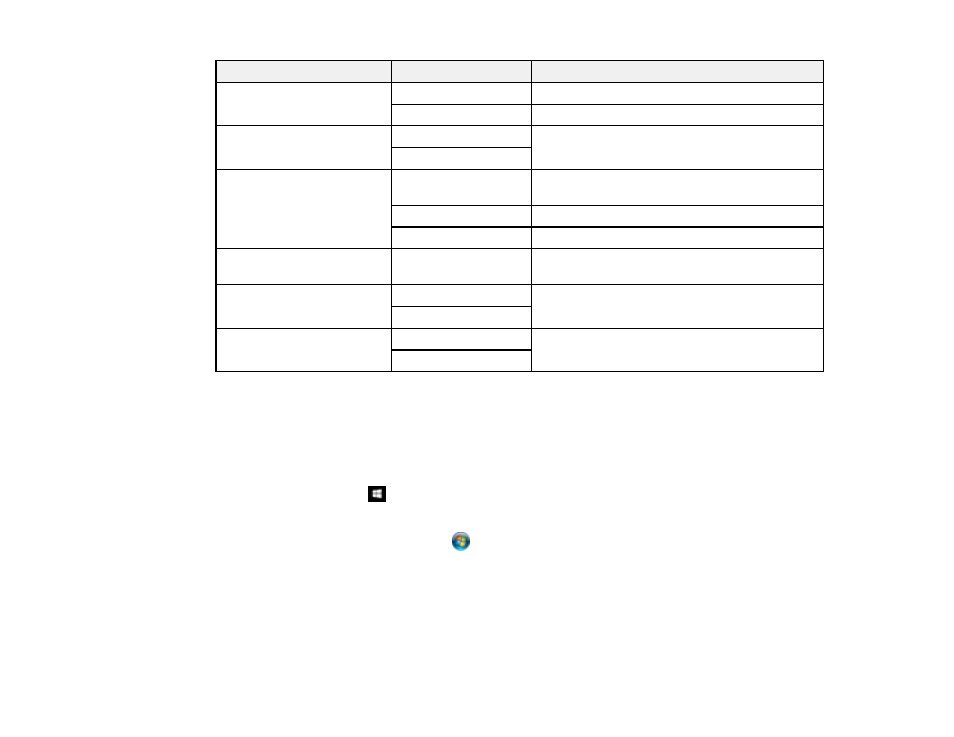
Scan to setting
Available options
Description
File Format
JPEG
Select for photos
Select for documents
Original Type
Text
Specifies the type of original you are scanning.
You can also select the resolution.
Photo
Scan Settings
Various sizes
Select the page size for documents. You can
also select the orientation of the original.
Auto Cropping
Select for photos with dark edges
Max Area
Select for most photos
Contrast
Varying levels
Adjusts the lightness or darkness of scanned
images
Select Memory Device
Memory Card
Select the currently inserted device to scan to
USB Memory
Clear All Settings
Yes
Restores all scan settings to their defaults
No
Parent topic:
Starting a Scan Using the Product Control Panel
Changing Default Scan Job Settings
You can view or change the default scan job settings your product uses when you scan to your
computer. You do this using the Event Manager program.
1.
Do one of the following to open Event Manager:
•
Windows 10:
Click
and select
Epson Software
>
Event Manager
.
•
Windows 8.x
: Navigate to the
Apps
screen and select
Event Manager
.
•
Windows (other versions)
: Click
or
Start
>
All Programs
or
Programs
>
Epson Software
>
Event Manager
.
•
Mac
: Open the
Applications
folder, click
Epson Software
, and select
Event Manager
.
2.
Open the
Scanner
(Windows) or
Select Scanner
(Mac) drop-down list and select your product, if
necessary.
3.
Click
Make Job Settings
.
- EcoTank ET-2850 Wireless Color All-in-One Cartridge-Free Supertank Printer (White) EcoTank ET-4850 All-in-One Cartridge-Free Supertank Printer (White) WorkForce ST-M1000 Monochrome Supertank Printer WorkForce ST-M3000 Monochrome MFP Supertank Printer WorkForce ST-C4100 All-in-One Supertank Color Printer EcoTank ET-3830 Wireless Color All-in-One Cartridge-Free Supertank Printer Expression Home XP-4200 Wireless All-In-One Color Printer Expression Home XP-5200 Wireless All-In-One Color Printer Workforce ST-C8090 All-in-One Supertank Printer EcoTank Pro ET-5880 All-in-One Cartridge-Free Supertank Printer with PCL Support EcoTank Pro ET-16600 Wide-Format All-in-One Supertank Printer WorkForce Pro WF-7820 All-in-One Inkjet Printer WorkForce Pro WF-7840 All-in-One Inkjet Printer EcoTank Pro ET-5150 Wireless All-in-One Supertank Printer Expression Photo XP-8700 Wireless All-in One Color Printer