Top Flite TOPA0130 User Manual
Page 44
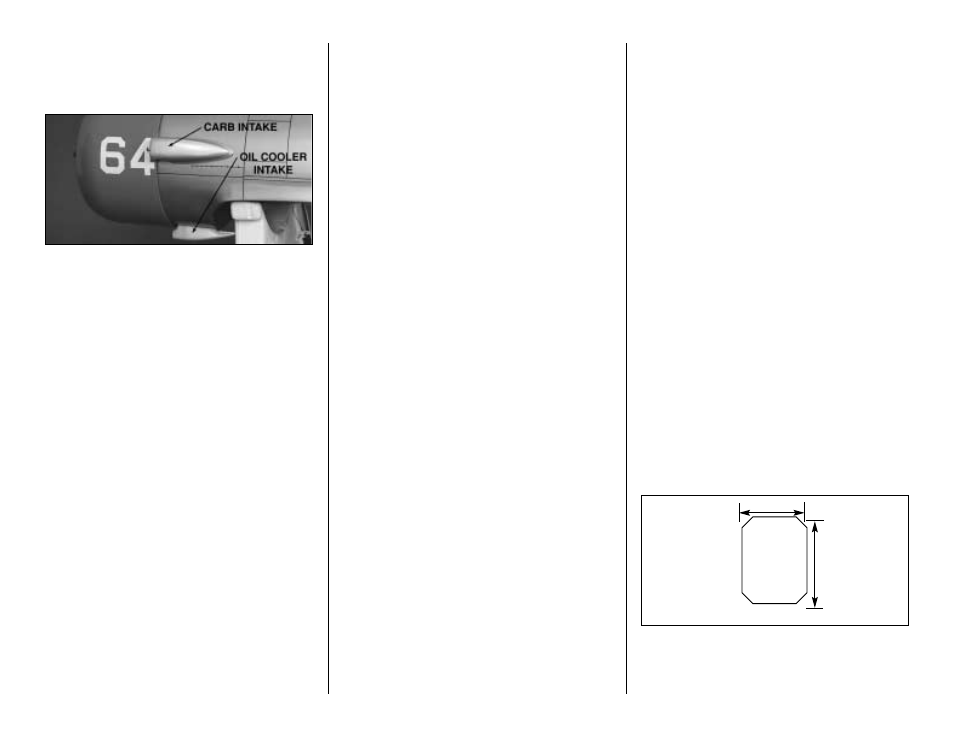
ASSEMBLE THE AIR INTAKES
AND EXHAUST STACK
❏ ❏
1. Cut out the front and rear sections of
the plastic
oil cooler and carb Air Intakes. Sand
the edges smooth.
❏ ❏
2. Test fit the parts together, then roughen
the inside mating surfaces and glue them
together with CA.
❏ ❏
3. Repeat steps 1 & 2 for the Exhaust
Stack.
❏ ❏
4. Use fiberglass resin automotive filler to
fill in any gaps between the parts. Use a sanding
block to level out the surfaces. Hint:
Wet sanding
works very well on automotive filler.
❏ ❏
5. Fit the Air Intakes to the fuse. You will
probably need to sand the underside of the
intakes to a slight radius to blend with the
sheeting.
Note: If you will be installing a 2-stroke engine
with a Top Flite In-Cowl Muffler, don't cut the
hole for the exhaust stack until the muffler has
been installed. You will find that by using a
Hobbico Exhaust Diverter (#HCAP2175) the
exhaust can be routed out through the scale
exhaust stack.
PAINTING
Paints used on the prototype:
We used K & B Super Poxy primer and color
coat for everything except the Canopy frame.
K & B has been known to attack butyrate
plastic, so we used
Chevron Perfect for the
Canopy.
Surface Preparation
Mix equal parts of K & B primer, hardener, and
thinner, then stir well. Spray the Cowl, Air
Intakes, and Exhaust Pipe with a thin coat of
primer. Add a second coat of primer to areas
that need it. Mask the wing (plastic garbage
bags work well for this) around the plastic LE
Fairing, then apply primer to prepare the Fairing
for paint. Wet sand the primer with 320 and 400
grit sandpaper using a block where possible.
Most of the primer should be sanded off.
Cut the excess mater ial from around the
Canopy, then sand off the rough edges with 320
grit sandpaper. Mask the window panes with
vinyl electrician's tape or Frisket film (available
at art supply stores).
Apply the colors
Spray the aluminum parts with K & B Super
Poxy (but not the canopy). Spray the canopy
frame with Chevron Perfect. The inside of the
flaps and wheel wells may be painted zinc
chromate green with a brush. We mixed the
Zink Chromate Green color by combining K & B
Super Poxy : roughly 5 parts yellow, 1 part blue,
and drop of black. Wet sand any rough parts
with 400 to 600 grit sandpaper.
We custom mixed the K & B paint to match the
red MonoKote by mixing a little yellow into their
standard red color. Start with 6 parts red and 1
par t yellow. A drop or two of black may be
needed to obtain an exact match. Keep a
swatch of MonoKote handy to test and compare
the color on a regular basis.
Note: All paints dry slightly darker
than they appear while wet. Spray on
the color coat when satisfied with
the match.
K & B paints are not difficult to use if you have
spray equipment. Use equal parts of the color
paint (Part A) and hardener ( Part B), mix well,
then thin the mixture with K & B Thinner so that
it can be sprayed. (e. g. 1 oz. Part A, 1oz. part B,
1oz. Thinner)
HINGING
NOTE: Hinging is usually done after covering
and painting. The hinge locations are shown on
the plans. Use a #11 blade in a hobby knife to
cut the hinge slots.
❏
1. Cut 15 hinges (3/4" x 1") from the 2" x 9"
CA hinge strip. Trim the corners at a 45 deg.
angle to make insertion easier.
44
3/4"
1"
Actual Size