Top Flite TOPA0130 User Manual
Page 18
❏
9. Insert the die-cut 1/8" slotted balsa TE AT
FLAP CENTER into the notches along the TE of
the wing ribs. If necessary, adjust the depth of
the notches to allow the slotted TE to fit flush
with the upward-facing rib edges. Glue the TE in
place when you are satisfied with the fit.
❏
10. Adjust the Wing Bolt Plate so that it
matches its position over the plans, and is
parallel to the TE. Glue it to both of the W-1 ribs
and the TE. Use thick CA or epoxy to create a
fillet along all points of contact.
❏
11. Glue the upper 1/4" x 3/8" x 18" balsa
Spar in place.
❏
12. Fit the die-cut 3/32" balsa W-3 ribs
between the spars. Make sure that the Landing
Gear Rail notch is pointing away from the work
surface. Butt the ribs firmly against both Spars
and glue them in place.
❏
13. Use medium CA to glue the die-cut 1/8"
ply Leading Edge Braces together (two pieces
per assembly), then glue the assemblies into the
notches in W-1 and W-2 and also to the side of
W-3 as shown.
❏
14. Center the shaped Leading Edges (Cut-
offs from the outer wing panels) vertically on the
front edges of ribs W-3, W-4, and W-5, then glue
them in place.
❏
15. Cut one 3-5/8" Forward Sub-Spar from
each of two pieces of 3/16" x 3/16" x 36" balsa
fuselage stringer. Test fit the these short spars
between Rib W-1 and the inside edge of the
Leading Edge Brace. Glue them in place when
satisfied with the fit. (See photo at step 16)
Skip the next four steps if you will be
installing retract gear.
❏
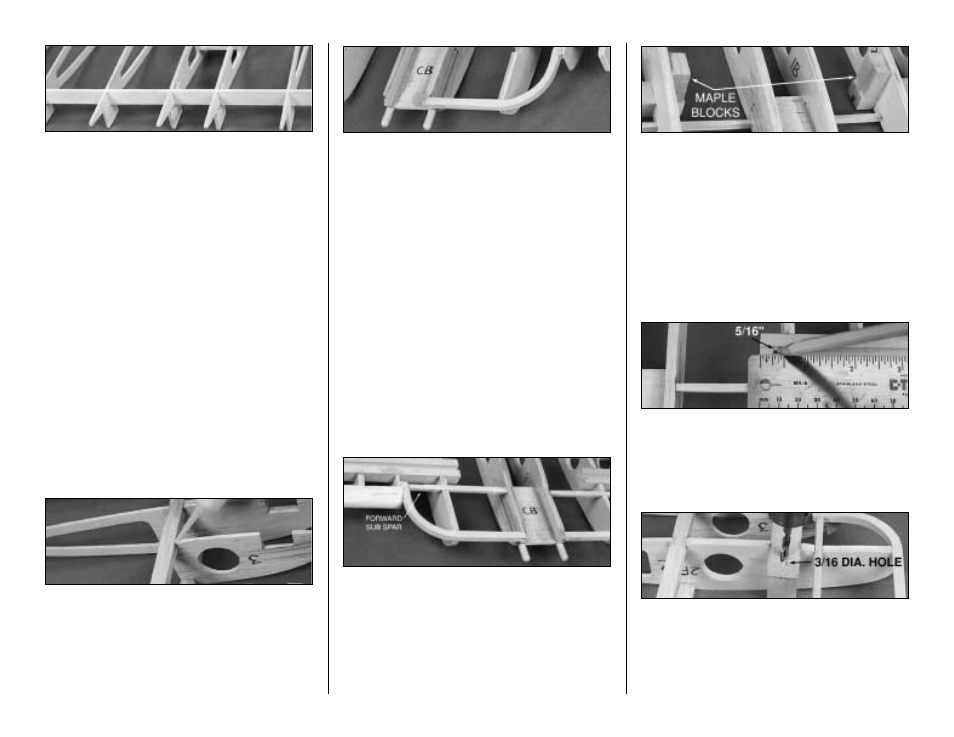
16. Test fit the two 1/2" x 3/4" x 5-3/4" grooved
Landing Gear Rails into the notches in ribs W-2
through W-5. The fit should be snug, and the
groove should be facing away from the work
surface. Use 30-minute epoxy to glue the Rails in
position. Be sure that the outer edge of the Rails
are flush with the outside of the W-5 ribs.
❏
17. Carefully remove the wing center panel
from the work surface. Use 30-minute epoxy to
glue the two 1/2" x 3/4" x 1" Maple Landing
Gear Blocks to the top of the Rails and the
sides of the W-2 ribs doublers.
❏
18. Draw a line 5/16" from the inside edge of
the Grooved Rail.
❏
19. Carefully drill a 3/16" diameter hole on
this mark, all the way through the Maple Block
with the drill bit angled slightly as shown in the
photo. Protect your work surface with a piece of
plywood underneath the drill bit.
18