Top Flite TOPA0130 User Manual
Page 10
❏
18. Make four stab skins from three 1/16" x
3" x 30" balsa sheets. See the sketch for the
proper layout on the wood. Refer to the plans for
the exact shapes and sizes, but remember to
make the skins slightly oversize.
❏
19. Pin the stab structure onto your building
surface using pins at the tips and diagonally
under the LE & TE.
Don't hide the pins under
the skin. Test fit the skins over the structure.
Make sure the skins meet flush at the center.
Adjust them if necessary.
❏
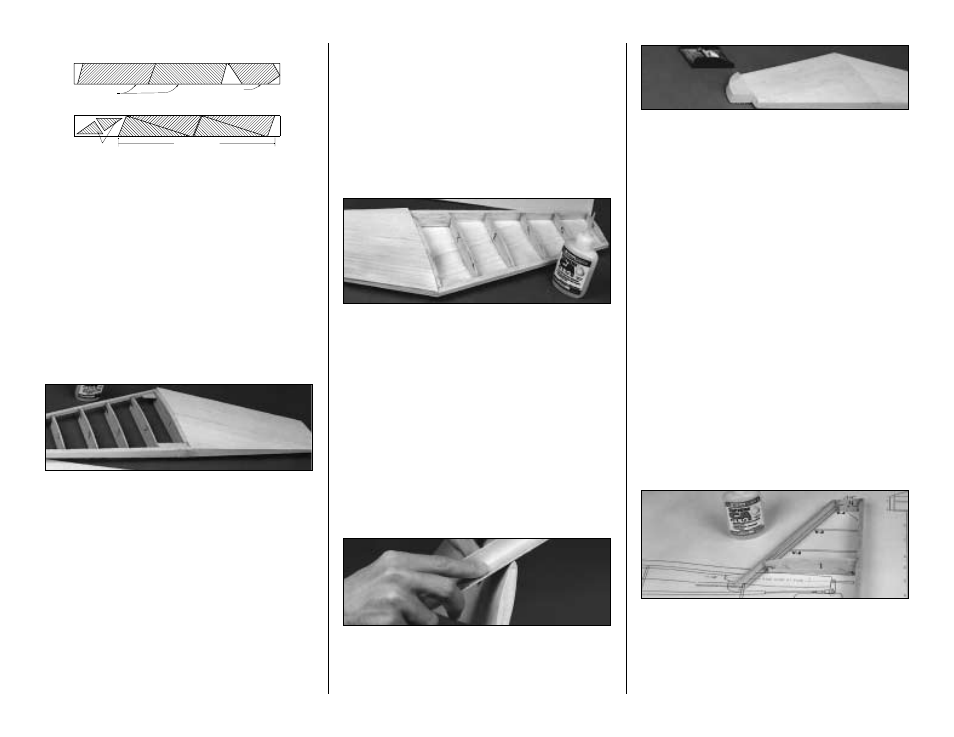
20. Apply an even bead of medium or thick
CA to the upward facing edges of the structure.
Place a skin in its proper position and press it
firmly down until the glue has set. Repeat this
step for the other top skin.
❏
21. Remove the stab from the building
board. Trim off the jig tabs with a sharp knife.
Trim and blend the LE and TE to the ribs as
you did before. Check all glue joints, adding
glue as necessary.
❏
22. Cut two 1/4" wide cross-grain strips from
1/16" x 3" balsa. (You probably have some left
over balsa from the stab sheeting operation)
Glue these strips between the two S-1 ribs flush
with their bottom edges as you did in step #13.
❏
23. It's important to get a good glue bond
between the stab structure and the bottom stab
skins. Apply a heavy bead of medium or thick
CA to all of the
upward facing edges of one side
of the stab structure. Place a skin on the
structure and hold it in place with your hands
until the glue sets. Repeat this for the other
bottom skin. Be careful not to bend or twist
the stab during this step.
❏
24. True up the ends of the stab with a
sanding block. IMPORTANT: Round the LE of
the stab to match the cross section on the plan.
❏
25. Glue the 5/8" thick shaped balsa Stab
Tips in position. Use a razor plane and a
sanding block to shape them to an airfoil that
matches the stab. You may contour the tips to
their final shape now, or wait until the model is
nearer completion.
BUILD THE FIN
❏
1. Punch out the die-cut 3/32" balsa ribs V-1
through V-4. Be sure to preserve their jig tabs.
❏
2. Cut an 8" length of the tapered 1/4" balsa
stabilizer LE stock and sand bevels on each end
to match the plans exactly as the length of the
LE sets the angle of the fin. Notice that the fin
LE protrudes through the stab and fits into a
notch on top of F-8.
❏
3. Punch out the die-cut 1/4" balsa fin TE
and lightly sand the edges to touch them up.
❏
4. Pin ribs V-1 and V-4 to the building board
over their proper locations. Center the LE on the
front of the ribs and glue it in place. Center the Fin
TE on the aft edge of the ribs and glue it in place.
10
Two Sheets
One Sheet
Stab Fwd
Fin Fwd
Stab Aft
Fin Tips