Top Flite TOPA0130 User Manual
Page 15
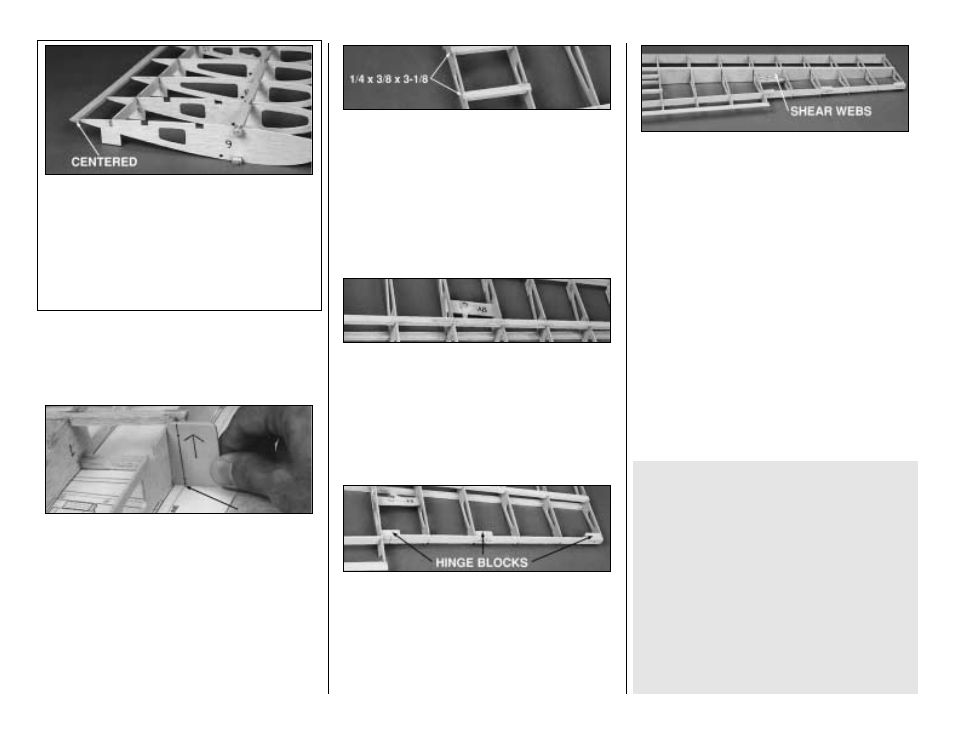
❏ ❏
9. Glue the Flap TE to ribs W-7 through
W-10. The Flap TE should be centered on the
aft edges of the ribs and should be (as shown in
the cross-section on the plans) aligned with the
top and bottom of the ribs. Make sure all the jig
tabs are contacting the table. A metal
straightedge can be placed on the structure over
the jig tabs to hold them down evenly.
Now you'll see why we didn't want you to glue
W-6 in place earlier.
❏ ❏
10. Draw a line through the two punch
marks on the ply Dihedral Gauge. With the
arrow on the gauge pointing up, position the
gauge on the plan so the line you drew is on the
dashed reference line printed on the plan.
Move the gauge along the reference line and
adjust the angle of W-6 until it's flush with the
gauge from the LE to the TE. After double (
even
triple) checking that the angle is perfect, glue
W-6 in place at all points of contact.
❏ ❏
11. Cut the two balsa 1/4" x 3/8" spar cut-
offs to 3-1/8" long. Glue two of these sticks into
the notches in ribs W-6 and W-7. These will act as
supports for the flap servo hatch. If you don't plan
on using flaps, fill the notches with scrap balsa (or
install the rails even if you won't use them).
❏ ❏
12. Glue the Aileron Bellcrank assembly
into the slots in ribs W-10 and W-11. The
bellcrank should face away from the building
board as shown in the photo.
❏ ❏
13. Locate the 3/8" x 1/2" x 15" balsa
Flap & Aileron Hinge Block. Cut six 1" lengths
to use as aileron hinge blocks (save the balance
for use as flap hinge blocks). Glue 3 blocks
where shown on the plans; save the other 3 for
use on the second wing panel.
❏ ❏
14. Trim the 1/16" x 2-3/4 x 1-11/16"
balsa Shear Webs to fit behind the spar
between ribs W-7 through W-15. Do not install
a shear web between W-6 and W-7. Glue them
in place with CA+. Wick CA between all the
joints of the shear webs and the spars to make
sure they are well bonded. It's not important to
glue the shear webs to the ribs.
If you are building your wing without operational
flaps you can take a short break to admire your
handiwor k. When fully revived, clean the
sawdust off your bench, swap the plan sheets,
and get busy building the other outer wing
frame. On the other hand, if you are installing
operational flaps, you still have some more work
to do, so get back to it. You can rest later.
PREPARE THE WING PANELS FOR
THE FLAPS
Do the following steps if you are building
operational flaps.
❏ ❏
1. Remove the wing panel from the
building board. Use a T-bar with fresh 220 grit
sandpaper to blend away any unevenness from
the structure. Pay special attention to the trailing
edge of the wing. It's important to make the
trailing edge as straight as possible so the split
flaps will fit well.
15