Top Flite TOPA0130 User Manual
Page 40
❏
6. Locate the four 1/2" x 5/8" x 3/4" Maple
Cowl Mounting Blocks. Slightly curve a 1/2" x
3/4" side to match the cowl contour on each of
the four blocks.
❏
7. Hold the blocks inside the cowl, centered
on the 1/8" hole, even with the scribed line, as
shown in the photo. Mark the location of each
hole. Drill a 3/32" pilot hole on the marks of each
block. Attach the blocks to the cowl with four #4 x
1/2" screws and four #4 washers. Make sure that
they are aligned with the scribed marks.
❏
8. Put a dab of 6 minute epoxy on the back
of each block, then fit the cowl in position on the
front of the fuse. Align the blocks with the center
stringers, top, bottom, left, and right. The small
open areas on each side are designed to allow
engine cooling air to exit the cowl. When
centered, use masking tape to hold the cowl in
position until the epoxy cures.
Hint: If you keep
the Fuse in a nose up position, gravity will help
hold the cowl in position.
❏
9. After the epoxy has cured, mark the "TOP"
of the cowl on the inside, then unscrew it. Add a
substantial fillet of fresh epoxy around each
block for added strength.
FIT THE COWL TO THE ENGINE
❏
1. Mount the engine. Install the needle valve,
and, if you will be using a 4-stroke engine, the
choke control wire.
❏
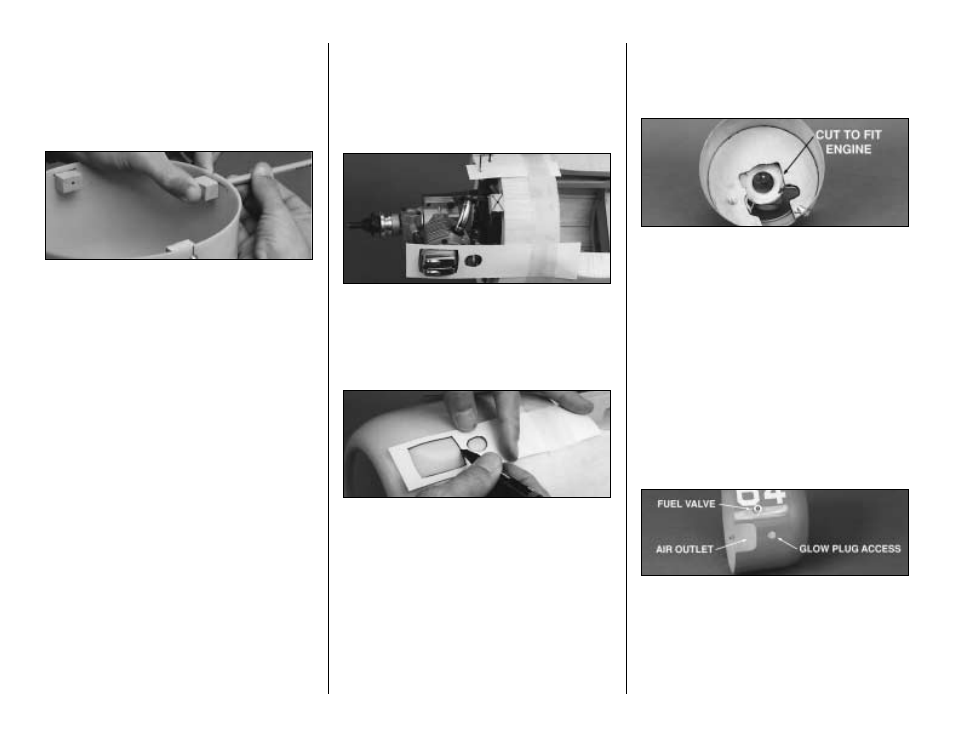
2. Use thin cardstock or a file folder to make
location templates as shown in the photo.
Securely tape these templates to the fuse a few
inches behind the forward edge.
❏
3. Remove the control extensions and engine
but leave the templates in place. Slide the cowl
under the templates and screw it in position.
Use a pen to trace the openings on the cowl.
Remove the cowl, then use a Dremel tool (or
power drill and a round file) to cut the openings.
❏
4. Put the engine back on the mount with a
couple of screws, then check the fit of the cowl
openings. Make adjustments as necessary, a
little at a time.
IMPORTANT: Fully cowled engines
require a baffle to direct air flow over the
cylinder and to limit the amount of heated
engine air that must exit the enclosure.
❏
5. Cut an engine baffle from 1/8" lite ply (not
included) using the Baffle Template on the
plans.
A Top Flite Dummy Radial Engine
(TOPQ7901) may be glued to the front of the
baffle to dress up the front of the model.
If you
plan on using a Dummy Radial, skip the rest
of this step, but refer back to it after the cowl
has been painted. Epoxy the baffle into the
front end of the cowl with the open area in front
of the engine cylinder. Use a file (or Dremel
drum sander) to fit the opening to the engine
you are using. Be sure to allow adequate
clearance for throttle movement through its full
range. Also notice in the photo the fuel filler
valve (GPMQ4160) and the air filler valve.
❏
6. Drill a 3/8" hole in the cowl across from the
carb to install an optional fuel filler valve
(GPMQ4160). Drill a 1/2" hole, if required, for
the glow plug batter y connection. Cut an
opening for the engine muffler (if required), or to
allow heated air to exit the cowl.
40