Top Flite TOPA0130 User Manual
Page 21
❏
3. Make four outboard wing skins by edge
gluing three 1/16" x 3" x 30" balsa wing sheets
together to make (4) 9" x 30" skins. Make two
center section skins using four sheets of 1/16"
x 3" x 18" balsa to make two 12" x 18" skins.
Refer to page 9 for tips on making skins.
NOTE: The steps below show the
sheeting of a wing with functioning flaps.
Wings without functioning flaps are sheeted the
same way, but they will look slightly different.
❏
4. Tape a center section skin to the bottom
surface of the wing with one edge butted up to
the LE. Mark the aft edge of the sheet (along
the flap line or
along the inside of the tapered
TE if no flaps are used) from the opposite side
with a pen. Cut the skin close to the correct size
then sand it for an exact fit. The side edges of
the skin should be centered on the joint
between ribs W-5 and W-6.
❏
5. Glue the center skin in position using
Medium or Thick CA. Hold the skin in contact
with structure until the glue is dr y. Glue a
separate piece of 1/16" x 3" x 9-1/2" balsa (cut
from a 30" sheet) to the forward, wheel well
portion of the center panel.
❏ ❏
6. Fit one of the 9" x 30" skins in place on
an outboard wing panel, with one long edge
butted tightly against the LE. The inboard edge
should overlap the center section. Tape the skin
in place. With a flexible ruler, mark the edge that
mates with the center panel. Flip the wing over
and mark the tip and TE from the back side.
Allow an extra 1/4" around these two edges.
Remove the skin and cut it to the marked size. If
necessary, use 220 grit sandpaper to
fine tune
the inboard edge for an exact fit.
Hint: The best balsa filler, is no balsa filler!
Take
you time fitting all sheeting and skins in place.
With a little bit of careful sanding you will be
rewarded with perfectly matched joints and a
lighter, stronger airframe.
NOTE: Make a "dry run" of steps 7
and 8 before actually performing
them with glue.
❏ ❏
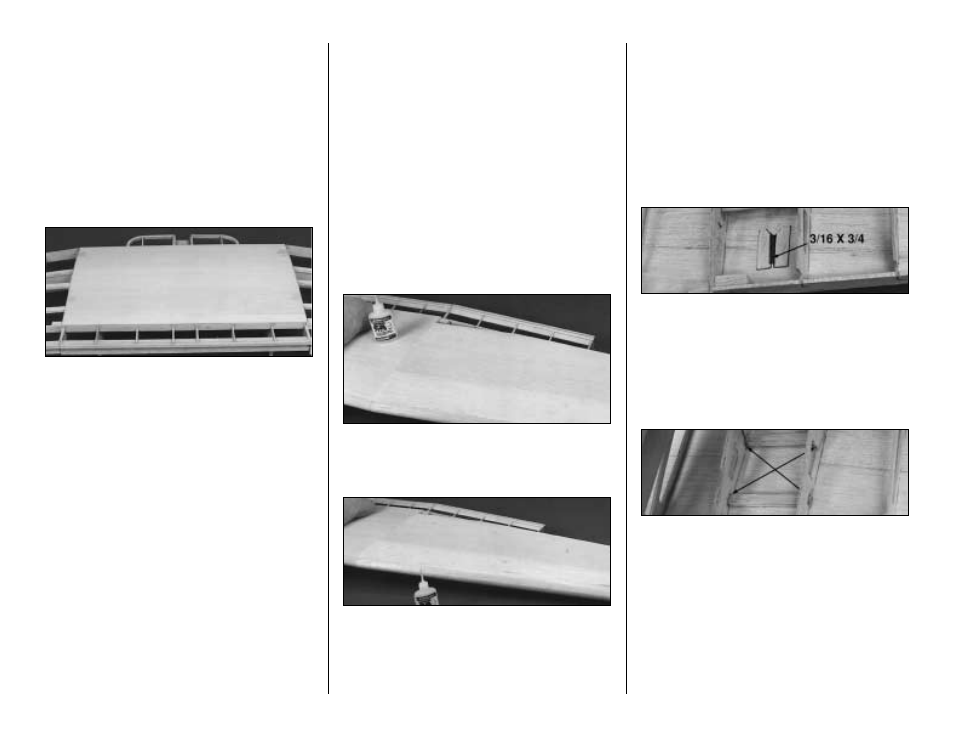
7. Position the skin up against the LE,
then glue it to the LE with Thin CA. Blot any
excess CA with a paper towel or tissue.
❏ ❏
8. Gently lift the skin and, working quickly,
apply a bead of Thick CA (also known as CA- )
to the structure that the skin will touch. Hold the
skin in position and press it into place.
Important: Before the CA sets, weight down
the center panel and the TE of W-15 to set the
washout angle
❏ ❏
9. Sheet any remaining openings in the
bottom wing skin such as around the TE and
non-operational flaps.
❏ ❏
10. Repeat steps 7, 8, and 9 for the other
outer wing panel.
❏ ❏
11. Turn the wing over and place it on
foam rubber or a soft surface to avoid premature
hangar rash. Use the plans to help you locate
the aileron pushrod exits. Cut a 3/16" x 3/4" exit
hole in each outboard panel. Reinforce the skin
around the openings (from the inside) with small
strips of 1/16" scrap balsa.
❏ ❏
12. Use a sharpened piece of wire to bore
small holes through the skin from the inside to
mark the location of the flap servo hatches and
retract rails. If you will be using fixed gear, mark
the location of the landing gear wire by twisting
a 3/16" drill bit through the top of the torque
block and out through the sheeting. Starting
from the hole you just made, cut away a 3/16"
wide strip of sheeting above the groove in the
landing gear block.
21