Top Flite TOPA0130 User Manual
Page 20
❏ ❏
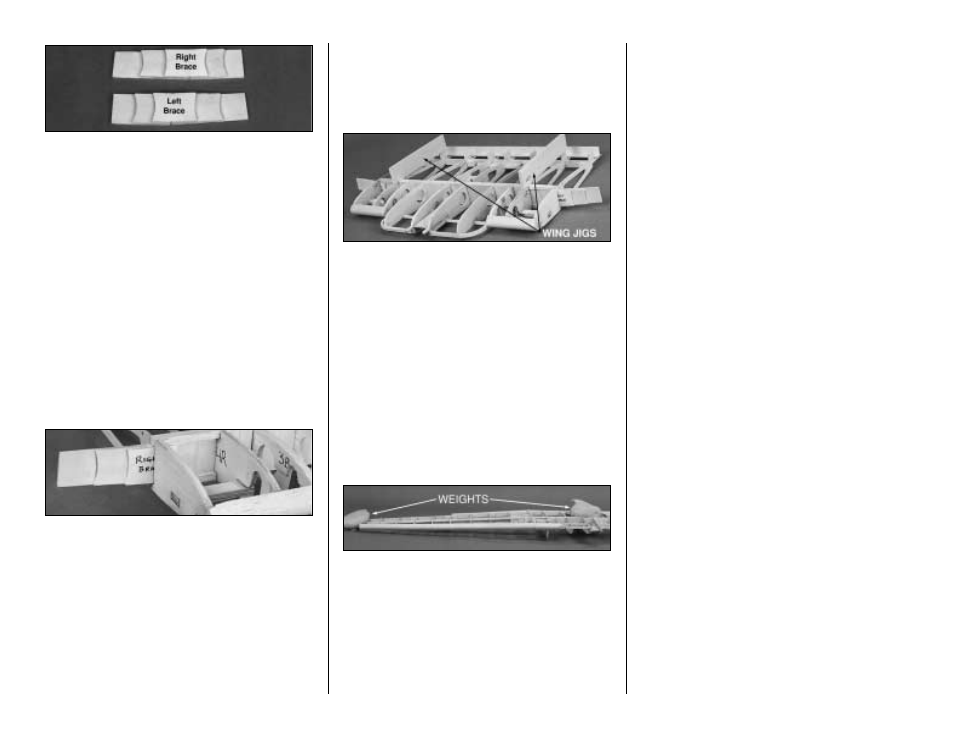
2. Without gluing, stack the three Braces
together and compare the assembly with the
drawing. Repeat this process with the second
set of braces,
but this time flip the pieces over
when you stack them. You should now have a
right hand and a left hand set of braces, as
shown in the photo.
Tracing around the edges of
the two shorter parts will help alignment when
you glue them together.
❏ ❏
3. When satisfied that the braces are
accurate, use 6 minute epoxy to glue the parts
together.
JOIN THE WING
❏ ❏
1. Carefully remove a 3/8" wide strip of
balsa between the spars on both W-5 and W-6
ribs. This will allow the Polyhedral Braces to be
inserted and glued between the spars.
❏ ❏
2. Test fit the Polyhedral braces into the
center and outboard wing panels, sanding if
necessary for a good fit. The wing panels should
mate evenly along the joint without any
unnecessary twisting or bending to line things up.
If you have to force the panels to fit, locate the
problem and fix it before proceeding. Any
twists will become a permanent part of the
structure after the panels are joined and will be
difficult to correct.
❏ ❏
3. Use only a spot of CA to glue the two
1/4" x 1-7/16 " x 7-1/2 " balsa Wing Jig Blocks
to the W-4 ribs. Glue the blocks to the W-4 jig
tabs and the top of the spar.
Now for the hard part, cleaning a space on your
work bench large enough to spread out and join
the wing.
IMPORTANT: Check your work surface with a
metal straightedge to make sure that it's
perfectly flat before proceeding. Make a "dry
run" of the following step before actually
performing it with glue.
❏ ❏
4. Place the Center panel on the Jig
Blocks in the middle of your work bench. Add
some weight to hold it in place (phone books or
small sandbags are handy for this). Prepare 1/2
ounce of 30 minute epoxy. Liberally apply the
epoxy to the W-6 Ribs and Polyhedral Braces.
Plug the Braces into the Outboard panels. Plug
the Outboard Wing Panels into the Center
section and align the Ribs for a flush fit.
Don't
worry about the exact alignment of the leading
edge. If you didn't glue the Leading Edges
exactly centered on the ribs they won't match.
After the wing is sheeted, the LE joints will be
blended with sandpaper. Once all the panels are
in position, clamp the ribs together and align the
Polyhedral Braces between the Spars as shown
on the top view of the plans. Put weights on the
two W-15 ribs to hold the jig tabs and Spars on
the work surface. Before the epoxy kicks off,
double check your work. Fill any gaps
between spars with 30 minute epoxy
SHEET THE BOTTOM OF THE
WING
Our suggested wing sheeting process allows
you to sheet the wing panels with one skin per
side. This technique is better than sheeting the
wing with individual sheets, and allows you to
pre-sand all of the seams that will be over
open structure.
All balsa sheeting will usually bend when it's cut
from the log since stresses are relieved. For the
best results, trim the edges of the wing sheeting
with a long metal straightedge and a sharp knife
before joining them.
NOTE: Do the following steps for
both the right and left wing panels.
❏
1. Sort through the remaining 1/16" x 3" x
30" balsa and pick out the 6 best sheets to be
used for the top surfaces of the outboard wing
panels. Pick out the 4 best 1/16" x 3" x 18"
sheets to use on the top of the center section.
❏
2. Lay waxed paper over a flat, smooth
work surface.
20