Reznor PDH Operation Manual PreevA User Manual
Page 37
Form O-PreevA, P/N 234661R8, Page 37
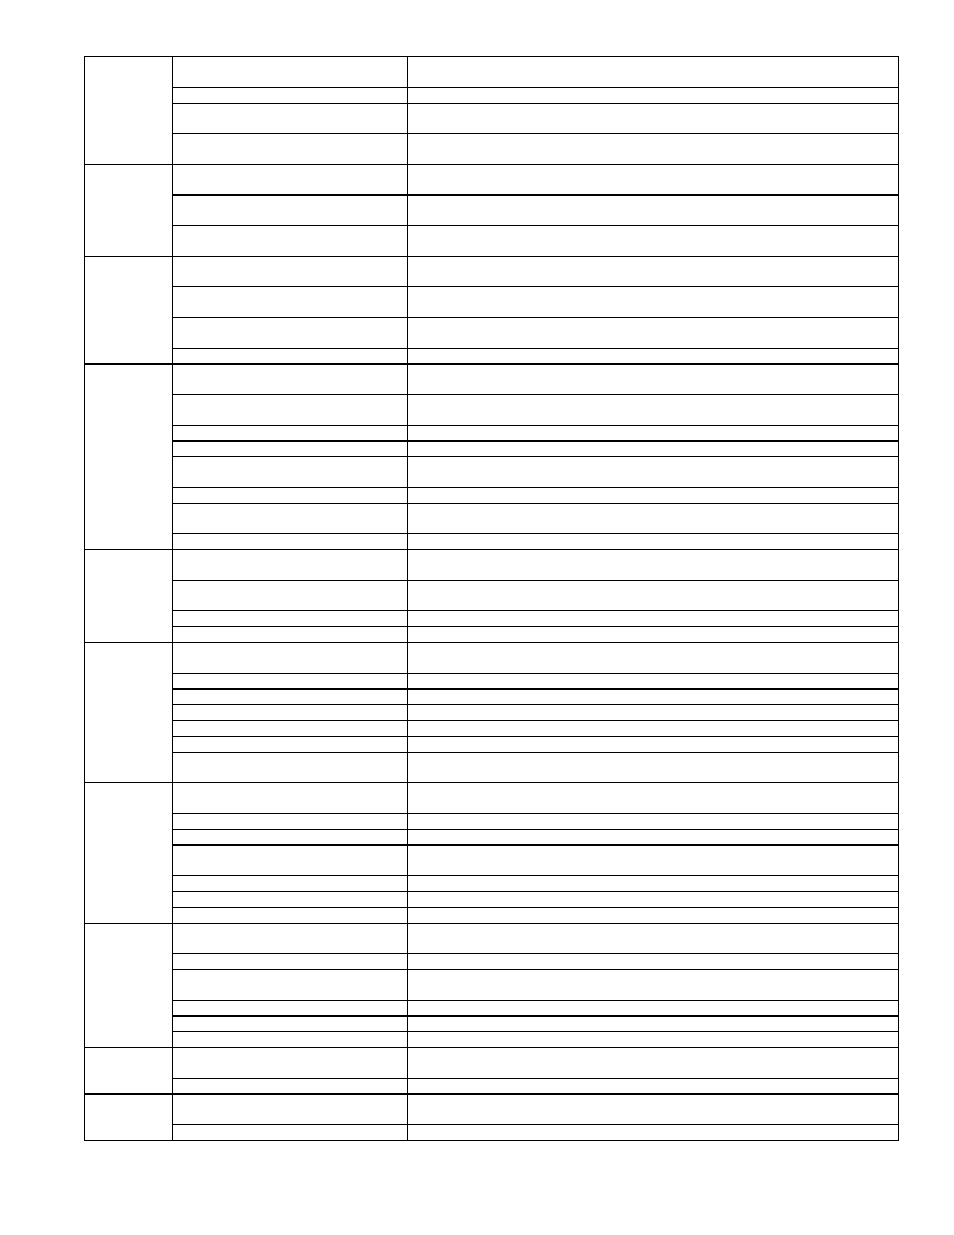
F. Noisy unit
operation.
1. Blower rotational noise.
1. Check blower, motor and drive for faulty adjustment or noisy bearings, loose parts,
and/or blower out of balance.
2. Air noise.
2. Check ductwork. Air velocity too high.
3. Chattering contactor.
3. Check for adequate control voltage, check for shorts or breaks, check thermostat,
check contact points.
4. Tubing rattle.
4. Dampen by taping or clamping, carefully bend tubing away from contact when
possible.
G. High
suction
pressure
1. Excessive load on evaporator coil.
1. Check superheat; see condensing unit manual or Paragraph 3.7.4, Step 11. Check
for high entering wet bulb temperature. Check for excessive air.
2. Compressor is unloaded.
2. Check head pressure. Check thermal expansion valve. If valve is not functioning
properly, check pressure drop across filter drier.
3. Expansion valve not secured to suction
line or defective.
3. Check the thermal expansion valve; ensure bulb is attached properly and insulated.
H. High
discharge
pressure.
1. Refrigerant overcharge.
1. Check subcooling; see condensing unit manual or Paragraph 3.7.4, Step 11. Adjust
refrigerant charge.
2. Thermal expansion valve setting.
2. Check superheat; see condensing unit manual or Paragraph 3.7.4, Step 11. Adjust
valve as needed.
3. Air inlet to condenser dirty or
obstructed.
3. Check for proper clearances and possible air recirculating.
4. Condenser fan motor defective.
4. Check condenser fan motor and capacitor.
I. Suction
pressure is too
low.
1. Refrigerant undercharge.
1. Check subcooling; see condensing unit manual or Paragraph 3.7.4, Step 11. Add
refrigerant as needed.
2. Thermal expansion valve setting.
2. Check superheat; see condensing unit manual or Paragraph 3.7.4, Step 11. Adjust
valve as needed.
3. Blower running backward.
3. Interchange any two wires from 3 phase disconnect.
4. Loose blower, pulley or belts.
4. Check drive pulley alignment, belt tension.
5. Defective or improperly adjusted
expansion valve.
5. Check superheat and adjust thermal expansion valve.
6. Dirty filter.
6. Check filter and evaporator coil.
7. Too little airflow or low entering air
temperature.
7. Check airflow and entering air wet bulb conditions.
8. Restriction in suction or liquid line.
8. Check refrigerant circuit for restriction.
J. Head
pressure too
low.
1. Insufficient refrigerant charge.
1. Check subcooling; see condensing unit manual or Paragraph 3.7.4, Step 11. Check
for leak. Repair; add refrigerant.
2. Defective or improperly adjusted
expansion valve.
2. Check superheat; see condensing unit manual or Paragraph 3.7.4, Step 11. Adjust
thermal expansion valve.
3. Low suction pressure.
3. See “I. Suction pressure too low” above.
4. Defective compressor.
4. See “G. High suction pressure” above.
K. Compressor
short cycles.
1. Improper refrigerant charge.
1. Check subcooling and superheat; see condensing unit manual or Paragraph 3.7.4,
Step 11.
.
2. Defective high or low pressure control. 2. Check high or low pressure switch.
3. Liquid floodback.
3. Possible tight bearings, see above.
4. Defective expansion valve.
4. Check superheat and thermal expansion valve.
5. Poor air distribution.
5. Check ductwork for recirculating.
6. High discharge pressure.
6. See “H. High discharge pressure” above.
7. Leaking discharge valves in
compressor.
7. See “G. High suction pressure” above.
L. Running
cycle is too
long or unit
operates
continuously.
1. Refrigeration undercharged.
1. Check subcooling; see condensing unit manual or Paragraph 3.7.4, Step 11. Add
refrigerant.
2. Dirty filter or evaporator coil.
2. Check filter, coil, and airflow.
3. Dirty or clogged condenser coil.
3. Check coil and airflow.
4. Air or other non-condensables in
system.
4. Check equalized high side pressure with equivalent outdoor temperature.
5. Defective compressor.
5. See “high suction pressure” above.
6. Restriction in suction and liquid line.
6. Check for restrictions in refrigerant circuit.
7. Control contacts stuck.
7. Check wiring.
M. Supply air
temperature is
too high.
1. Refrigerant undercharge or leak in
system.
1. Check subcooling; see condensing unit manual or Paragraph 3.7.4, Step 11. Check
for leaks.
2. Evaporator plugged with dirt or ice.
2. Check evaporator, airflow, and filter.
3. Improperly adjusted or defective
expansion valve.
3. Check superheat & adjust thermal expansion valve, check bulb.
4. Defective compressor.
4. Check compressor for proper operation.
5. High discharge pressure.
5. See “high discharge pressure” above.
6. Airflow is too high.
6. Check external static pressure.
N. Supply air
temperature is
too low.
1. Airflow is too low.
1. Check evaporator coil; check filters, check for closed dampers or grills, check drive
for loose parts, belts, or misalignment; check external static pressure.
2. Return air temperature too low.
2. Check entering air wet bulb conditions.
O. Liquid line
is too hot.
1. Refrigerant undercharge.
1. Check subcooling; see condensing unit manual or Paragraph 3.7.4, Step 11. Adjust
refrigerant.
2. High discharge pressure.
2. See H. above.