Pax2a d, Isplay, Oops – Red Lion PAX2A User Manual
Page 10: Code, Pax2a display loops
10
paX2a d
isplay
l
OOps
Pro
NO
Pro
1-INPUt
Pro
2-FUNCt
Pro
3-dISPLY
Pro
4-SCNdrY
Pro
5-totAL
Pro
6-SEtPNt
Pro
7-SErIAL
Pro
8-AnLOut
Pro
9-FACtrY
P
COdE
1-250
Pro
End
HIDDEN
PARAMETER
DISPLAY
LOOP
PARAMETER
DISPLAY
LOOP
P
P
P
P
P
MAIN DISPLAY LOOP
D
Exit
Programming
Alternate Full
Programming
entry path
Code 0
AND
PLOC Disabled
Code 1-250
OR
Any Code with
PLOC Enabled
* Pressing “D” at any time exits back to the Main Display Loop.
F1
F1
F1
F1
F1
F1
F1
F1
F1
F1
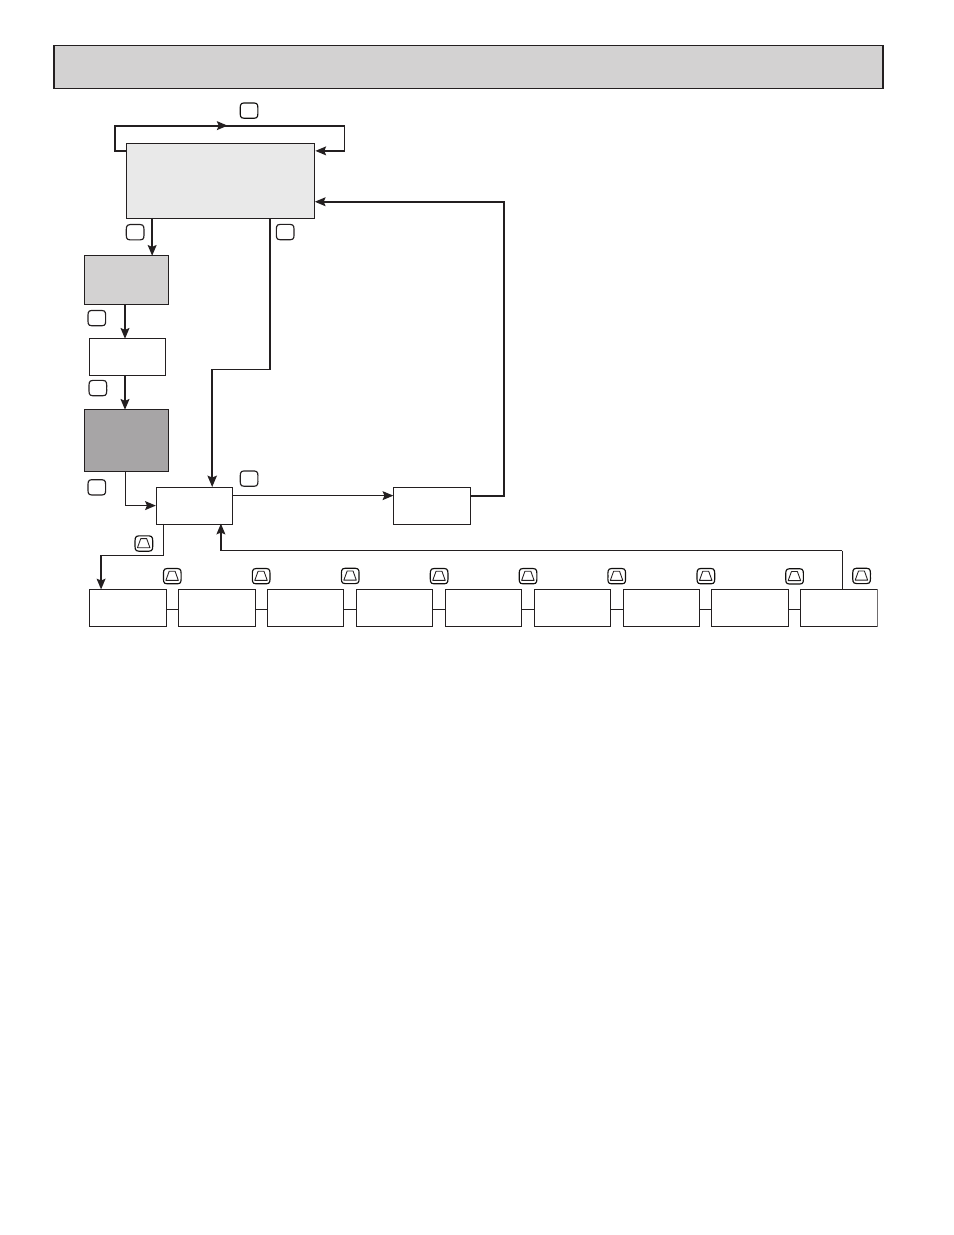
PAX2A DISPLAY LOOPS
The PAX2A offers three display loops to allow users quick access to needed
information. These display loops are available when the meter is in the normal
display mode. By pressing the
D key, the user can view parameters such as the
Total, Min, Max or the Input in the Main Display Loop. Display selections are
fully programmable and are viewed on the 9 digit line of the meter.
Pressing the
P key with no security code (COdE 0) will put the meter directly
into the programming mode. When a security code is programmed (Code
1-250), pressing the
P key will allow access to the Parameter Display Loop.
This loop is where the parameters like setpoint values are normally put for
general public access. Parameters in this loop can only be viewed/changed if
enabled in the meter programming. After all the parameters in the Parameter
Display Loop are viewed, an additional press of the
P key will bring up the
security code (COdE 0). Access the Hidden Parameter Display Loop by entering
the selected security code. In this loop displayed parameters can be changed.
Combining the two parameter loops provides an area for parameters that require
general access and/or protected or secure access depending on your application
needs.
During programming of the meter you will need to select if a value is to be
displayed or not. If the value is not required, select the lock mode (LOC). If you
decide to display the value, you will need to assign it to a loop;
D for the Main
Display Loop,
P for the Parameter Display Loop, and HidE for the Hidden
Display Loop. In the case of the parameters, such as the setpoint values you will
also need to decide if the value can only be read (rEd) or entered (ENt). The !
and @ key will increment or decrement the value when the edit mode is active.
After the change, press the
P key to save and move to the next value. Any values
placed in the Hidden Parameter Loop can be changed as they are protected by
the security code. While in the parameter display and hidden parameter loops,
pressing the
D key will return the meter to the main display.
There are selections in the programming that allow for the values to be reset.
When the
P key is pushed on a resettable display, the unit will display the value
mnemonic and “NO” (if Line 2 value was set for “d-ENt” in “3-dISPLY”).
Pressing the ! and @ keys will toggle between “NO’ and “YES”. Pressing the
P key with “YES” displayed will cause the reset action to be performed.
The
P, Parameter key is used to scroll among the programmed Line 2
parameter values when at the main display or to step through the parameter loop
and hidden parameter loop. It is used as the enter key when the meter is in the
programming mode.
Numerical Value Entry
If the parameter is programmed for enter (ENt), the ! and @ keys are used
to change the parameter values in any of the display loops.
The ! and @ keys will increment or decrement the parameter value. When
the arrow key is pressed and held, the value automatically scrolls. The longer the
arrow key is held the faster the value scrolls.
For large value changes, press and hold the ! or @ key. While holding that
key, momentarily press the
D key and the value scrolls by 1000’s as the arrow
key is held. Releasing the arrow key removes the 1000’s scroll feature. The
arrow keys can then be used to make small value changes as described above.