Low voltage cable installations, See figures 6, 7, and 8), Table 1 - spacer plates – Ransburg Evolver 303 Dual Purge Solvent Robotic Applicator A12374-XXX User Manual
Page 22
17
Evolver 303 Dual Purge Robotic Atomizers - Installation
Robot Spacer Plate
The robot spacer plate is included with the robot
manifold assembly to increase life of the tubing
bundle. The extra spacing it provides increases the
bend radius of the tubes and decreases the hose or
cable stress at the connector.
There is only one way the spacer plate may be as-
sembled to the mounting plate. The spacer plate has
an alignment pin that may only engage in one hole
position in the robot mount plate. This provides the
final position to top dead center of the robot.
Six (6) robot spacer plates shown in Table 1 are avail-
able for this product.
LOW VOLTAGE CABLE
INSTALLATIONS
(See Figures 6, 7, and 8)
A low voltage cable is provided to send power to
the high voltage cascade in the applicator as well
as sending important information during operation
back to the MicroPak controls. One piece of the cable
is a permanent length of approximately
72-inches (1.8 meters) from the robot plate end. The
connecting cable can be ordered in various lengths
depending on the distance required to reach from
the robot arm to the MicroPak controller. The ends of
the cables have a male and female quick disconnect
end. This provides for a quick and easy removal of
the cable at the robot plate if servicing or replace-
ment is required.
It is important that the quick disconnect fitting be
secured to a good ground source. The A12241-XX
cable is supplied with a ground cable which can be
secured to the bulkhead connector and the other
end to a known ground source. The cable can also
be grounded by attaching the bulkhead connector
to a grounded bulkhead plate. The bulkhead plate
can be no more than 1/8-inch (3.18mm) in thickness.
The bracket should be made as in Figure 7 to hold
the connector from turning. To mate the connec-
tors, align the raised key section of the cable on the
applicator end with the key groove of the cable that
goes to the MicroPak. Push the male end into the
mating connector until an audible click is heard. Tug
on cable to ensure that it is locked in place. To remove
or disconnect the cable, pull back on the male con-
nector shell and pull cable back at the same time. To
remove this section from the robot plate, remove the
applicator. Locate the set screw holding the flanged
plastic 9 pin connector. Loosen with a 3/32" hex key
wrench. Pull the cable out from the robot plate end.
Install new cable in reverse direction, align the 9 pin
connector with the alignment mark on the robot
plate face and tighten set screw. Torque 5-10 lbs•in
(0.56-1.13 Nm).
>
Cable connector shell must be electrically
grounded. Electrical noise or other interference
may result.
W A R N I N G
!
>
With the exception of fluid, dump, and
bearing air/paint trigger, all other pilot and
air supply lines should be bulkheaded and
their diameters increased one nominal size.
For example: atomization air should be in-
creased to an 1/2" ID (8mm) from bulkhead
plate to the volume booster.
NOTE
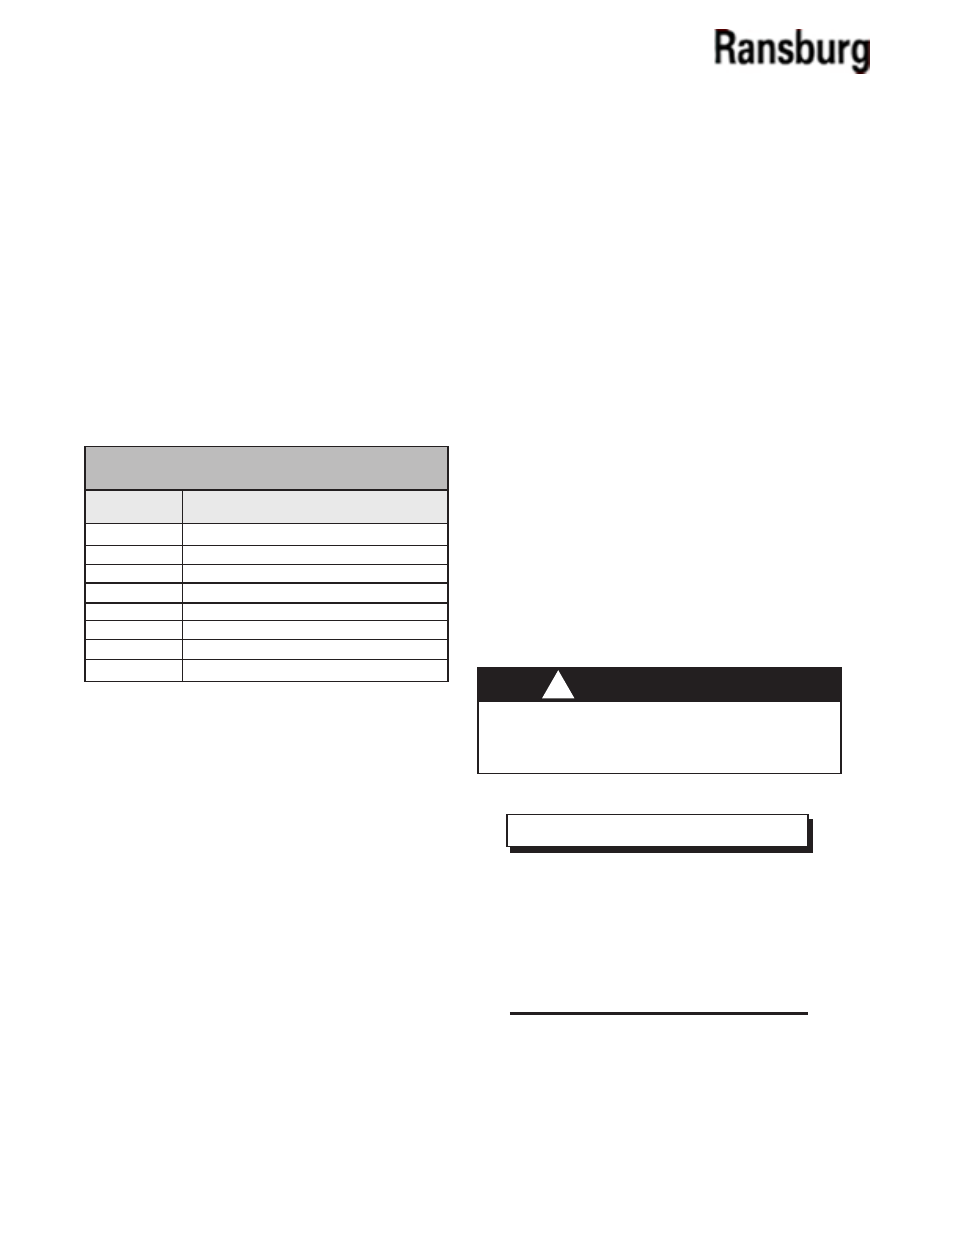
79107-00
ABB 5400, 5002 Robots
78983-00
Fanuc P155, 145 Robots
79131-00
Fanuc P200/P-250 Robots
A10847-00
Adapter (Kawasaki-KE610L)
A10848-00
Adapter (Motoman-PX2850)
A10849-00
Adapter (Motoman-PX2900)
A10851-00
Adapter (B & M LZ2000)
A12036-00
Adapter (ABB 5400 Enhanced Wrist)
Part #
Description
TABLE 1 - SPACER PLATES
AA-08-01.1