Multi-Contact MA301 User Manual
Page 6
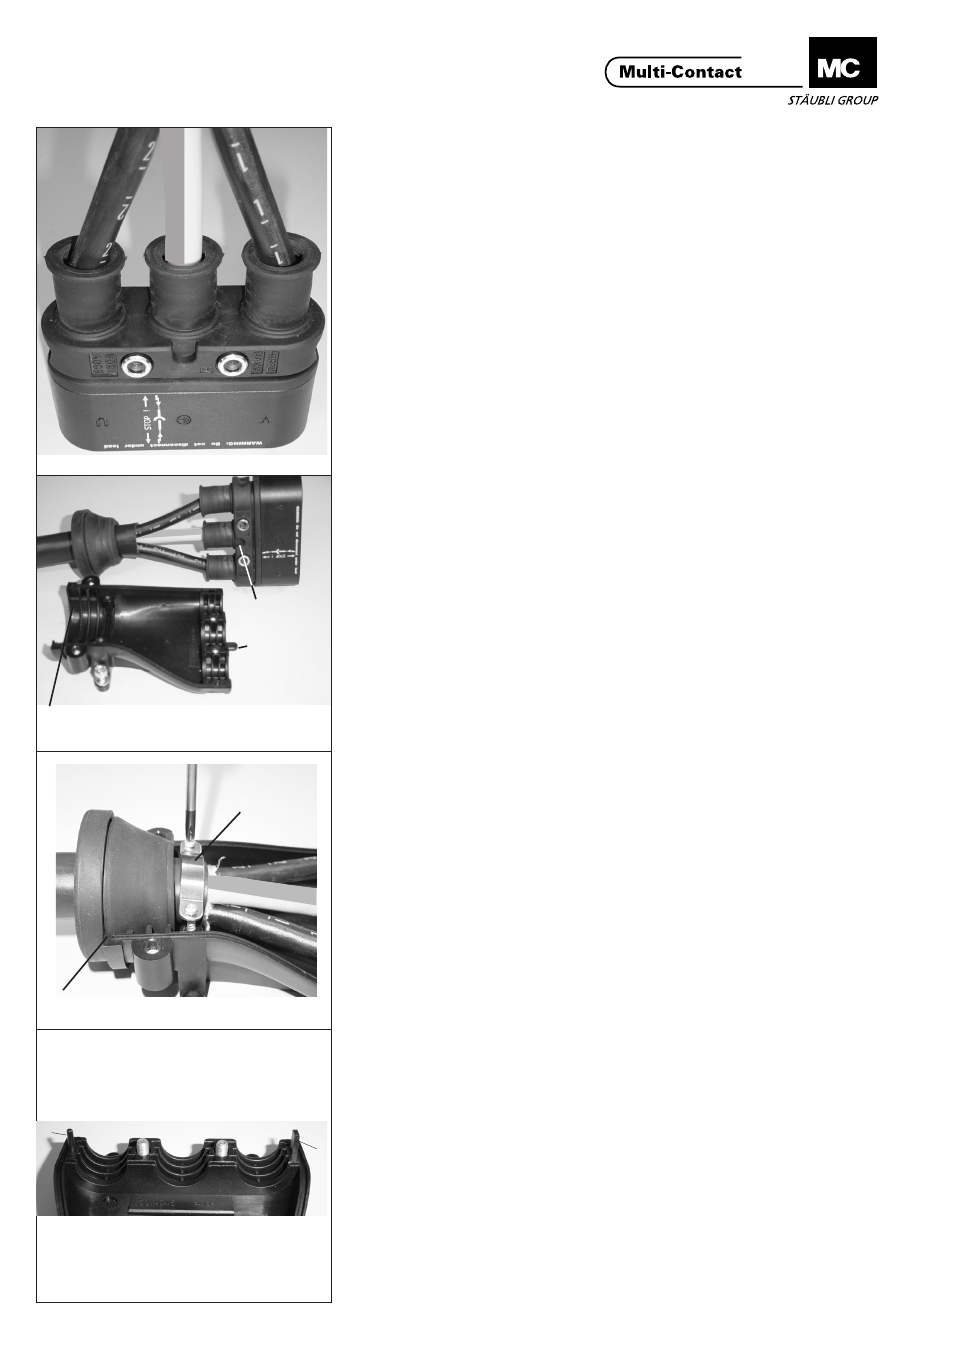
(ill.13)
Nach einlegen der Flip-
Dichtung und
Kontaktträger, RobiFix
Zugentlastungsschelle (Z)
auf Kabelmantel,
befestigen. Es ist darauf
zu achten, dass die
Schrauben abwechselnd
fest gedreht werden.
(Anzugsdrehmoment
1Nm).
ill.13
Montage RobiFix-ZEM
(ill.12)
Konfektionierte Leitung
mit RobiFix Kontaktträger
in RobiFix-ZEM-Unterteil
einlegen.
Die Kodierung (K) muss
dabei in die Führung (F)
passen.
Flip-Dichtung FD 50 auf
Leitung positionieren und
in den hintersten Steg (S)
einfädeln.
ill.12
F
K
ZEM-Unterteil /english / Partie inférieure ZEM
S
Hinweis:
(ill.14)
Bei der Montage auf ein
mögliches Verkanten der
beiden Einführungsstege
(E) mit RobiFix-ZEM-
Unterteil achten.
Richtige Montage der
Flip-Dichtung kontrollieren
gegebenenfalls von Hand,
durch einpressen,
korrigieren.
ill.14
(ill.13)
After inserting the lead-
through and contact
arrier, fix the RobiFis
strain relief (Z) on the
cable jacket.
Take care to tighten the
screws alternately
(tightening torque 1Nm).
Assembly with
RobiFix-ZEM
(ill.12)
Insert assembled lead
with RobiFix contact
carrier in RobiFix-ZEM
lower part.
The coding (K) must fit in
the guide (F)
Position lead-through
FD50 on the cable and fit
over the rearmost ridge
(S).
Note:
(ill.14)
When assembling, check
for possible tilting of the
two locating pins (E) in
relation to the RobiFix
ZEM lower part.
Check correct mounting
of the lead-through,
correct if necessary by
pressing in manually.
(ill.13)
Après insertion du joint
passe-câble et du boîtier,
fixer la bride (Z) sur la
gaine de câble. Veiller à
serrer les vis alternative-
ment. (Couple de serrage
1 Nm).
Montage RobiFix-ZEM
(ill.12)
Insérer le câble confec-
tionné avec boîtier
RobiFix dans la partie
inférieure RobiFix-ZEM.
Le codage (K) doit se
loger dans le guide (F).
Positionner le joint passe-
câble FD50 sur le câble et
l’enfiler dans la nervure la
plus reculée (S).
Note:
(ill.14)
Lors du montage, veiller à
éviter un possible coince-
ment des deux nervures
d’introduction (E) avec la
partie inférieure RobiFix-
ZEM.
Contrôler le montage
correct du joint passe-
câble, le cas échéant
corriger en pressant à la
main.
ill.11
Crimpen der Kontakte,
siehe Seite 11/24
(ill.11)
Crimpen und Montage
der Kontaktteile,
siehe Seite 11/24.
Crimping the contacts,
see page 11/24
(ill.11)
Crimping and assembly
of the contact parts, see
page 11/24.
Sertissage des contacts,
voir page 11/24
(ill.11)
Sertissage et montage
des contacts, voir page
11/24.
Z
S
6/28
www.multi-contact.com
Advanced Contact Technology
E
E