Directions to calibrate do sensor mg/l value – YSI 5200A User Manual
Page 41
YSI 5200A
81
YSI 5200A
80
6. Follow these instructions to create a 100% water-saturated air environment
for DO sensor calibration:
For the 5562 probe assembly - page 76:
•
Place approximately 3 mm (~ 1/8”) of water in the bottom of the
calibration/storage cup.
•
Next, engage only 1 or 2 threads of the calibration/storage cup to
ensure the DO sensor is vented to the atmosphere. Note: Make
sure that the DO sensor is not immersed in water and that there
are no water droplets on the membrane.
For the 5561 probe assembly - 35:
• Moisten the sponge in the calibration/storage chamber with a
small amount of clean water. Do not use too much water! The
idea is to create a 100% humid environment.
• With the sensor guard installed, place the sensor into the cali-
bration/storage chamber. Make sure that the DO sensor is not
immersed in water and that there are no water droplets on the
membrane.
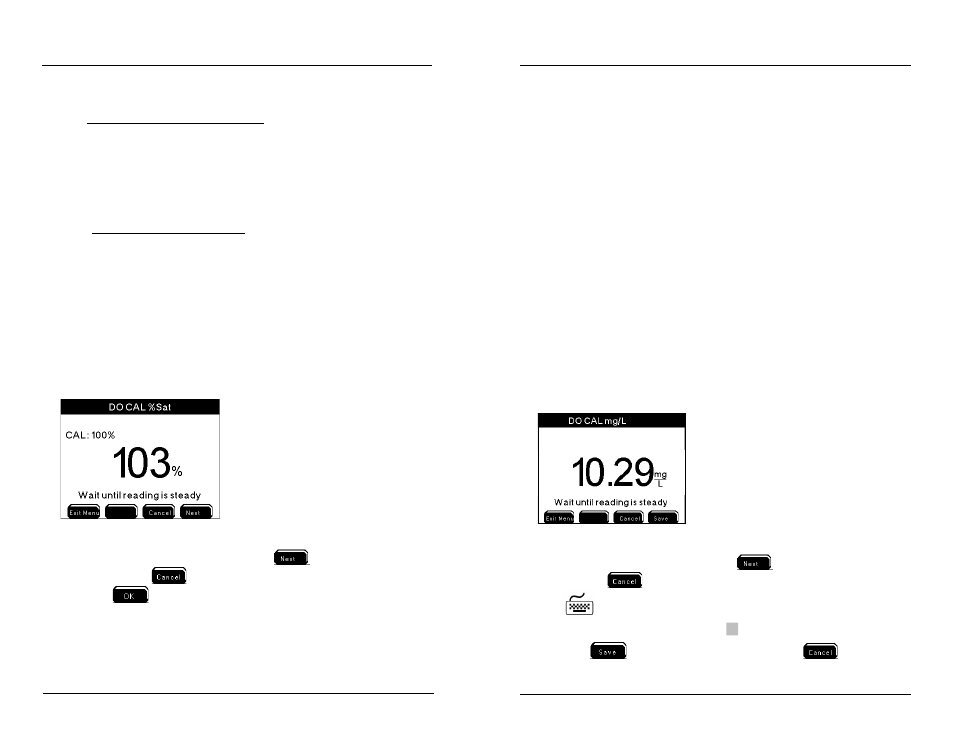
7. Enter DO calibration menu
Menus → Calibration→ DO→Sat
8. Allow approximately 10 minutes for the air in the calibration cup to become
completely water saturated and for the temperature to equilibrate.
9. After 10 minutes, verify that the DO reading shows no significant change
for approximately 30 seconds. Then, press
to complete the calibra-
tion OR press
to abort the calibration without saving.
10. Press
to save calibration and return to Run Screen.
11. Remove the calibration/storage cup from probe assembly.
12. Rinse sensor in tap or purified water and place probe assembly in monitor-
ing location or continue calibrating other sensors.
Configuring the 5200A
Directions to Calibrate DO Sensor mg/L Value
A large bucket can be used when calibrating the DO mg/L reading. Be sure to
provide sample flow across the membrane by physically stirring the probe or using
a stirrer such as a stir bar. The DO sensor requires a sample flow rate of at least 3
inches (~7.62 cm) per second if using the 2.0 mil PE membrane (blue) and at least
6 inches (~15.24 cm) per second if using the 2.0 mil Teflon membrane (gray).
1. Connect probe assembly - page 61.
2. Read Getting Ready to Calibrate - page 75.
3. Wait at least 10-15 minutes after the 5200A is powered on, or after the
DO sensor is serviced, before calibrating. (This allows enough time for
the DO sensor to stabilize).
4. If not using a conductivity sensor or if the conductivity sensor is disabled,
enter the salinity (ppt) value of the water to be monitored in DO Sensor
Setup menu. This will result in accurate DO mg/L readings.
Menus → Sensor Setup→ DO→ppt
5. Place the DO probe in a water sample with a known DO concentration
(the DO mg/L value can be determined from another recently calibrated
DO instrument or from a Winkler titration).
6. Enter the DO calibration menu.
Menus → Calibration→ DO→mg/L
7. Let probe stabilize for approximately one minute.
8. After one minute, verify that the DO value shows no significant change for
approximately 30 seconds. Then, press
to complete the calibration
OR press
to cancel the calibration without saving.
9.
Use the arrow keys to select numbers on the numeric keypad, enter
the known DO value in mg/L. Press
to confirm each number selection.
10. Press
to confirm the entered value OR press
to abort the
calibration without saving any changes.
Configuring the 5200A