3 troubleshooting, 0 maintenance and service (cont'd), 2 maintenance procedures (cont'd) – Reznor RPB Unit Installation Manual User Manual
Page 38: Troubleshooting the system, 4 clean the heat exchanger (cont'd)
Form I-RPB, P/N 131782 R11, Page 38
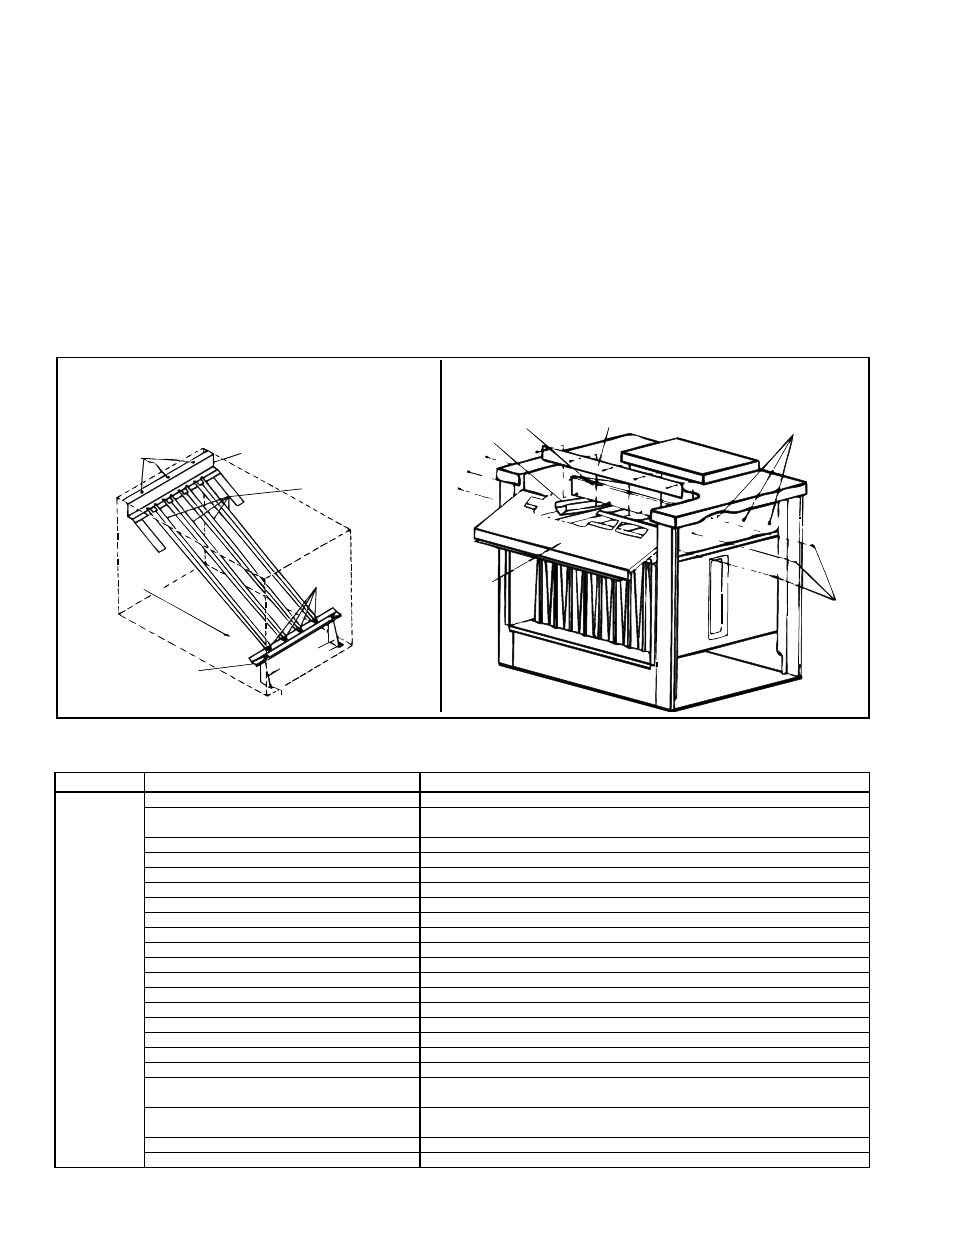
FIGURE 39 - Remove "V" Baffles to Clean Inner
Surface of Heat Exchanger Tubes
Loosen
Screws
Remove
Screws
Tube Baffle Holddown Plate
Rear Baffle
Front
Baffle
Tube
Baffle
Top Baffle
Support
Screws
B
Bottom
Baffle Support
Bracket
s
Air Discharge
Direction of
Airflow
Screw C
Right
Lef
t
Screws A
Screw C
Airflow
Baffles
FIGURE 38 - When cleaning outer heat
exchanger surface remove directional air
baffles. Remove Screws "A" and slide baffles
out. Clean and replace all baffles.
Troubleshooting the System
10.3 Troubleshooting
TROUBLE
PROBABLE CAUSE
REMEDY
Venter motor
will not start.
Pilot will not
light. (Venter
operating on
power-vented
models.)
1. No power to the furnace.
1. Turn on power, check supply fuses or circuit breaker.
2. No 24-volt power to venter relay.
2. Turn up thermostat, check control transformer output. Check for loose or improper
wire connections.
3. Venter relay defective.
3. Replace.
4. Defective motor or capacitor.
4. Replace defective part.
1. Manual valve not open.
1. Open manual valve.
2. Air in gas line.
2. Bleed gas line.
3. Dirt in pilot orifice.
3. Remove and clean with compressed air or solvent (do not ream).
4. Gas pressure too high or too low.
4. Adjust supply pressure. (See Paragraph 6.1).
5. Kinked pilot tubing.
5. Replace tubing.
6. Pilot valve does not open.
6. If 24 volt available at valve, replace valve.
7. No spark:
7.
a) Loose wire connections
a) Be certain all wires connections are solid.
b) Transformer failure.
b) Be certain 24 volts is available.
c) Incorrect spark gap.
c) Maintain spark gap at 7/64".
d) Spark cable shorted to ground.
d) Replace worn or grounded spark cable.
e) Spark electrode shorted to ground.
e) Replace pilot if ceramic spark electrode is cracked or grounded.
f) Drafts affecting pilot.
f) Make sure all panels are in place and tightly secured to prevent drafts at pilot.
g) Ignition control not grounded.
g) Make certain ignition control is grounded to furnace chassis.
h) Faulty ignition controller.
h) If 24 volt is available to ignition controller and all other causes have been
eliminated, replace controller.
8. Optional lockout device interrupting control circuit
by above causes.
8. Reset lockout by interrupting control at thermostat.
9. Faulty combustion air proving switch.
9. Replace combustion air proving switch.
10. Activated blocked vent switch (indoor system)
10. Correct venting problem. Reset switch.
10.2 Maintenance
Procedures
(cont'd)
10.0 Maintenance
and Service
(cont'd)
10.2.4 Clean the Heat Exchanger (cont'd)
NOTE: High efficiency
furnaces manufactured prior
to 3/95 have a "C" prefix in
their model designation.
All
furnaces manufactured
beginning 3/95 are designed
for high efficiency and
include the heat exchanger
"V" baffles.
Instructions to Remove Heat Exchanger "V" Baffles (FIGURES 38 & 39.)
1) Remove the ends of the flue gas collection box. On the control side of the
furnace, remove the venter assembly and the flue outlet duct to gain access to the
collection box end.
2)
Sizes 125-300 -- Remove one of the tube baffle retaining angles on each inside
wall of the collection box. Each tube baffle angle has one screw.
Size 400 -- Remove the inner baffle from the flue collection box. On the control
side, align the inner baffle with the slot in the collection box edge. Pull the inner
baffle until it clears the heat exchanger. Remove the screw at each end and slide
the flue diverter out of the furnace.
3) Pull the "V" baffles out of the heat exchanger.
Clean the inner surfaces of the heat exchanger from beneath using the brush to "scrub"
the tube walls to remove any accumulated dust, rust and/or soot. Clean the "V" tubes
and re-assemble the heat exchanger and the furnace.
Check the furnace for proper
operation.