0 dimensions and clearances -7, 1 dimensions, 0 dimensions and clearances – Reznor UEAS Unit Installation Manual User Manual
Page 6: Figure 2 - model ueas dimensions
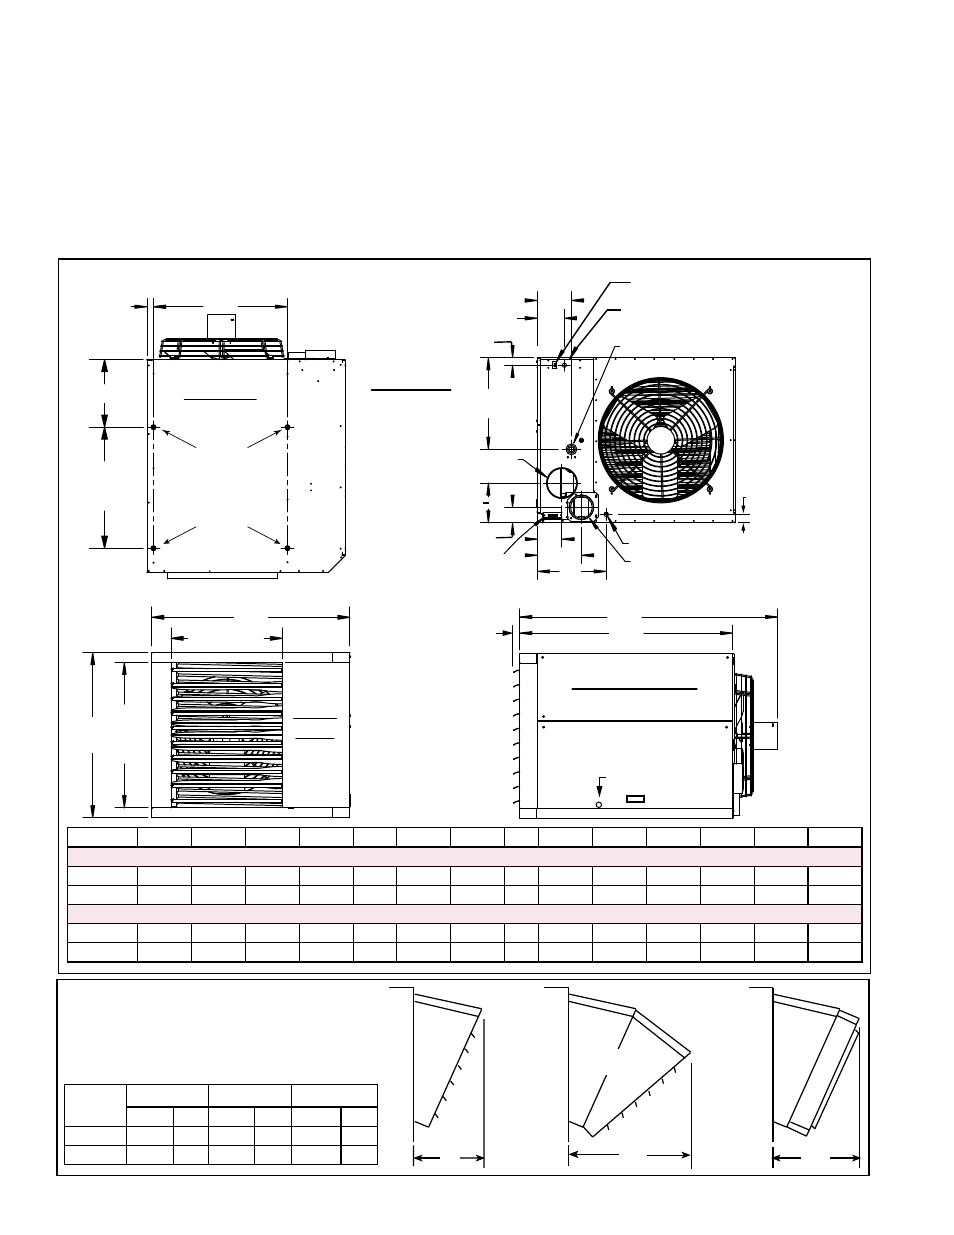
4.1 Dimensions
4.0 Dimensions and
Clearances
FIGURE 2 - Model UEAS Dimensions
Unit with
25-65°
downturn
nozzle with
horizontal
louvers
Unit with
50-90°
downturn
nozzle with
horizontal
louvers
Unit with
25-65°
downturn
nozzle with
horizontal
and vertical
louvers
Option
CD2
Option
CD3
Option
CD4
T
T
T
FIGURE 3 - Dimension
“T” With Optional
Downturn Nozzle
Top View
Rear View
Front
View
Right Side View
A
B
E
F
G
H
J
K
M
N
R
P
C
25”
(635mm)
5-5/8” (143mm)
1-9/16” (40mm)
Condensate Drain
4” Vent Connection
Line Voltage Entrance
(connects in sealed electrical box)
6” Combustion
Air Connection
Disconnect Switch
Thermostat
Connection
8-1/4” (210mm)
3-1/4” (83mm)
1-1/4” (32mm)
Four
Suspension
Points
(3/8-16 Female
Thread)
23” (584)
LED Viewport
External Gas Connection
S
Size
A
B
C
E
F
G
H
J
K
M
N
P
R
S
Dimensions - inches (±1/8 inch)
130, 180
20-1/8 39-3/16 16-1/16 11-15/16 2-3/8 25-11/16 50-1/2
42
13-7/16 8-5/16
4-5/16
5-1/16
6-5/16
1-3/4
260, 310
34-1/8 40-15/16 30-1/16 13-15/16 1-3/8 27-11/16 53-5/16 44 14-7/32 9-3/32
5-1/16 18-15/16 7-3/4
1-3/8
Dimensions - mm (±3 mm)
130, 180
511
995
408
303
60
652
1283
1067
341
211
110
129
160
44
260, 310
867
1039
764
354
35
703
1354
1118
361
231
129
481
197
35
"T" for
Size
w/Opt CD2 w/Opt CD3 w/Opt CD4
inches mm inches mm inches mm
130, 180 11-1/2 292 19-7/8 505 14-1/2 368
260, 310 18-1/2 470
32
813 21-1/2 546
3.0 Receiving,
Uncrating, and
Preparing for
Installation
(cont’d)
If the installation includes optional vertical louvers, downturn nozzle, and/or a
hanger kit, install these options before the heater is suspended. Instructions are in
this form or in the option package; option packages are shipped separately.
Other shipped-separate items could include a thermostat bracket kit, a thermostat,
and/or a thermostat guard. Be sure all options ordered are at the installation site.
IMPORTANT: Shipping brackets are attached with cabinet screws. When
removing shipping brackets, re-insert ALL screws into the cabinet.
Form I-UEAS, Page 6