Baseline Systems BaseStation 6000 User Manual
Page 32
BaseStation 6000 Site Controller Manual
24 |
P a g e
To perform the manual calibration, saturate the soil around the sensor by pouring approximately two gallons of water directly
over the spot where the sensor is buried. Over the next several hours, the water will spread out through capillary movement. As
a rule, it is best to wait 24 hours to get an accurate field capacity reading. Test the biSensor to get the moisture percentage
reading, and then set the upper moisture level (upper threshold) at or slightly below this moisture reading. Refer to Testing
Sensors on page 100.
The most common method for manually calibrating a sensor for the lower moisture level (lower threshold) is to let the
landscape dry out to the point where watering is desired and then test the biSensor again to get the moisture percentage
reading and use that reading as the lower moisture level (lower threshold).
For more information, refer to Adjusting Programming with biSensors on page 41, and refer to the Graphs section on page 92
for information about reading and interpreting the soil moisture graphs. When the graph displays, you have many different
tools for changing how the graph looks. Refer to Adjusting the Data View on a Graph on page 93 for details.
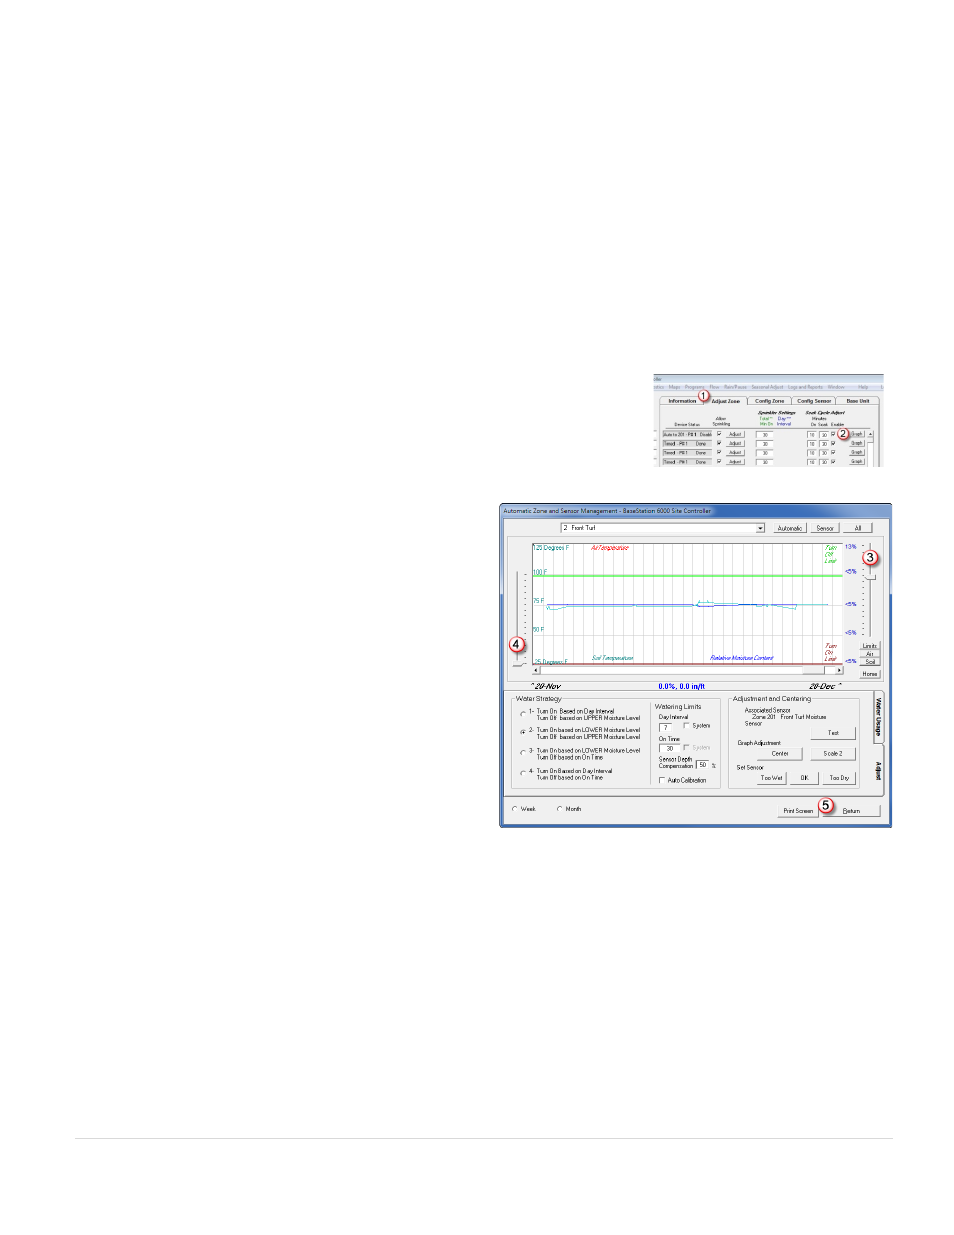
To set the upper and lower moisture levels for a biSensor that is associated with an auto zone
1. Click the Adjust Zone
(1)
tab on the Main Page.
2. Click the Graph
(2)
button for the auto zone that you want to set the moisture
levels for. The Automatic Zone and Sensor Management window opens.
Note: When you adjust the auto zone, the new settings will be applied to all zones
that are linked to it.
3. If you are using Water Strategy 1 or 2, use the slider
(3)
on
the right side of the graph to set the Upper Moisture Level
represented by the green line. The Upper Moisture Level
refers to the field capacity of the soil. Set the Upper
Moisture Level at or slightly below the biSensor reading
that you took after allowing the water to soak in around
the sensor for 24 hours.
4. If you are using Water Strategy 2 or 3, you can adjust the
Lower Moisture Level with the slider
(4)
on the left of the
graph. The Lower Moisture Level is represented by the red
line. This setting represents how dry you will let the soil
become before watering again.
5. Click Return
(5)
to close the window.
Continuous Calibration – The Auto Calibration option on the Automatic Zone and Sensor Management window enables the
controller to continuously measure the field capacity of the soil. When you enable auto calibration, the controller applies water
to the auto zone (the zone where the sensor is buried) during every run cycle until the response curve slows. After the
controller has measured field capacity, it is able to use this data to set an upper or lower threshold based on this reading. You
can then choose to use this threshold or reset it as needed.
If you have your thresholds precisely set, you can use continuous calibration to make minor adjustments that will improve plant
health. Keep the following points in mind:
WARNING! Continuous calibration uses a lot of water while attempting to determine field capacity especially if the sensor is
placed in a very dry area.
• If you enable continuous calibration when the soil moisture content is already high, the calibration will fail because the
system must be able to detect a change in soil moisture content.