System diagrams – Diode LED Solid Color Tape Light User Manual
Page 5
1.877.817.6028
www.DiodeLED.com
www.DiodeLED.com
INSTALLATION GUIDE
5 OF 6
SOLID COLOR LED TAPE LIGHT
®
IG082514-2.4
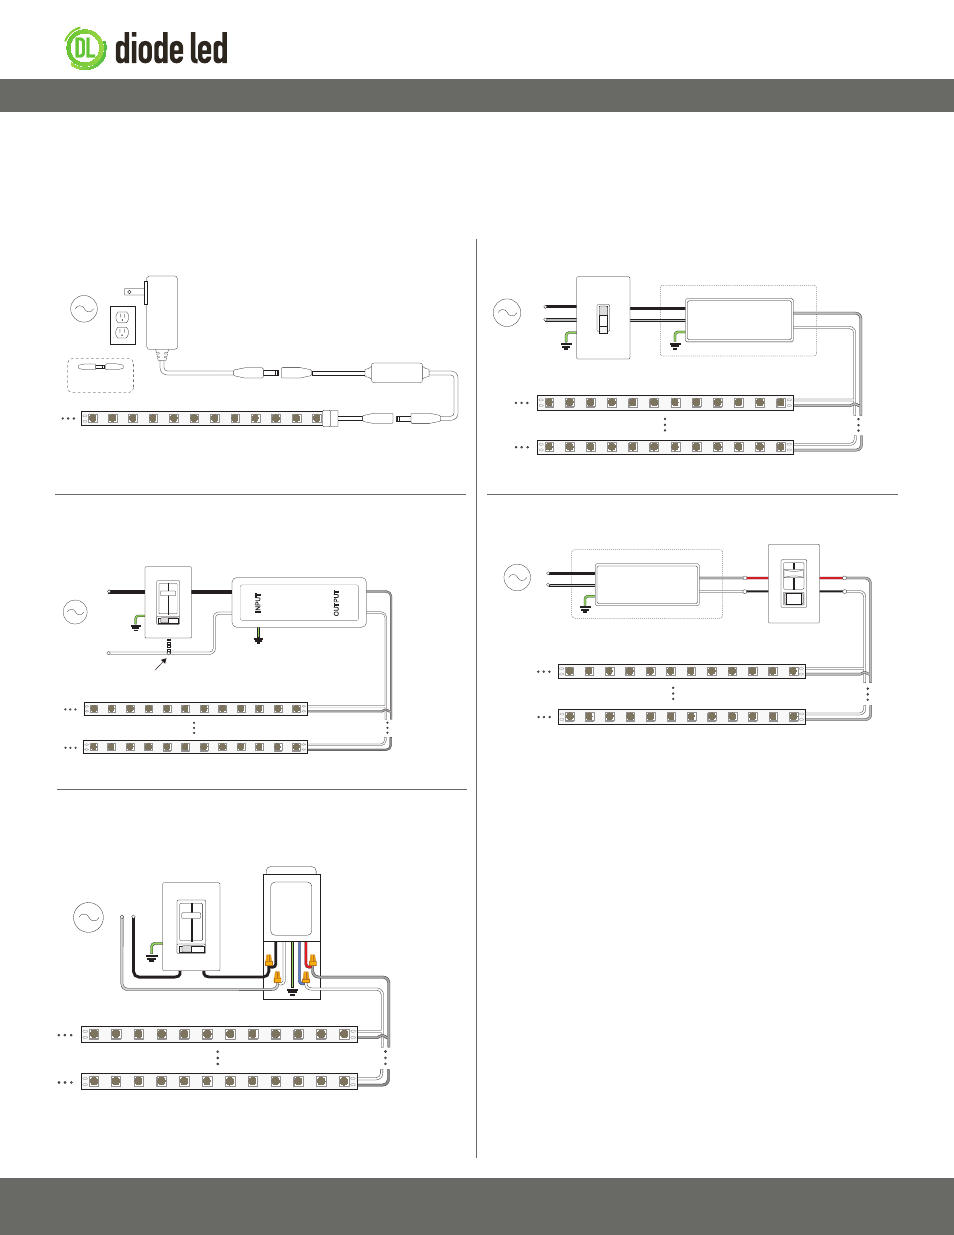
System Diagrams
The following diagrams are provided as example system designs. For information regarding larger systems or systems not pictured below, please see
our web page or contact technical support. Always review each component installation guide for detailed and up-to-date wiring instructions. Install in
accordance with NEC and local regulations.
AC Power
50/60Hz
Inline Accessory§
(Extensions, splitters, controls, etc.)
Class 2 Low Voltage
Plug-In Adapter (Driver)
Tape Light DC
Plug Connector§§
Insertion points for
DC Accessories
LED Tape Light / Fixture‡‡
G*
N
L
Input
Output
V+
V-
AC Power
50/60Hz
120VAC On/Off Switch
Class 2 Low Voltage Driver**
Installed in Junction Box‡
L
N
V+
V-
LED Tape Light / Fixture‡‡
Install applicable wire gauge / type
V+
V-
Traditional ON/OFF Switch System
Plug-in-Adapter System
AC Power
50/60Hz
Compatible Dimming Control
or On/Off Switch ^
LED Tape Light / Fixture‡‡
L
Ins
tall applic
able wire
gauge / type
OMNIDRIVE Dimmable Driver ^^
Some dimmers may require an
additional neutral wire connection.
N
N
GND*
N
L
V+
V−
V+
V−
V+
V−
AC Power
50/60Hz
120VAC Magnetic Low
Voltage Dimmer†
V+ (Red)
V- (Blue)
LED Tape Light / Fixture‡‡
L
N
N (White)
L (Black)
Magnetic
Dimmable Driver††
Install applicable wire gauge / type
V+
V-
V+
V-
GND (Green)
REIGN™ 12-24V Dimmer System
OMNIDRIVE™ Electronic Dimmable Driver System
Magnetic Dimmable Driver System
AC Power
50/60Hz
L
N
V- (Black)
Input
Output
V+ (Red)
G*
N
L
Input
Output
V+
V-
Class 2 Low Voltage Driver***
Installed in Junction Box‡
Install applicable wire gauge / type
V+
V-
LED Tape Light / Fixture‡‡
REIGN 12-24V Dimmer****
V+
V-
* Driver may not require a fault ground connection. Refer to driver specifications for additional
information.
** Install a compatible Class 2 constant voltage driver. Refer to each driver specification sheet for
full power ratings & load deratings.
*** Install a Class 2 constant voltage driver compatible with a low voltage PWM controller/
dimmer switch. Refer to each driver specification sheet for full power ratings & load deratings.
**** Determine the number of low voltage outputs of the driver when installing multiple PWM
controllers/dimmer switches. No more than one PWM controller/dimmer switch can be attached
to a single output of the driver.
^ Install a compatible dimming control or switch. See the ‘Electronic Dimmable Driver / Dimmer
Compatibility List’ for compatible dimming controls. See the dimming control manufacturer
installation guide for complete wiring instructions.
^^ Ensure to load the driver at least 60% the labeled load for proper dimming performance
(required for dimmable installations only).
† Install a compatible magnetic low voltage dimmer switch. See the MFG installation guide for
complete wiring instructions.
†† Dimmable drivers may require a compatible magnetic low voltage dimmer switch to supply
the driver and fixture with appropriate input voltage. Do not test or install directly connected to
an AC power source or to an On/Off switch. Refer to each driver specification sheet for full power
ratings & load deratings. See spec sheet for potential updated information. See dimmer switch
manufacturer specifications for minimum load recommendations.
‡ Refer to driver or controller specifications for a compatible junction box.
‡‡ See fixture specifications for maximum series run limits.
§ See in-line accessories specifications for maximum amperage ratings.
§§ See fixture accessories for a compatible adapter connector.