Diode LED Wall Mount RGB Color Controller User Manual
Warning, Safety & warnings, Installation quick specs
IG051514-1.0
1.877.817.6028
www.DiodeLED.com
INSTALLATION GUIDE
®
www.DiodeLED.com
1 OF 3
RGB WALL MOUNT COLOR CONTROLLER
• Install in accordance with the National Electric Code, and local
regulations.
• This product is intended to be installed and serviced by a qualified,
licensed electrician.
• Do not connect directly to high voltage 120V~277V power. Install with
a compatible Class 2 constant voltage LED driver (power supply).
• Only install compatible LED drivers and fixtures. Contact technical
support or visit the product page for compatible products.
• This product is rated for indoor installation and is not protected against
moisture.
• Proper heat dissipation will prolong the working lifespan of this product.
Install in a well-ventilated area free from explosive gases and vapors.
• Ensure applicable wire is installed between driver, fixture, and any
controls in between. When choosing wire, factor in voltage drop,
amperage rating, and type (in-wall rated, wet location rated, etc.).
Inadequate wire installation could overhead wires, and cause a fire.
• Do not modify or disassemble this product beyond instructions or the
warranty will be void.
Safety & Warnings
Prior to installation, verify all components are a compatible system. Configure and pre-test your LED system prior to permanent installation to ensure all
components are operating correctly. Install in accordance with the NEC and local regulations.
Installation
Quick Specs
Ambient Temperature †
-4°
~ 122°F (-20° ~ 50°C)
Transmitting Distance
130 ft.
Control Type
Pulse Width Modulation (PWM).
3-channel RGB fixtures.
Input / Output Voltage
12-24VDC constant voltage
Max Current Load
3A x 3CH Max 9A
Max Output Power
108W/216W (12V/24V)
Environment
Indoor / dry location
† Do not install product in an environment outside the listed ambient
temperature.
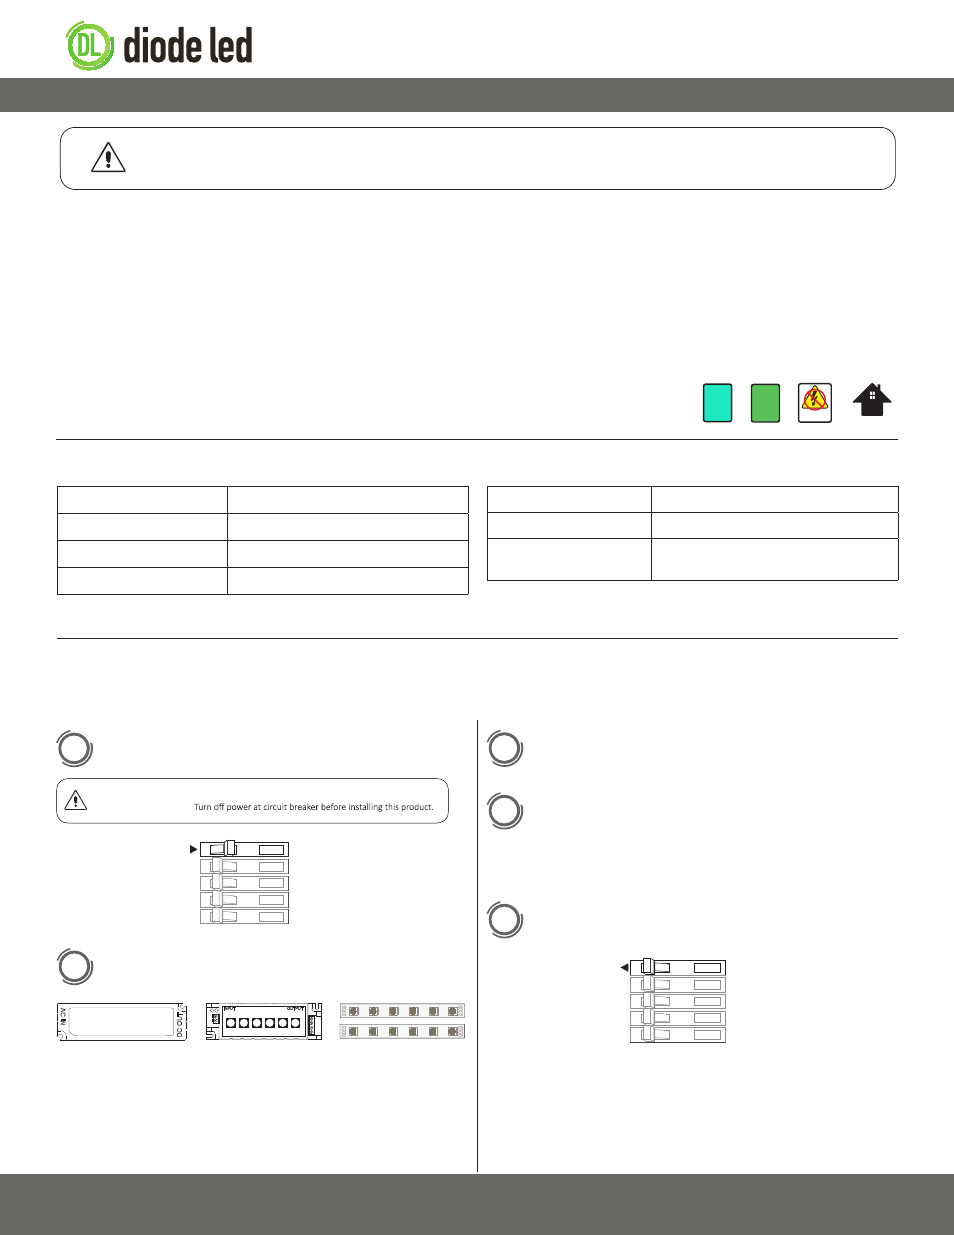
Turn OFF High Voltage AC Power at the main breaker.
Determine Locations to Install 3 Main Components.
Refer to the ‘System Diagrams.’
Mount RGB Receiver to Surface. See ‘Wiring Connections’, use
applicable screws.
Attach Lighting Load and Driver. Only use copper wiring.
Reference ‘Wiring Connections’ located further in guide for
visual. Use a mini flathead screwdriver for attaching wires to
terminal ports. Terminals fit up to 12AWG solid-core copper wire.
Verify a compatible constant voltage driver is installed.
Install Additional Components, Verify Connections, and Turn
Main Power ON at Breaker.
1
ON
OFF
OFF
OFF
ON
ON
OFF
OFF
ON
ON
2
1) Driver
2) RGB Color
Controller
3) Fixture
Ensure applicable wire is installed between driver, fixture, and any
controls in between. When choosing wire, factor in voltage drop,
amperage rating, and type (in-wall rated, wet location rated, etc.).
3
4
5
ON
OFF
OFF
OFF
ON
ON
OFF
OFF
ON
ON
If system remains unresponsive or is working improperly, turn OFF
main power at breaker and verify all connections. Review the ‘Wiring
Connections.’
DO NOT CONNECT DIRECTLY TO HIGH VOLTAGE POWER!
Read all warnings and installation instructions thoroughly.
WARNING
WARNING
Shock Hazard. May result in serious injury or death.
DO NOT CONNECT
TO HIGH VOLTAGE
Dry Location Only
12V
DC
24V
DC