Cable routing and conduit access, Access holes for mounting bolts or screws – ETC SmartPack CE Wall Mount User Manual
Page 9
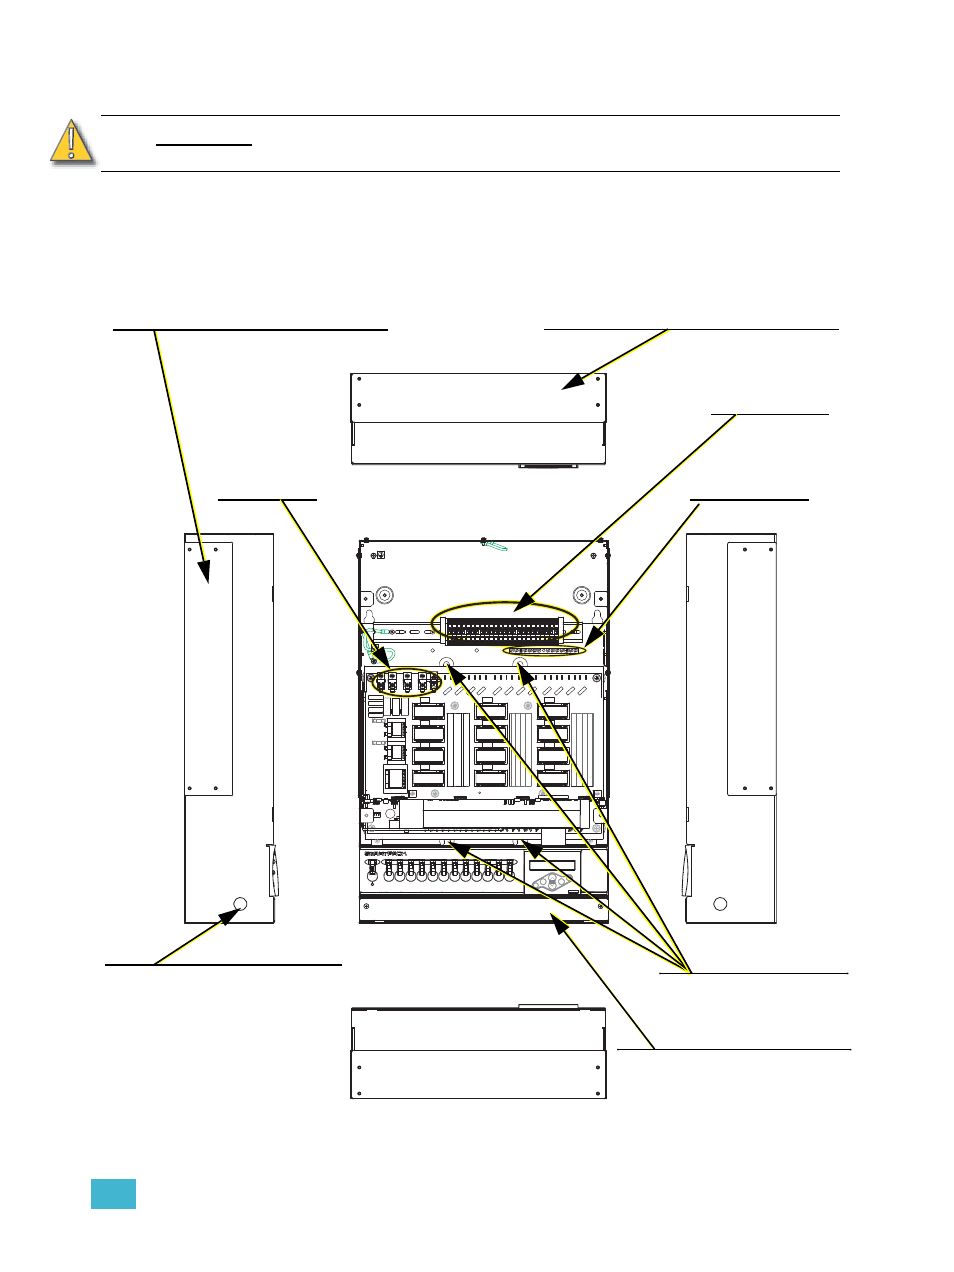
Prepare for Installation
7
Cable Routing and Conduit Access
C A U T I O N :
In order to maintain safety, proper air flow and cooling, do not leave any panels
removed unless facing an adjoined pack.
1 N
1 L1
2 N
2 L1
3 N
3 L1
4 N
4 L1
5 N
5 L2
6 N
6 L2
1 L
7 N
7 L2
8 N
8 L2
9 N
9 L3
10 N
10 L3
11 N
11 L3
12 N
12 L3
2 L
3 L
4 L
5 L
6 L
7 L
8 L
9 L
10 L
11 L
12 L
Rear
Rear
Rear
Rear
Removable plates on top and bottom.
Remove appropriate plate to punch
conduit access as needed for AC Input
and load wiring. Remove plate
permanently if SmartPack is mounted
below another SmartPack or SmartSwitch.
Removable plates on either side.
Remove appropriate plate to punch
conduit access as needed for AC Input
and load wiring. Remove plate
permanently if SmartPack is mounted
to the side of another SmartPack.
Top
Bottom
Righ
t Sid
e
Lef
t Side
Load Terminals
Access Holes for
mounting bolts or screws.
Earth/Ground Bus
AC Input Lugs
Knockouts in the lower side
panels accommodate conduit
or bushes for low voltage
control wiring to the
I/O compartment.
I/O Compartment - all low-
voltage (control terminations
conveniently located in the lower
panel.
- Unison Mosaic Rack Mount Kit and Power Supply Kit (2 pages)
- Unison Mosaic Show Control (48 pages)
- DIN Rail Enclosure (1 page)
- Unison Mosaic Tessera Rack Mount (2 pages)
- Unison Ridethru Option Kit (3 pages)
- Unison BatteryPack Option Kit (4 pages)
- Unison ERn Wall-mount Control Enclosure (44 pages)
- Unison ERn Rack Power Supply (1 page)
- Unison Paradigm Station Power Module (SPM) (1 page)
- Unison Paradigm Repeater Module (4 pages)
- Unison Paradigm Repeater Rack Mount (3 pages)
- Unison Paradigm Repeater Wall Mount (4 pages)
- Unison ERn Rack-mount Control Enclosure (36 pages)
- Echo Wall Mount Station Power Supply (3 pages)
- Unison DRd Dimming Rack Enclosure (68 pages)
- Echo DRd Network Termination Kit (2 pages)
- Unison DRd Right IO Card Upgrade Kit (4 pages)
- Unison DRd Semi-Recessed Installation Kit (8 pages)
- Unison Auxiliary Enclosure Series (24 pages)
- Unison DRd with Paradigm Control Termination Kit (2 pages)
- Unison Fluorescent Option Kit (2 pages)
- Unison DRd DALI Option Kit (2 pages)
- Unison Paradigm Virtual Touchscreen (8 pages)
- Unison Paradigm Central Control Server BACnet Interface Reference Guide (40 pages)
- Unison Paradigm Central Control Server Setup Guide (4 pages)
- Unison Paradigm ACP Configuration Manual v2.1.2 (100 pages)
- Unison Paradigm Handheld Docking Station (3 pages)
- Unison Paradigm Wireless Access Station (4 pages)
- Unison Paradigm Handheld Touchscreen and Wireless Accessories (44 pages)
- Unison Paradigm Touchscreen (24 pages)
- Unison Paradigm 18-inch Touchscreen Rack Mount Kit (2 pages)
- Unison Paradigm 18-inch Touchscreen Wall Mount Kit (4 pages)
- Unison Paradigm 18-inch Touchscreen Setup and Connect Guide (12 pages)
- Unison Paradigm Portable Touchscreen (2 pages)
- Unison Paradigm Rack Mount Touchscreen (4 pages)
- Unison Paradigm Touchscreen with Locking Cover (4 pages)
- Unison Paradigm Wall Mount Touchscreen (4 pages)
- Echo Architectural Control Processor (ACP) v1.0.0 (88 pages)
- EchoConnect Cat5 Termination Box (2 pages)
- EchoConnect Cat5 Termination Tray (2 pages)
- EchoConnect Cat5 Station Termination Kit (1 page)
- Echo Station Power Module (1 page)
- Echo Lockout Station (6 pages)
- Echo Inspire Station (8 pages)
- Matrix MkII Rack (32 pages)