Käytön tiivistelmä, Measurement – Nikon Laser User Manual
Page 97
Ru
Se
Nl
Dk
Pl
Hu
Cz
Fi
No
En
De
Fr
Es
It
Ro
192
Ru
Se
Nl
Dk
Pl
Hu
Cz
Fi
No
En
De
Fr
Es
It
Ro
193
Käytön tiivistelmä
Measurement
1. Press the POWER button for power-on.
(Power turns off 8 seconds after the last
operation.)
Immediately after power-on.
(Initializing)
Stand-by.
3. Press POWER button once to start single measurement.
Measuring.
4. After measurement, “distance” or “fail to measure” indicator are displayed for 8 seconds, then power turns off. If you press the POWER
button during power-on (while the internal display is lit), another single measurement starts.
Failure to measure or
unable to measure distance.
Displays the measured
figure. (Target 1)
Displays the measured
figure. (Target 2)
3. Keep pressing POWER button to start continuous measurement up to 20 seconds. The internal display shows “distance” and
“fail to measure” indicator alternately.
Note: Laser irradiaton mark is blinking during the measurement.
Note: If you stop pressing the button, the continuous measuremen stops
Target focusing.
2. Aim at the target
.
Position the target at the center of the reticle
[Single measurement]
Failure to measure or
unable to measure distance.
Upward measurement.
Downward measurement.
Displays the measured figure.
[Continuous measurement]
4. After continuous measurement, the measure results are displayed for 8 seconds, then power turns off. If you press the POWER
button during power-on (while the internal display is lit), another measrement starts.
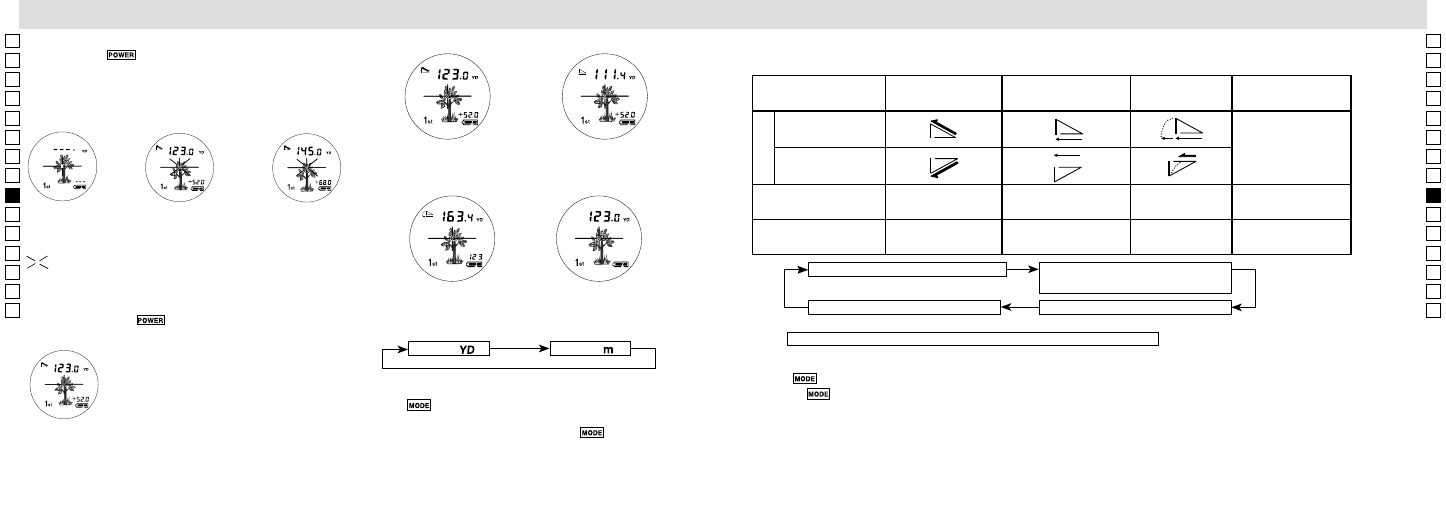
3. Paina jatkuvasti
-painiketta aloittaaksesi jatkuvan
mittaamisen enintään noin 5 sekunnin ajaksi. Sisäinen näyttö
esittää "etäisyyden" tai "epäonnistuneen mittauksen" merkintää
vaihtoehtoisesti.
Huomio: Lasersäteilyn merkintä vilkkuu mittauksen ajan.
Huomio: Jos lopetat painamisen, jatkuva mittaus pysähtyy.
【Jatkuva mittaus】
Mittaus epäonnistui
tai etäisyyttä ei voi
mitata.
Näyttää mitatun
kuvan.
(Kohde 1)
Näyttää mitatun
kuvan.
(Kohde 2)
5. Käyttötilojen näyttöesimerkit
Todellisen etäisyyden
ja korkeuden tila
Vaakasuoran etäisyyden ja
korkeuden tila
Golf-tila
Todellisen etäisyyden tila
Metriä
[
]
Jaardia
[
]
1.
Varmista, että nestekidenäyttö on päällä.
2.
Paina
-painiketta ja pidä painettuna noin kahden sekunnin
ajan.
3.
Kun näyttöyksikkö on vaihtunut, vapauta
-painike.
4.
Yksikön vaihtamisen jälkeen tulokset muunnetaan ja näytetään
valitsemassasi mittayksikössä.
6. Mittaus-/näyttötilojen vaihto
(Tehtaan oletusarvona on todellisen etäisyyden näyttötila.)
1. Varmista, että nestekidenäyttö on päällä.
2. Paina
-painiketta 0,5 sekunnin kuluessa.
3. Vapauta
-painike käyttötilan vaihtamiseksi.
4. Toista vaiheet 2 ja 3, kunnes haluamaasi näyttötilaa näytetään.
5. Tilan vaihtaminen mittauksen jälkeen muuntaa tulokset uuden näyttötilan mukaan.
6. Näyttötilan asettamisen jälkeen mittaukset suoritetaan uuden näyttötilan mukaan.
Todellisen etäisyyden ja korkeuden tila
Vaakasuoran etäisyyden ja korkeuden
tila
Todellisen etäisyyden tila
Golf-tila
Kun esim. golfkentällä mitataan etäisyyttä lipputankoon, käytä
lähimmän kohteen esivalintatilaa ja jatkuvaa mittausta. Jos sinun ja
lipputangon välissä ei ole esteitä, pienin näytettävä lukema on sinun ja
lipputangon välinen etäisyys.
Painaessasi MODE-painiketta tilat vaihtuvat yllä esitetyssä järjestyksessä.
5. Näyttöyksikön valinta (Tehtaan oletusarvo on jaardia.)
4. Mittauksen jälkeen "etäisyyden" tai "epäonnistuneen mittauksen"
merkintää näytetään 8 sekunnin ajan, jonka jälkeen virta kytkeytyy
pois päältä. Jos painat
-painiketta virran ollessa päällä (kun
sisäinen näyttö on aktiivinen), uusi yksittäinen mittaus alkaa.
Tilojen nimet
Todellisen etäisyyden
ja korkeuden tila
Vaakasuoran etäisyyden
ja korkeuden tila
Golf-tila
Todellisen etäisyyden
tila
Katselu ylöspäin (+)
kulma ylöspäin
Ei symbolia
Katselu alaspäin (-)
kulma alaspäin
Ylempi 7-numeroinen
näyttö
Todellinen etäisyys
Vaakasuora etäisyys
Kulmakorjattu
etäisyys
Todellinen etäisyys
Alempi 7-numeroinen
näyttö
Korkeus
Korkeus
Todellinen
etäisyys
Ei näyttöä
Symboli
Measurement
1. Press the POWER button for power-on.
(Power turns off 8 seconds after the last
operation.)
Immediately after power-on.
(Initializing)
Stand-by.
3. Press POWER button once to start single measurement.
Measuring.
4. After measurement, “distance” or “fail to measure” indicator are displayed for 8 seconds, then power turns off. If you press the POWER
button during power-on (while the internal display is lit), another single measurement starts.
Failure to measure or
unable to measure distance.
Displays the measured
figure. (Target 1)
Displays the measured
figure. (Target 2)
3. Keep pressing POWER button to start continuous measurement up to 20 seconds. The internal display shows “distance” and
“fail to measure” indicator alternately.
Note: Laser irradiaton mark is blinking during the measurement.
Note: If you stop pressing the button, the continuous measuremen stops
Target focusing.
2. Aim at the target
.
Position the target at the center of the reticle
[Single measurement]
Failure to measure or
unable to measure distance.
Upward measurement.
Downward measurement.
Displays the measured figure.
[Continuous measurement]
4. After continuous measurement, the measure results are displayed for 8 seconds, then power turns off. If you press the POWER
button during power-on (while the internal display is lit), another measrement starts.
Vilkkuu mittausten suorittamisen aikana.
Measurement
1. Press the POWER button for power-on.
(Power turns off 8 seconds after the last
operation.)
Immediately after power-on.
(Initializing)
Stand-by.
3. Press POWER button once to start single measurement.
Measuring.
4. After measurement, “distance” or “fail to measure” indicator are displayed for 8 seconds, then power turns off. If you press the POWER
button during power-on (while the internal display is lit), another single measurement starts.
Failure to measure or
unable to measure distance.
Displays the measured
figure. (Target 1)
Displays the measured
figure. (Target 2)
3. Keep pressing POWER button to start continuous measurement up to 20 seconds. The internal display shows “distance” and
“fail to measure” indicator alternately.
Note: Laser irradiaton mark is blinking during the measurement.
Note: If you stop pressing the button, the continuous measuremen stops
Target focusing.
2. Aim at the target
.
Position the target at the center of the reticle
[Single measurement]
Failure to measure or
unable to measure distance.
Upward measurement.
Downward measurement.
Displays the measured figure.
[Continuous measurement]
4. After continuous measurement, the measure results are displayed for 8 seconds, then power turns off. If you press the POWER
button during power-on (while the internal display is lit), another measrement starts.