Visor interno resumen operativo – Nikon Laser User Manual
Page 41
Ru
Se
Nl
Dk
Pl
Hu
Cz
Fi
No
En
De
Fr
Es
It
Ro
80
Ru
Se
Nl
Dk
Pl
Hu
Cz
Fi
No
En
De
Fr
Es
It
Ro
81
Visor interno
Resumen operativo
6. 『
』 Modo de prioridad al sujeto
A. Modo de prioridad al primer sujeto
『
』 Aparece cuando se ha fijado el modo de Prioridad
al primer sujeto.
B. Modo de prioridad al sujeto más lejano
『
』 Aparece cuando se ha fijado el modo de
Prioridad al sujeto más lejano.
7. Visor con control activo del brillo
El visor con control activo del brillo detecta las condiciones de
iluminación principalmente de la zona del suelo del campo de
visión y, si es necesario, activa automáticamente la iluminación
con LED naranja.
El brillo de la iluminación naranja se ajusta automáticamente a
las condiciones de iluminación.
Aunque el LCD se fabricó empleando la tecnología más
avanzada, es imposible eliminar totalmente el polvo. Al utilizar
este producto, el LCD está ampliado por la gran ampliación de
la lente del ocular y puede verse polvo como un defecto. No
obstante, no afectará a la precisión de la medición.
Precaución: La utilización de controles o ajustes o
parámetros de procedimiento distintos de los aquí
indicados puede provocar una exposición a
radiaciones peligrosas
1. Coloque una batería en el compartimento de la batería
(consulte "Cambio de baterías")
2. Ojera de goma
Tanto quienes llevan gafas como quienes no lo hacen pueden
usar este telémetro sin colocar la ojera de goma.
3. Ajuste de dioptrías
Ajuste las dioptrías para conseguir una imagen clara en el LCD.
En primer lugar gire el aro de ajuste de dioptrías en sentido
contrario al de las agujas del reloj hasta que llegue a su tope.
Después encienda el aparato para activar el LCD cuando mire a
través del Nikon Laser 1000A S. Gire el aro de ajuste de dioptrías
en el sentido de las agujas del reloj hasta que la pantalla quede
enfocada.
Si no ajusta las dioptrías a su graduación, quizás no pueda
enfocar claramente su sujeto.
4. Medición
Nota: Si mantiene pulsado el botón POWER aparecerán todos los
símbolos en el panel LCD interno. Después de retirar el dedo
del botón POWER se mostrará el último ajuste utilizado (si pulsa
brevemente el botón POWER el panel LCD mostrará el último
ajuste utilizado sin mostrar todos los símbolos. Esto no supone que
haya ninguna avería ni otro problema).
Antes de medir asegúrese de confirmar los ajustes, como unidad,
modo de medición/visualización y modo de prioridad.
◎ : Consulte la sección del modo correspondiente de este manual
para realizar el ajuste.
Measurement
1. Press the POWER button for power-on.
(Power turns off 8 seconds after the last
operation.)
Immediately after power-on.
(Initializing)
Stand-by.
3. Press POWER button once to start single measurement.
Measuring.
4. After measurement, “distance” or “fail to measure” indicator are displayed for 8 seconds, then power turns off. If you press the POWER
button during power-on (while the internal display is lit), another single measurement starts.
Failure to measure or
unable to measure distance.
Displays the measured
figure. (Target 1)
Displays the measured
figure. (Target 2)
3. Keep pressing POWER button to start continuous measurement up to 20 seconds. The internal display shows “distance” and
“fail to measure” indicator alternately.
Note: Laser irradiaton mark is blinking during the measurement.
Note: If you stop pressing the button, the continuous measuremen stops
Target focusing.
2. Aim at the target
.
Position the target at the center of the reticle
[Single measurement]
Failure to measure or
unable to measure distance.
Upward measurement.
Downward measurement.
Displays the measured figure.
[Continuous measurement]
4. After continuous measurement, the measure results are displayed for 8 seconds, then power turns off. If you press the POWER
button during power-on (while the internal display is lit), another measrement starts.
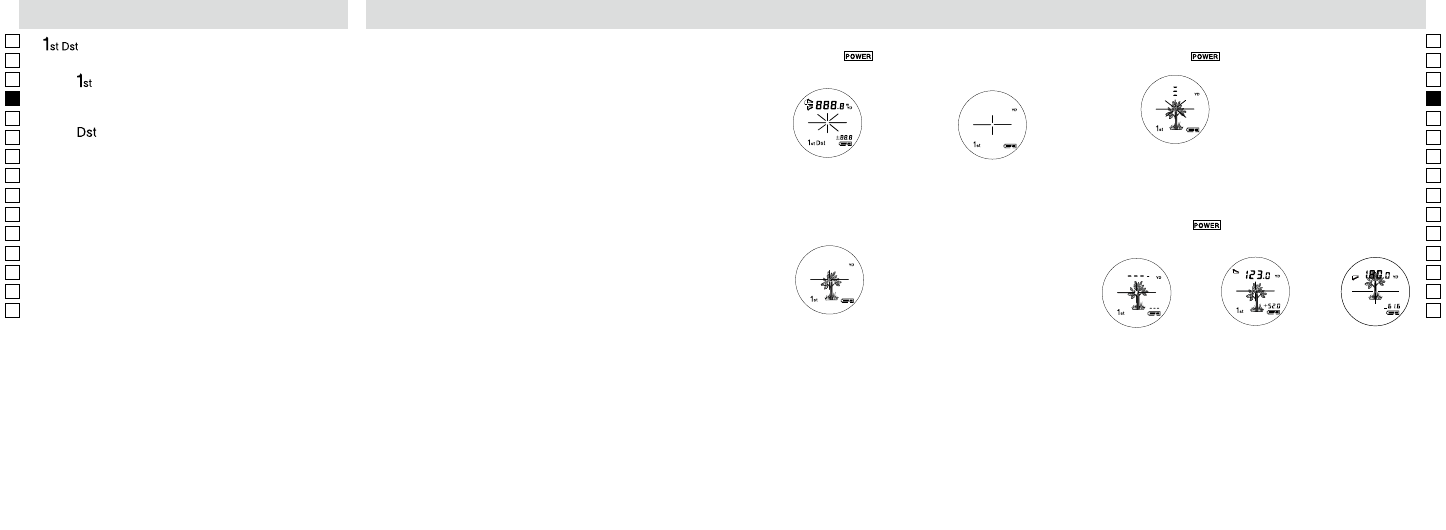
1. Presione el botón
para encender.
(La corriente se apaga 8 segundos después de la última operación.)
Inmediatamente después del
encendido (Inicialización)
Espera
2. Apunte al sujeto.
Coloque el sujeto en el centro de la retícula.
Apuntar al sujeto
3. Presione el botón
una vez para iniciar una medición única.
【Medición única】
Medición
Measurement
1. Press the POWER button for power-on.
(Power turns off 8 seconds after the last
operation.)
Immediately after power-on.
(Initializing)
Stand-by.
3. Press POWER button once to start single measurement.
Measuring.
4. After measurement, “distance” or “fail to measure” indicator are displayed for 8 seconds, then power turns off. If you press the POWER
button during power-on (while the internal display is lit), another single measurement starts.
Failure to measure or
unable to measure distance.
Displays the measured
figure. (Target 1)
Displays the measured
figure. (Target 2)
3. Keep pressing POWER button to start continuous measurement up to 20 seconds. The internal display shows “distance” and
“fail to measure” indicator alternately.
Note: Laser irradiaton mark is blinking during the measurement.
Note: If you stop pressing the button, the continuous measuremen stops
Target focusing.
2. Aim at the target
.
Position the target at the center of the reticle
[Single measurement]
Failure to measure or
unable to measure distance.
Upward measurement.
Downward measurement.
Displays the measured figure.
[Continuous measurement]
4. After continuous measurement, the measure results are displayed for 8 seconds, then power turns off. If you press the POWER
button during power-on (while the internal display is lit), another measrement starts.
4. Después de la medición, se visualiza el indicador "distancia" o
"no se pudo medir" durante 8 segundos y después se apaga. Si
presiona el botón
con el aparato encendido (con la pantalla
interna encendida) se inicia otra medición única.
Medición fallida o
no se pudo medir la
distancia.
Medición hacia
arriba
Medición hacia
abajo
Muestra la cifra medida.