Internal display operational summary – Nikon Laser User Manual
Page 8
14
Ru
Se
Nl
Dk
Pl
Hu
Cz
Fi
No
En
De
Fr
Es
It
Ro
15
Ru
Se
Nl
Dk
Pl
Hu
Cz
Fi
No
En
De
Fr
Es
It
Ro
6. 『
』 Target priority mode
A. First Target Priority mode
『
』 Indicated when First Target Priority mode is set.
B. Distant Target Priority mode
『
』 Indicated when Distant Target Priority mode is set.
7. Active Brightness Control Viewfinder
Active Brightness Control Viewfinder detects light conditions of
the ground area mainly in the view field and, when necessary,
automatically turns on the orange LED illumination.
The brightness of the orange illumination is adjusted
automatically according to the light conditions.
Although the LCD was produced using the most advanced
technology, it is impossible to eliminate dust completely. When
using this product, the LCD is magnified by high magnification
of the eyepiece lens and dust may appear as a defect. It will not,
however, affect measurement accuracy.
Caution — use of controls or adjustments or
performance of procedures other than those specified
herein may result in hazardous radiation exposure
1. Install a battery in the battery chamber. (See "Changing
Batteries")
2. Rubber eyepiece cup
Both eyeglass wearers and non-wearers can use this rangefinder
without attaching the rubber eyepiece cup.
3. Diopter adjustment
Adjust diopter to obtain a clear image in the LCD.
First, rotate the diopter adjustment ring counterclockwise until it
comes to a complete stop. Next, turn on the power to activate the
LCD when you look through the Nikon Laser 1000A S. Rotate the
diopter adjustment ring clockwise until the display comes into
focus.
If the diopter is not adjusted to correspond to your eyesight, you
may not be able to clearly focus your subject.
4. Measuring
Note: Depressing and holding down the POWER button causes all
symbols to be displayed in the internal LCD panel. After you
remove your finger from the POWER button, the last-used
setting is displayed. (If you briefly press the POWER button
then remove your finger, the LCD panel may display the last-
used setting without displaying all of the symbols. This is not a
malfunction or other problem.)
Before measuring, be sure to confirm settings, such as unit,
measurement/display mode and priority mode.
◎ : See the relevant mode section in this manual for setting.
Internal display
Operational summary
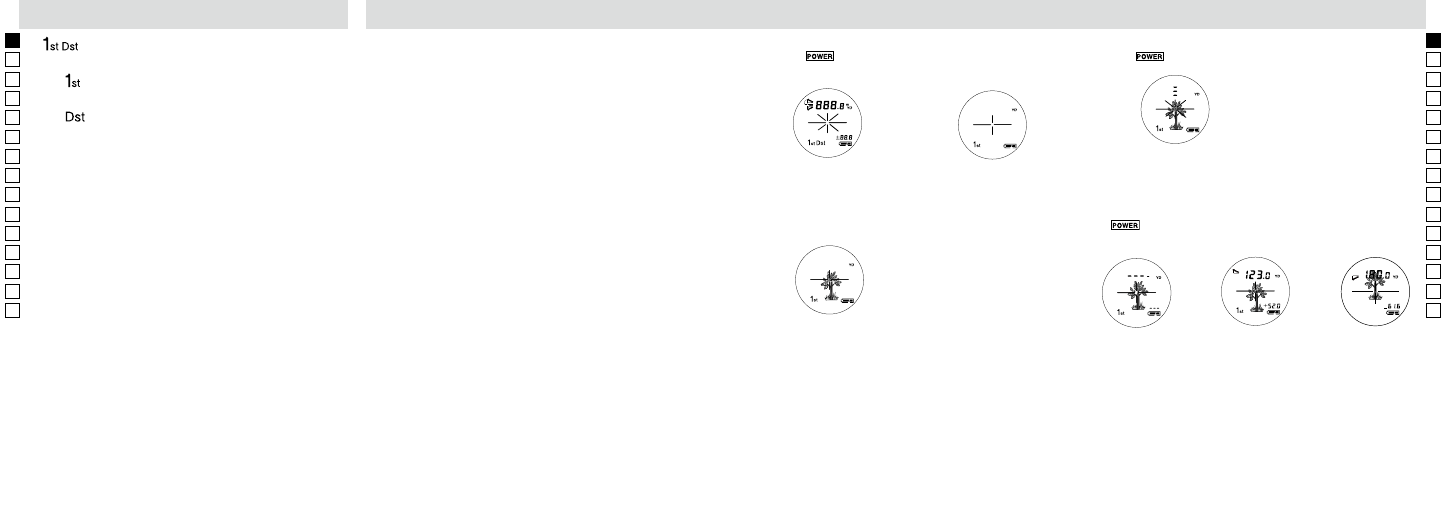
Measurement
1. Press the POWER button for power-on.
(Power turns off 8 seconds after the last
operation.)
Immediately after power-on.
(Initializing)
Stand-by.
3. Press POWER button once to start single measurement.
Measuring.
4. After measurement, “distance” or “fail to measure” indicator are displayed for 8 seconds, then power turns off. If you press the POWER
button during power-on (while the internal display is lit), another single measurement starts.
Failure to measure or
unable to measure distance.
Displays the measured
figure. (Target 1)
Displays the measured
figure. (Target 2)
3. Keep pressing POWER button to start continuous measurement up to 20 seconds. The internal display shows “distance” and
“fail to measure” indicator alternately.
Note: Laser irradiaton mark is blinking during the measurement.
Note: If you stop pressing the button, the continuous measuremen stops
Target focusing.
2. Aim at the target
.
Position the target at the center of the reticle
[Single measurement]
Failure to measure or
unable to measure distance.
Upward measurement.
Downward measurement.
Displays the measured figure.
[Continuous measurement]
4. After continuous measurement, the measure results are displayed for 8 seconds, then power turns off. If you press the POWER
button during power-on (while the internal display is lit), another measrement starts.
1. Press the
buttun for power-on.
(Power turns off 8 seconds after the last operation.)
Immediately after power-on.
(Initializing)
Stand-by
2. Aim at the target.
Position the target at the center of the reticle.
Target aiming
3. Press
button once to start single measurement.
【Single measurement】
Measuring
Measurement
1. Press the POWER button for power-on.
(Power turns off 8 seconds after the last
operation.)
Immediately after power-on.
(Initializing)
Stand-by.
3. Press POWER button once to start single measurement.
Measuring.
4. After measurement, “distance” or “fail to measure” indicator are displayed for 8 seconds, then power turns off. If you press the POWER
button during power-on (while the internal display is lit), another single measurement starts.
Failure to measure or
unable to measure distance.
Displays the measured
figure. (Target 1)
Displays the measured
figure. (Target 2)
3. Keep pressing POWER button to start continuous measurement up to 20 seconds. The internal display shows “distance” and
“fail to measure” indicator alternately.
Note: Laser irradiaton mark is blinking during the measurement.
Note: If you stop pressing the button, the continuous measuremen stops
Target focusing.
2. Aim at the target
.
Position the target at the center of the reticle
[Single measurement]
Failure to measure or
unable to measure distance.
Upward measurement.
Downward measurement.
Displays the measured figure.
[Continuous measurement]
4. After continuous measurement, the measure results are displayed for 8 seconds, then power turns off. If you press the POWER
button during power-on (while the internal display is lit), another measrement starts.
4. After measurement, "distance" or "fail to measure" indiator are
displayed for 8 seconds, then power turns off. If you press the
button during power-on (while the internal display is
active), another single measurement starts.
Failure to measure or
unable to measure
distance.
Upward
measurement
Downward
measurement
Displays the measured figure.