Resumen operativo, Measurement – Nikon Laser User Manual
Page 42
Ru
Se
Nl
Dk
Pl
Hu
Cz
Fi
No
En
De
Fr
Es
It
Ro
82
Ru
Se
Nl
Dk
Pl
Hu
Cz
Fi
No
En
De
Fr
Es
It
Ro
83
Resumen operativo
Measurement
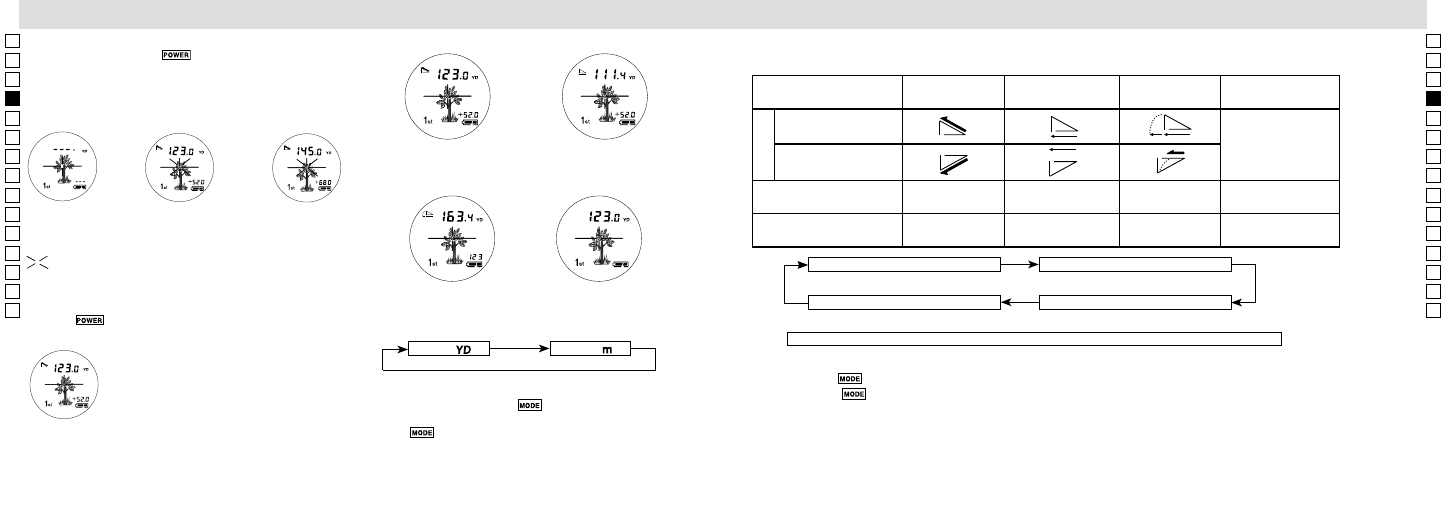
1. Press the POWER button for power-on.
(Power turns off 8 seconds after the last
operation.)
Immediately after power-on.
(Initializing)
Stand-by.
3. Press POWER button once to start single measurement.
Measuring.
4. After measurement, “distance” or “fail to measure” indicator are displayed for 8 seconds, then power turns off. If you press the POWER
button during power-on (while the internal display is lit), another single measurement starts.
Failure to measure or
unable to measure distance.
Displays the measured
figure. (Target 1)
Displays the measured
figure. (Target 2)
3. Keep pressing POWER button to start continuous measurement up to 20 seconds. The internal display shows “distance” and
“fail to measure” indicator alternately.
Note: Laser irradiaton mark is blinking during the measurement.
Note: If you stop pressing the button, the continuous measuremen stops
Target focusing.
2. Aim at the target
.
Position the target at the center of the reticle
[Single measurement]
Failure to measure or
unable to measure distance.
Upward measurement.
Downward measurement.
Displays the measured figure.
[Continuous measurement]
4. After continuous measurement, the measure results are displayed for 8 seconds, then power turns off. If you press the POWER
button during power-on (while the internal display is lit), another measrement starts.
Measurement
1. Press the POWER button for power-on.
(Power turns off 8 seconds after the last
operation.)
Immediately after power-on.
(Initializing)
Stand-by.
3. Press POWER button once to start single measurement.
Measuring.
4. After measurement, “distance” or “fail to measure” indicator are displayed for 8 seconds, then power turns off. If you press the POWER
button during power-on (while the internal display is lit), another single measurement starts.
Failure to measure or
unable to measure distance.
Displays the measured
figure. (Target 1)
Displays the measured
figure. (Target 2)
3. Keep pressing POWER button to start continuous measurement up to 20 seconds. The internal display shows “distance” and
“fail to measure” indicator alternately.
Note: Laser irradiaton mark is blinking during the measurement.
Note: If you stop pressing the button, the continuous measuremen stops
Target focusing.
2. Aim at the target
.
Position the target at the center of the reticle
[Single measurement]
Failure to measure or
unable to measure distance.
Upward measurement.
Downward measurement.
Displays the measured figure.
[Continuous measurement]
4. After continuous measurement, the measure results are displayed for 8 seconds, then power turns off. If you press the POWER
button during power-on (while the internal display is lit), another measrement starts.
3. Mantenga pulsado el botón
para iniciar una medición
continua hasta unos 5 segundos. La pantalla interna muestra
alternativamente los indicadores "distancia" y "no se pudo medir".
Nota: Durante la medición destella la marca de radiación láser.
Nota: Si deja de pulsar el botón se detiene la medición continua.
【Medición continua】
Medición fallida o
no se pudo medir
la distancia.
Muestra la cifra
medida
(Sujeto 1)
Muestra la cifra
medida
(Sujeto 2)
5. Ejemplos de visualización de cada modo
Modo de distancia real
y altura
Modo de distancia
horizontal y altura
Modo de golf
Modo de distancia real
Metro
[
]
Yarda
[
]
1.
Confirme que el panel LCD está encendido.
2.
Mantenga pulsado el botón
durante unos dos segundos.
3.
Cuando la unidad de visualización haya cambiado, suelte el
botón
.
4.
Una vez fijada la unidad, los resultados se convertirán y
visualizarán en la unidad de medición seleccionada.
6. Conmutación de modos de medición/visualización
(El ajuste predeterminado de fábrica es el modo de medición de la distancia lineal)
1. Confirme que el panel LCD está encendido.
2. Pulse el botón
en 0,5 segundos.
3. Suelte el botón
para cambiar de modo.
4. Repita los pasos 2 y 3 hasta que se muestre el modo deseado.
5. Cambiar de modo después de la medición convierte los resultados al nuevo modo.
6. Después de fijar el modo las mediciones se realizan según el nuevo modo.
Modo de distancia real y altura
Modo de distancia horizontal y altura
Modo de distancia real
Modo de golf
Al medir una bandera en un recorrido de golf, por ejemplo, utilice
la Prioridad al primer sujeto y el modo de Medición continua para
facilitar la medición. Si no hay objetos entre usted y la bandera, el
número más pequeño es la distancia a la bandera a la que apunta.
Pulsando el botón MODE (modo), los modos cambiarán en el orden indicado arriba.
5. Selección de la unidad de visualización (el ajuste
predeterminado de fábrica es la yarda).
4. Después de la medición, se visualiza el indicador "distancia" o "no
se pudo medir" durante 8 segundos y después se apaga. Si presiona
el botón
con el aparato encendido (con la pantalla interna
encendida) se inicia otra medición única.
Nombres de modos
Modo de distancia
real y altura
Modo de distancia
horizontal y altura
Modo de golf
Modo de distancia real
Ángulo hacia arriba (+)
Pendiente ascendente
Sin símbolo
Ángulo hacia abajo (-)
Pendiente descendente
Pantalla superior de 7
segmentos
Distancia real
Distancia horizontal Distancia ajustada
en pendiente
Distancia real
Pantalla inferior de 7
segmentos
Altura
Altura
Distancia real
Sin visualización
Símbolo
Measurement
1. Press the POWER button for power-on.
(Power turns off 8 seconds after the last
operation.)
Immediately after power-on.
(Initializing)
Stand-by.
3. Press POWER button once to start single measurement.
Measuring.
4. After measurement, “distance” or “fail to measure” indicator are displayed for 8 seconds, then power turns off. If you press the POWER
button during power-on (while the internal display is lit), another single measurement starts.
Failure to measure or
unable to measure distance.
Displays the measured
figure. (Target 1)
Displays the measured
figure. (Target 2)
3. Keep pressing POWER button to start continuous measurement up to 20 seconds. The internal display shows “distance” and
“fail to measure” indicator alternately.
Note: Laser irradiaton mark is blinking during the measurement.
Note: If you stop pressing the button, the continuous measuremen stops
Target focusing.
2. Aim at the target
.
Position the target at the center of the reticle
[Single measurement]
Failure to measure or
unable to measure distance.
Upward measurement.
Downward measurement.
Displays the measured figure.
[Continuous measurement]
4. After continuous measurement, the measure results are displayed for 8 seconds, then power turns off. If you press the POWER
button during power-on (while the internal display is lit), another measrement starts.
Destella mientras se realizan mediciones.
Measurement
1. Press the POWER button for power-on.
(Power turns off 8 seconds after the last
operation.)
Immediately after power-on.
(Initializing)
Stand-by.
3. Press POWER button once to start single measurement.
Measuring.
4. After measurement, “distance” or “fail to measure” indicator are displayed for 8 seconds, then power turns off. If you press the POWER
button during power-on (while the internal display is lit), another single measurement starts.
Failure to measure or
unable to measure distance.
Displays the measured
figure. (Target 1)
Displays the measured
figure. (Target 2)
3. Keep pressing POWER button to start continuous measurement up to 20 seconds. The internal display shows “distance” and
“fail to measure” indicator alternately.
Note: Laser irradiaton mark is blinking during the measurement.
Note: If you stop pressing the button, the continuous measuremen stops
Target focusing.
2. Aim at the target
.
Position the target at the center of the reticle
[Single measurement]
Failure to measure or
unable to measure distance.
Upward measurement.
Downward measurement.
Displays the measured figure.
[Continuous measurement]
4. After continuous measurement, the measure results are displayed for 8 seconds, then power turns off. If you press the POWER
button during power-on (while the internal display is lit), another measrement starts.