Gebruiksaanwijzing, Measurement – Nikon Laser User Manual
Page 108
Ru
Se
Nl
Dk
Pl
Hu
Cz
Fi
No
En
De
Fr
Es
It
Ro
214
Ru
Se
Nl
Dk
Pl
Hu
Cz
Fi
No
En
De
Fr
Es
It
Ro
215
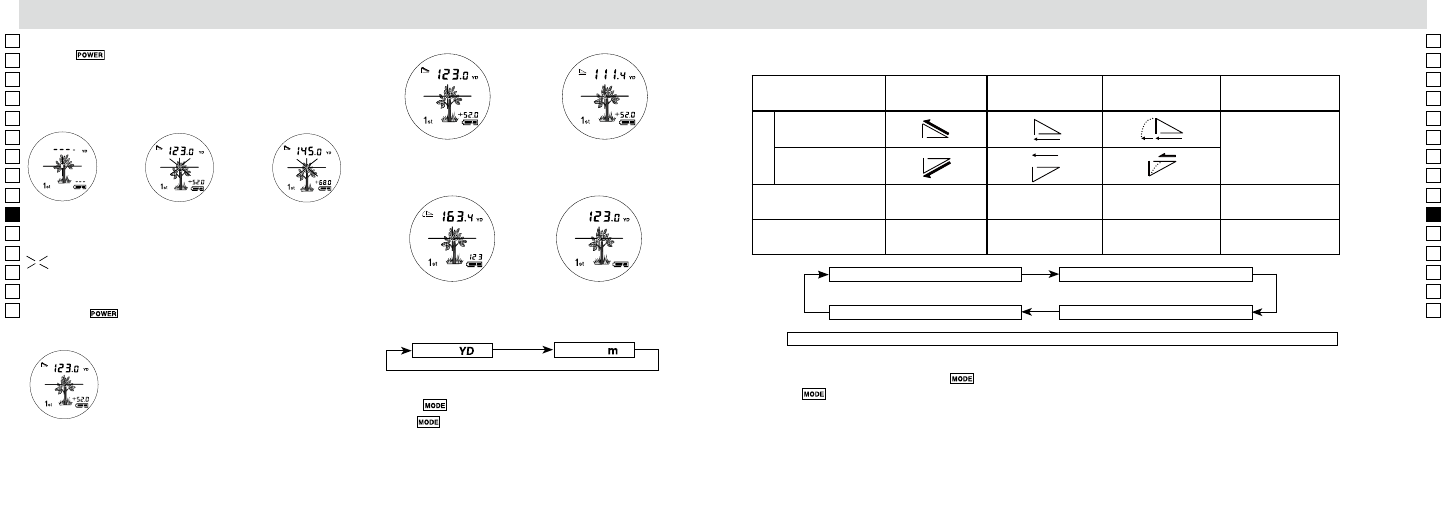
【Modus voor continue meting】
Meters
[
]
Yards
[
]
Gebruiksaanwijzing
Werkelijke afstand en hoogte modus
Horizontale afstand en hoogte modus
Werkelijke afstand modus
Golf modus
Measurement
1. Press the POWER button for power-on.
(Power turns off 8 seconds after the last
operation.)
Immediately after power-on.
(Initializing)
Stand-by.
3. Press POWER button once to start single measurement.
Measuring.
4. After measurement, “distance” or “fail to measure” indicator are displayed for 8 seconds, then power turns off. If you press the POWER
button during power-on (while the internal display is lit), another single measurement starts.
Failure to measure or
unable to measure distance.
Displays the measured
figure. (Target 1)
Displays the measured
figure. (Target 2)
3. Keep pressing POWER button to start continuous measurement up to 20 seconds. The internal display shows “distance” and
“fail to measure” indicator alternately.
Note: Laser irradiaton mark is blinking during the measurement.
Note: If you stop pressing the button, the continuous measuremen stops
Target focusing.
2. Aim at the target
.
Position the target at the center of the reticle
[Single measurement]
Failure to measure or
unable to measure distance.
Upward measurement.
Downward measurement.
Displays the measured figure.
[Continuous measurement]
4. After continuous measurement, the measure results are displayed for 8 seconds, then power turns off. If you press the POWER
button during power-on (while the internal display is lit), another measrement starts.
3. Houd de
knop ongeveer 5 seconden ingedrukt voor een
continue meting. Het interne LCD-scherm toont afwisselend het
'afstand' en 'meting mislukt' symbool.
NB: Het laseremissie symbool knippert tijdens het meten.
NB: Wanneer u de knop loslaat, stopt de continue meting.
De meting is mislukt
of de afstand kan niet
worden gemeten.
Toont de gemeten
afstand.
(Doel 1)
Toont de gemeten
afstand.
(Doel 2)
Wanneer u bijvoorbeeld de afstand wilt meten tot een vlag op een
golfbaan, combineert u de functie Prioriteit eerste doel met de
meetmodus Continu om eenvoudig de afstand te bepalen. Als er zich
geen voorwerpen bevinden tussen u en de vlag, geeft de laagste
waarde de afstand tot de vlag aan.
4. Na meting wordt het 'afstand' of 'meting is mislukt' symbool
gedurende 8 seconden getoond, daarna schakelt het instrument uit.
Als u op de
knop drukt terwijl het instrument is ingeschakeld
(en het interne LCD-venster verlicht is), wordt een volgende
enkelvoudige meting gestart.
Measurement
1. Press the POWER button for power-on.
(Power turns off 8 seconds after the last
operation.)
Immediately after power-on.
(Initializing)
Stand-by.
3. Press POWER button once to start single measurement.
Measuring.
4. After measurement, “distance” or “fail to measure” indicator are displayed for 8 seconds, then power turns off. If you press the POWER
button during power-on (while the internal display is lit), another single measurement starts.
Failure to measure or
unable to measure distance.
Displays the measured
figure. (Target 1)
Displays the measured
figure. (Target 2)
3. Keep pressing POWER button to start continuous measurement up to 20 seconds. The internal display shows “distance” and
“fail to measure” indicator alternately.
Note: Laser irradiaton mark is blinking during the measurement.
Note: If you stop pressing the button, the continuous measuremen stops
Target focusing.
2. Aim at the target
.
Position the target at the center of the reticle
[Single measurement]
Failure to measure or
unable to measure distance.
Upward measurement.
Downward measurement.
Displays the measured figure.
[Continuous measurement]
4. After continuous measurement, the measure results are displayed for 8 seconds, then power turns off. If you press the POWER
button during power-on (while the internal display is lit), another measrement starts.
Knippert tijdens het uitvoeren van metingen.
Measurement
1. Press the POWER button for power-on.
(Power turns off 8 seconds after the last
operation.)
Immediately after power-on.
(Initializing)
Stand-by.
3. Press POWER button once to start single measurement.
Measuring.
4. After measurement, “distance” or “fail to measure” indicator are displayed for 8 seconds, then power turns off. If you press the POWER
button during power-on (while the internal display is lit), another single measurement starts.
Failure to measure or
unable to measure distance.
Displays the measured
figure. (Target 1)
Displays the measured
figure. (Target 2)
3. Keep pressing POWER button to start continuous measurement up to 20 seconds. The internal display shows “distance” and
“fail to measure” indicator alternately.
Note: Laser irradiaton mark is blinking during the measurement.
Note: If you stop pressing the button, the continuous measuremen stops
Target focusing.
2. Aim at the target
.
Position the target at the center of the reticle
[Single measurement]
Failure to measure or
unable to measure distance.
Upward measurement.
Downward measurement.
Displays the measured figure.
[Continuous measurement]
4. After continuous measurement, the measure results are displayed for 8 seconds, then power turns off. If you press the POWER
button during power-on (while the internal display is lit), another measrement starts.
5. Voorbeelden weergave alle meetmodi
Werkelijke afstand en
hoogte modus
Horizontale afstand en
hoogte modus
Golf modus
Werkelijke afstand modus
5. De weergave-eenheid selecteren (de standaardinstelling is yard.)
1.
Controleer of het LCD-venster is ingeschakeld.
2.
Houd de
knop ongeveer twee seconden ingedrukt.
3.
Laat de
knop los als de andere eenheid wordt
weergegeven.
4.
Als u overschakelt naar de andere weergave-eenheid, worden
de resultaten omgerekend en weergegeven in de nieuwe
eenheid.
6. Een andere meet-/weergavemodus kiezen
(standaard is de meetmodus ingesteld op werkelijke afstand en hoogte)
Benamingen modi
Werkelijke afstand
en hoogte modus
Horizontale afstand
and hoogte modus
Golf modus
Werkelijke afstand
modus
Omhoog gericht (+)
hoek Helling op
Geen symbool
Omlaag gericht (-)
hoek Helling af
Bovenste 7-segmenten
display
Werkelijke afstand
Horizontale afstand
Afstand gecorrigeerd
voor helling
Werkelijke afstand
Onderste 7-segmenten
display
Hoogte
Hoogte
Werkelijke afstand
Geen weergave
Symbool
1. Controleer of het LCD-venster is ingeschakeld.
2. Druk binnen een halve seconde op de
knop.
3. Laat de
knop los om een andere modus te kiezen.
4. Herhaal stappen 2 en 3 totdat de gewenste modus wordt weergegeven.
5. Als u na het uitvoeren van een meting een andere modus kiest, wordt het resultaat aangepast aan de nieuwe modus.
6. Als de modus is ingesteld, worden metingen uitgevoerd in de nieuwe modus.
Druk de MODE-knop in om de beschikbare meet-/weergavemodi in de bovenstaande volgorde te doorlopen.