Provozní souhrn, Measurement – Nikon Laser User Manual
Page 163
Ru
Se
Nl
Dk
Pl
Hu
Cz
Fi
No
En
De
Fr
Es
It
Ro
324
Ru
Se
Nl
Dk
Pl
Hu
Cz
Fi
No
En
De
Fr
Es
It
Ro
325
Provozní souhrn
Measurement
1. Press the POWER button for power-on.
(Power turns off 8 seconds after the last
operation.)
Immediately after power-on.
(Initializing)
Stand-by.
3. Press POWER button once to start single measurement.
Measuring.
4. After measurement, “distance” or “fail to measure” indicator are displayed for 8 seconds, then power turns off. If you press the POWER
button during power-on (while the internal display is lit), another single measurement starts.
Failure to measure or
unable to measure distance.
Displays the measured
figure. (Target 1)
Displays the measured
figure. (Target 2)
3. Keep pressing POWER button to start continuous measurement up to 20 seconds. The internal display shows “distance” and
“fail to measure” indicator alternately.
Note: Laser irradiaton mark is blinking during the measurement.
Note: If you stop pressing the button, the continuous measuremen stops
Target focusing.
2. Aim at the target
.
Position the target at the center of the reticle
[Single measurement]
Failure to measure or
unable to measure distance.
Upward measurement.
Downward measurement.
Displays the measured figure.
[Continuous measurement]
4. After continuous measurement, the measure results are displayed for 8 seconds, then power turns off. If you press the POWER
button during power-on (while the internal display is lit), another measrement starts.
3. Tisknutím tlačítka
zahájíte trvalé měření na dobu přibližně 5
sekund. Na interním displeji se bude střídavě zobrazovat "distance"
(vzdálenost) "fail to measure" (nezměřeno).
Poznámka: Během měření bliká znak laserového záření.
Poznámka: Pokud přestanete tlačítko mačkat, trvalé měření se
přeruší.
【Trvalé měření】
Porucha měření
nebo neschopen
změřit vzdálenost.
Zobrazí naměřenou
hodnotu
(Cíl 1)
Zobrazí naměřenou
hodnotu
(Cíl 2)
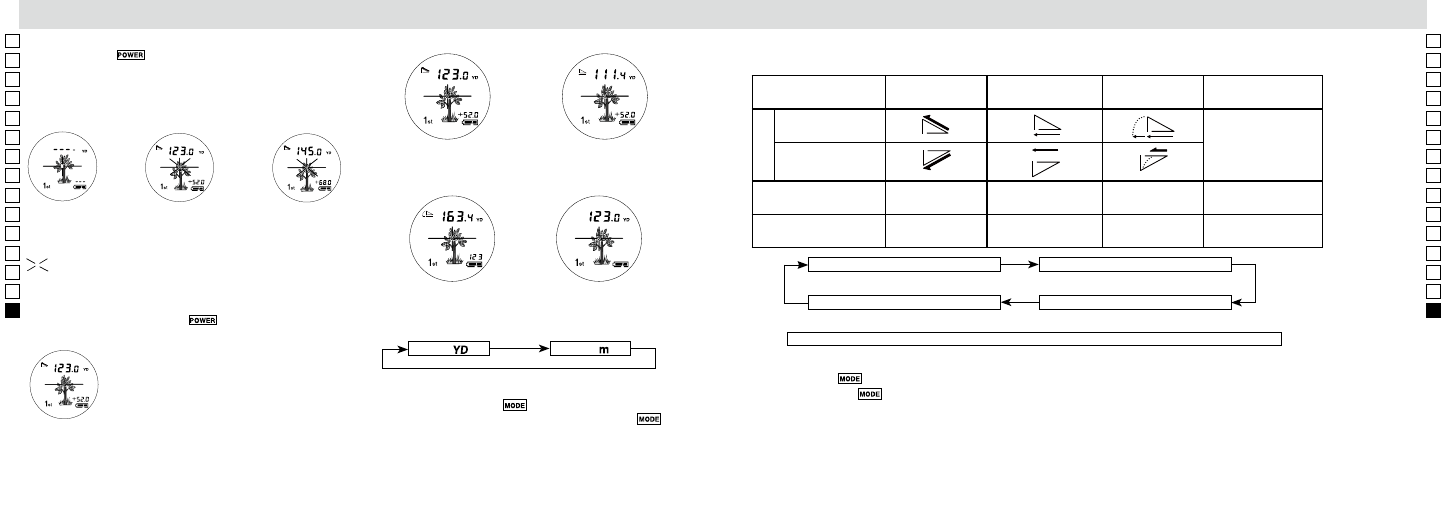
5. Příklady zobrazení pro jednotlivé režimy
Skutečná vzdálenost a
výška
Horizontální vzdálenost a
výška
Režim Golf
Režim skutečné vzdálenosti
Metr
[
]
Yard
[
]
1.
Potvrďte, že je LCD panel zapnut.
2.
Stlačte a podržte tlačítko
po přibližně dvě sekundy.
3.
Když se jednotka zobrazení přepla, uvolněte tlačítko
.
4.
Poté co je nastavena jednotka, budou výsledky konvertovány a
zobrazovány ve vámi zvolených měřicích jednotkách.
6. Přepínání režimů měření / zobrazení
(Výchozí nastavení výrobce je režim skutečné vzdálenosti a výšky)
1. Potvrďte, že je LCD panel zapnut.
2. Stlačte tlačítko
v průběhu 0,5 sekundy.
3. Uvolněním tlačítka
přepněte režim.
4. Opakujte kroky 2 a 3 dokud se nezobrazí vámi žádaný režim.
5. Přepnutí režimu po měření konvertuje výsledky do nového režimu.
6. Poté co je nastaven režim, jsou měření prováděna v novém režimu.
Režim skutečné vzdálenosti a výšky
Režim horizontální vzdálenosti a výšky
Režim skutečné vzdálenosti
Režim Golf
Když měříte, například, kolík na golfovém hřišti, použijte pro snadné
měření Režim priority prvního cíle a režim trvalého měření. Když
nejsou žádné předměty mezi vámi a kolíkem, je nejmenší číslo
vzdálenost k vámi zacílenému kolíku.
Při stlačení tlačítka MODE (REŽIM), se budou režimy měnit v pořadí uvedeném nahoře.
5. Výběr zobrazovací jednotky (Implicitní nastavení z výroby je
yard.)
4. Po změření se na 8 sekund zobrazí ukazatel "distance" (vzdálenost)
nebo "fail to measure" (nezměřeno), potom se vypne napájení. Pokud
stiskněte během zapínání tlačítko
(při rozsvíceném vnitřním
displeji), spustí se další jednotlivé měření.
Názvy režimů
Režim skutečné
vzdálenosti a výšky
Režim horizontální
vzdálenosti a výšky
Režim Golf
Režim skutečné
vzdálenosti
Pohled nahoru (+)
úhel Stoupání
Bez symbolu
Pohled dolů (-)
úhel Klesání
Horní displej se 7
segmenty
Skutečná
vzdálenost
Vodorovná
vzdálenost
Vzdálenost
upravená o sklon
Skutečná vzdálenost
Dolní displej se 7
segmenty
Výška
Výška
Skutečná
vzdálenost
Bez zobrazení
Symbol
Measurement
1. Press the POWER button for power-on.
(Power turns off 8 seconds after the last
operation.)
Immediately after power-on.
(Initializing)
Stand-by.
3. Press POWER button once to start single measurement.
Measuring.
4. After measurement, “distance” or “fail to measure” indicator are displayed for 8 seconds, then power turns off. If you press the POWER
button during power-on (while the internal display is lit), another single measurement starts.
Failure to measure or
unable to measure distance.
Displays the measured
figure. (Target 1)
Displays the measured
figure. (Target 2)
3. Keep pressing POWER button to start continuous measurement up to 20 seconds. The internal display shows “distance” and
“fail to measure” indicator alternately.
Note: Laser irradiaton mark is blinking during the measurement.
Note: If you stop pressing the button, the continuous measuremen stops
Target focusing.
2. Aim at the target
.
Position the target at the center of the reticle
[Single measurement]
Failure to measure or
unable to measure distance.
Upward measurement.
Downward measurement.
Displays the measured figure.
[Continuous measurement]
4. After continuous measurement, the measure results are displayed for 8 seconds, then power turns off. If you press the POWER
button during power-on (while the internal display is lit), another measrement starts.
Bliká při provádění měření.
Measurement
1. Press the POWER button for power-on.
(Power turns off 8 seconds after the last
operation.)
Immediately after power-on.
(Initializing)
Stand-by.
3. Press POWER button once to start single measurement.
Measuring.
4. After measurement, “distance” or “fail to measure” indicator are displayed for 8 seconds, then power turns off. If you press the POWER
button during power-on (while the internal display is lit), another single measurement starts.
Failure to measure or
unable to measure distance.
Displays the measured
figure. (Target 1)
Displays the measured
figure. (Target 2)
3. Keep pressing POWER button to start continuous measurement up to 20 seconds. The internal display shows “distance” and
“fail to measure” indicator alternately.
Note: Laser irradiaton mark is blinking during the measurement.
Note: If you stop pressing the button, the continuous measuremen stops
Target focusing.
2. Aim at the target
.
Position the target at the center of the reticle
[Single measurement]
Failure to measure or
unable to measure distance.
Upward measurement.
Downward measurement.
Displays the measured figure.
[Continuous measurement]
4. After continuous measurement, the measure results are displayed for 8 seconds, then power turns off. If you press the POWER
button during power-on (while the internal display is lit), another measrement starts.