Interne anzeige übersicht über den betrieb – Nikon Laser User Manual
Page 19
Ru
Se
Nl
Dk
Pl
Hu
Cz
Fi
No
En
De
Fr
Es
It
Ro
36
Ru
Se
Nl
Dk
Pl
Hu
Cz
Fi
No
En
De
Fr
Es
It
Ro
37
Interne Anzeige
Übersicht über den Betrieb
6. 『
』 Prioritätsmodus Ziel
A. Prioritätsmodus 1. Ziel
『
』 Wird angezeigt, wenn der Prioritätsmodus 1. Ziel
eingestellt ist.
B. Prioritätsmodus Entferntes Ziel
『
』 Wird angezeigt, wenn der Prioritätsmodus
Entferntes Ziel eingestellt ist.
7. Sucher mit aktiver Helligkeitssteuerung
Der Sucher mit aktiver Helligkeitssteuerung erkennt die
Lichtbedingungen im Bodenbereich hauptsächlich im Sehfeld
und schaltet, falls notwendig, automatisch die orangefarbene
LED-Beleuchtung ein.
Die Helligkeit der orangefarbenen Beleuchtung wird
automatisch entsprechend der Lichtbedingungen angepasst.
Obwohl das LC-Display mittels der höchstentwickelten
Technologie hergestellt wurde, ist es unmöglich, das Eindringen
von Staub vollständig zu verhindern. Bei Einsatz dieses
Produktes wird das LC-Display durch die hohe Vergrößerung
des Okularobjektivs vergrößert und Staub kann als Defekt
erscheinen. Hierdurch wird jedoch nicht die Messgenauigkeit
beeinflusst.
Vorsicht — Die Verwendung von Einstellelementen
oder Justagen oder die Ausführung von anderen als
den hierin angegebenen Verfahren können zu einer
gefährlichen Strahlenbelastung führen.
1. Legen Sie eine Batterie ins Batteriefach. (Sehen Sie
„Wechseln der Batterie“)
2. Gummiokularkappe
Sowohl Brillenträger als auch Nicht-Brillenträger können diesen
Entfernungsmesser benutzen, ohne die Gummiokularkappe
anzubringen.
3. Dioptrin-Einstellung
Stellen Sie den Dioptrinwert ein, um ein klares Bild auf dem
LC-Display zu erhalten.
Drehen Sie den Dioptrin-Einstellring zuerst bis zum
vollständigen Anschlag links herum. Schalten Sie als nächstes
die Spannung ein, um das LC-Display zu aktivieren, wenn Sie
durch das Nikon Laser 1000A S blicken. Drehen Sie den Dioptrin-
Einstellring nach rechts, bis die Anzeige scharf wird.
Wird der Dioptrinwert nicht entsprechend Ihrem Sehvermögen
eingestellt, sind Sie nicht in der Lage, Ihr Ziel klar zu fokussieren.
4. Messen
Hinweis: Durch das Drücken und Halten der POWER-Taste werden
alle Symbole auf dem internen LC-Display angezeigt. Nach
der Freigabe der POWER-Taste durch Ihren Finger wird die
zuletzt verwendete Einstellung angezeigt. (Wenn Sie die
POWER-Taste nur kurz mit dem Finger betätigen, zeigt das
LC-Display nur die zuletzt verwendete Einstellung an, ohne
alle Symbole anzuzeigen. Dieses ist keine Störung oder kein
anderes Problem.)
Prüfen Sie vor der Messung Einstellungen, wie Maßeinheit, Mess-/
Anzeigemodus und Prioritätsmodus.
◎ : Sehen Sie das entsprechende Modus-Kapitel in diesem
Handbuch für die Einstellung.
Measurement
1. Press the POWER button for power-on.
(Power turns off 8 seconds after the last
operation.)
Immediately after power-on.
(Initializing)
Stand-by.
3. Press POWER button once to start single measurement.
Measuring.
4. After measurement, “distance” or “fail to measure” indicator are displayed for 8 seconds, then power turns off. If you press the POWER
button during power-on (while the internal display is lit), another single measurement starts.
Failure to measure or
unable to measure distance.
Displays the measured
figure. (Target 1)
Displays the measured
figure. (Target 2)
3. Keep pressing POWER button to start continuous measurement up to 20 seconds. The internal display shows “distance” and
“fail to measure” indicator alternately.
Note: Laser irradiaton mark is blinking during the measurement.
Note: If you stop pressing the button, the continuous measuremen stops
Target focusing.
2. Aim at the target
.
Position the target at the center of the reticle
[Single measurement]
Failure to measure or
unable to measure distance.
Upward measurement.
Downward measurement.
Displays the measured figure.
[Continuous measurement]
4. After continuous measurement, the measure results are displayed for 8 seconds, then power turns off. If you press the POWER
button during power-on (while the internal display is lit), another measrement starts.
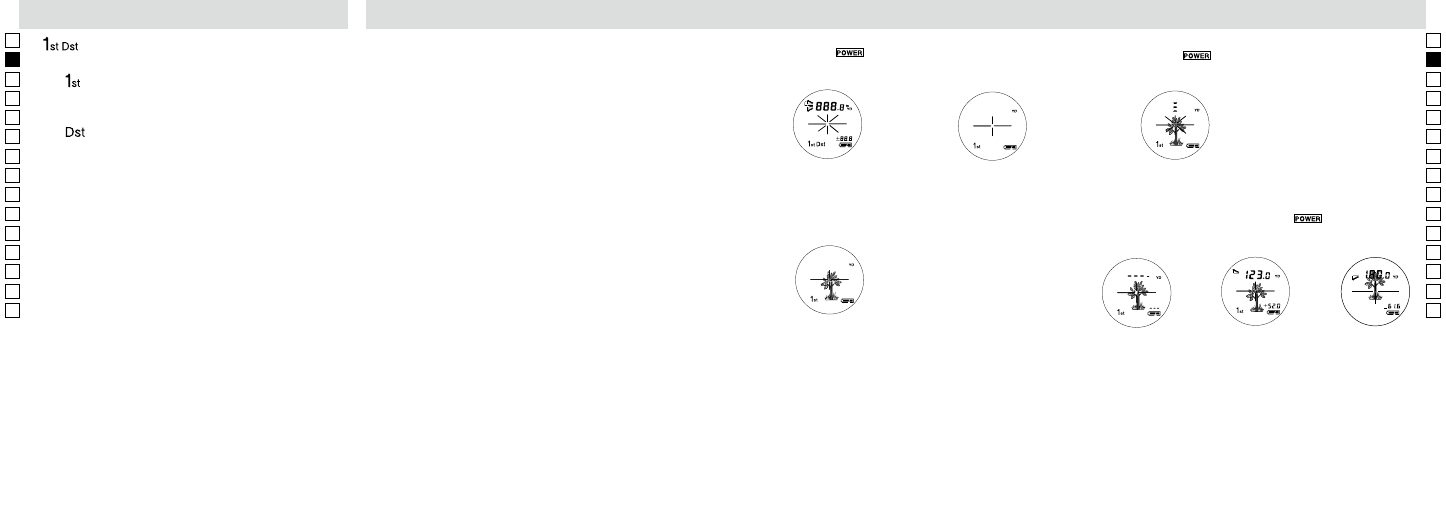
1. Drücken Sie die
-Taste zum Einschalten.
(Die Spannung stellt sich 8 Sekunden nach dem letzten
Bedienvorgang ab.)
Sofort nach dem Einschalten
(Initialisierung)
Standby
2. Visieren Sie das Ziel an.
Positionieren Sie das Ziel in die Mitte des Fadenkreuzes.
Zielfokussierung
3. Drücken Sie die
-Taste einmal, um die einzelne Messung zu
aktivieren.
【Einzelne Messung】
Messung
Measurement
1. Press the POWER button for power-on.
(Power turns off 8 seconds after the last
operation.)
Immediately after power-on.
(Initializing)
Stand-by.
3. Press POWER button once to start single measurement.
Measuring.
4. After measurement, “distance” or “fail to measure” indicator are displayed for 8 seconds, then power turns off. If you press the POWER
button during power-on (while the internal display is lit), another single measurement starts.
Failure to measure or
unable to measure distance.
Displays the measured
figure. (Target 1)
Displays the measured
figure. (Target 2)
3. Keep pressing POWER button to start continuous measurement up to 20 seconds. The internal display shows “distance” and
“fail to measure” indicator alternately.
Note: Laser irradiaton mark is blinking during the measurement.
Note: If you stop pressing the button, the continuous measuremen stops
Target focusing.
2. Aim at the target
.
Position the target at the center of the reticle
[Single measurement]
Failure to measure or
unable to measure distance.
Upward measurement.
Downward measurement.
Displays the measured figure.
[Continuous measurement]
4. After continuous measurement, the measure results are displayed for 8 seconds, then power turns off. If you press the POWER
button during power-on (while the internal display is lit), another measrement starts.
4. Nach der Messung wird die Meldung „Entfernung“ oder „Messung
fehlgeschlagen“ 8 Sekunden lang angezeigt und dann schaltet sich
der Entfernungsmesser ab. Wenn Sie die
-Taste während des
Einschaltens (während das interne Display aktiv ist) drücken, wird
eine weitere einzelne Messung aktiv.
Messung
fehlgeschlagen oder
nicht imstande,
Entfernung zu messen.
Aufwärts-
Messung
Abwärts-Messung
Zeigt die gemessene Zahl an.