Podsumowanie dotyczące obsługi, Measurement – Nikon Laser User Manual
Page 141
Ru
Se
Nl
Dk
Pl
Hu
Cz
Fi
No
En
De
Fr
Es
It
Ro
280
Ru
Se
Nl
Dk
Pl
Hu
Cz
Fi
No
En
De
Fr
Es
It
Ro
281
Podsumowanie dotyczące obsługi
Measurement
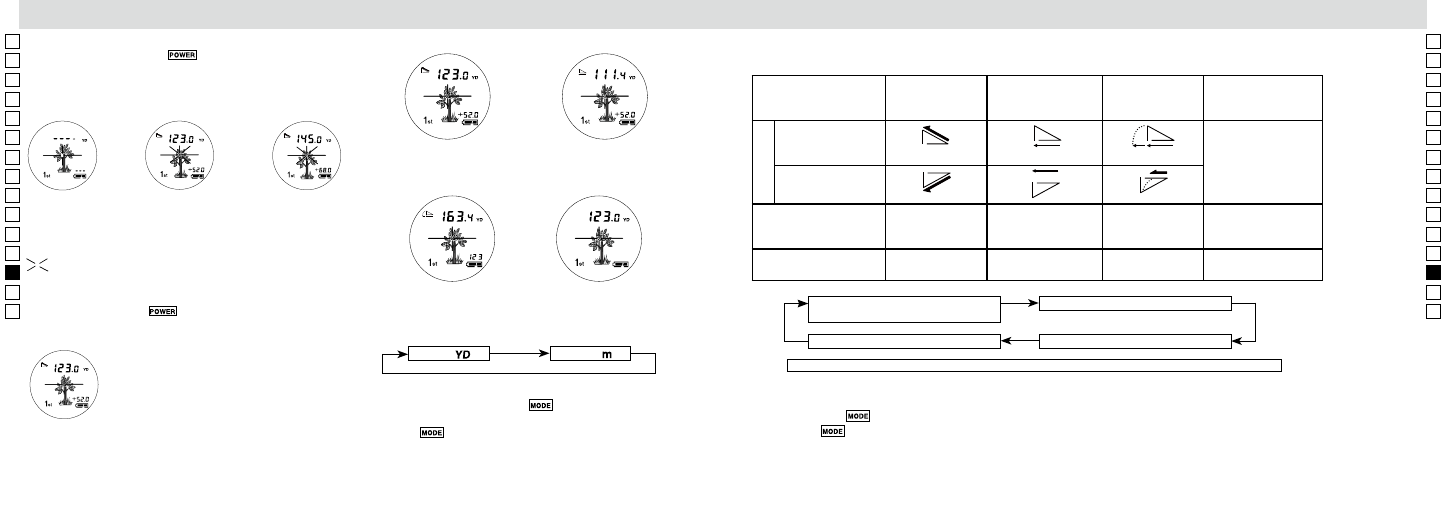
1. Press the POWER button for power-on.
(Power turns off 8 seconds after the last
operation.)
Immediately after power-on.
(Initializing)
Stand-by.
3. Press POWER button once to start single measurement.
Measuring.
4. After measurement, “distance” or “fail to measure” indicator are displayed for 8 seconds, then power turns off. If you press the POWER
button during power-on (while the internal display is lit), another single measurement starts.
Failure to measure or
unable to measure distance.
Displays the measured
figure. (Target 1)
Displays the measured
figure. (Target 2)
3. Keep pressing POWER button to start continuous measurement up to 20 seconds. The internal display shows “distance” and
“fail to measure” indicator alternately.
Note: Laser irradiaton mark is blinking during the measurement.
Note: If you stop pressing the button, the continuous measuremen stops
Target focusing.
2. Aim at the target
.
Position the target at the center of the reticle
[Single measurement]
Failure to measure or
unable to measure distance.
Upward measurement.
Downward measurement.
Displays the measured figure.
[Continuous measurement]
4. After continuous measurement, the measure results are displayed for 8 seconds, then power turns off. If you press the POWER
button during power-on (while the internal display is lit), another measrement starts.
Measurement
1. Press the POWER button for power-on.
(Power turns off 8 seconds after the last
operation.)
Immediately after power-on.
(Initializing)
Stand-by.
3. Press POWER button once to start single measurement.
Measuring.
4. After measurement, “distance” or “fail to measure” indicator are displayed for 8 seconds, then power turns off. If you press the POWER
button during power-on (while the internal display is lit), another single measurement starts.
Failure to measure or
unable to measure distance.
Displays the measured
figure. (Target 1)
Displays the measured
figure. (Target 2)
3. Keep pressing POWER button to start continuous measurement up to 20 seconds. The internal display shows “distance” and
“fail to measure” indicator alternately.
Note: Laser irradiaton mark is blinking during the measurement.
Note: If you stop pressing the button, the continuous measuremen stops
Target focusing.
2. Aim at the target
.
Position the target at the center of the reticle
[Single measurement]
Failure to measure or
unable to measure distance.
Upward measurement.
Downward measurement.
Displays the measured figure.
[Continuous measurement]
4. After continuous measurement, the measure results are displayed for 8 seconds, then power turns off. If you press the POWER
button during power-on (while the internal display is lit), another measrement starts.
3. Wciśnij i przytrzymaj przycisk
w celu rozpoczęcia ciągłego
pomiaru przez maks. 5 sekund. Wewnętrzny ekran wyświetla na
przemian wskazanie „odległość” i „błąd pomiaru”.
Uwaga: Oznaczenie promienia lasera miga podczas pomiaru.
Uwaga: Po zwolnieniu przycisku pomiar ciągły zostaje zatrzymany.
【Ciągły pomiar】
Pomiar zakończony
niepowodzeniem
lub brak możliwości
dokonania pomiaru.
Wyświetlanie
pomierzonej
wartości (Cel 1)
Wyświetlanie
pomierzonej
wartości (Cel 2)
5. Przykłady każdego trybu
Tryb odległości
rzeczywistej i
wysokości
Tryb odległości w poziomie
i wysokości
Tryb gry w golfa
Tryb odległości rzeczywistej
Metry
[
]
Jardy
[
]
1.
Upewnij się, że ekran LCD jest włączony.
2.
Naciśnij i przytrzymaj przycisk
przez około dwie sekundy.
3.
Gdy wyświetlana jednostka miary zostanie zmieniona, puść
przycisk
.
4.
Po ustawieniu jednostki wyniki zostaną przeliczone i
wyświetlone w wybranej jednostce miary.
6. Przełączanie trybów pomiaru/wyświetlania
(Domyślne ustawienie fabryczne to Tryb odległości rzeczywistej i wysokości)
1. Upewnij się, że ekran LCD jest włączony.
2. Naciśnij przycisk
na pół sekundy.
3. Zwolnienie
p
rzycisku spowoduje przełączenie trybu.
4. Powtórz kroki 2 i 3 do momentu wybrania żądanego trybu.
5. Zmiana trybu po dokonaniu pomiaru spowoduje przekonwertowanie wyników na nowy tryb.
6. Po ustawieniu trybu pomiary dokonywane są w nowym trybie.
Tryb odległości rzeczywistej i
wysokości
Tryb odległości w poziomie i wysokości
Tryb odległości rzeczywistej
Tryb gry w golfa
Przykładowo, dokonując pomiaru na chorągiewce podczas gry w golfa,
skorzystaj z trybu priorytetu pierwszego planu oraz ciągłego pomiaru,
aby w łatwy sposób uzyskać pomiar. Z uwagi na to, że między Tobą
a chorągiewką nie ma innych obiektów, najniższa wartość będzie
rzeczywistą odległością od chorągiewki.
Naciśnięcie przycisku MODE (Tryb) spowoduje zmianę trybów w kolejności określonej powyżej.
5. Wybór wyświetlanej jednostki miary (domyślne ustawienie
fabryczne to jardy.)
4. Po wykonaniu pomiaru przez 8 sekund wyświetlany jest komunikat
„odległość” lub „błąd pomiaru”, a następnie zasilanie jest wyłączane.
Po naciśnięciu przycisku
podczas włączonego zasilania (gdy
wewnętrzny wyświetlacz jest aktywny) rozpoczyna się kolejny pomiar
pojedynczy.
Nazwy trybów
Tryb odległości
rzeczywistej i
wysokości
Tryb odległości w
poziomie i wysokości
Tryb gry w golfa
Tryb odległości
rzeczywistej
Spojrzenie w górę
(+) kąt w górę
wzniesienia
Brak symbolu
Spojrzenie w dół (-)
kąt w dół wzniesienia
Górny, 7-segmentowy
wyświetlacz
Rzeczywista
odległość
Odległość w poziomie
Odległość z
uwzględnieniem
wzniesienia
Rzeczywista odległość
Dolny, 7-segmentowy
wyświetlacz
Wysokość
Wysokość
Rzeczywista
odległość
Bez wyświetlania
Symbol
Measurement
1. Press the POWER button for power-on.
(Power turns off 8 seconds after the last
operation.)
Immediately after power-on.
(Initializing)
Stand-by.
3. Press POWER button once to start single measurement.
Measuring.
4. After measurement, “distance” or “fail to measure” indicator are displayed for 8 seconds, then power turns off. If you press the POWER
button during power-on (while the internal display is lit), another single measurement starts.
Failure to measure or
unable to measure distance.
Displays the measured
figure. (Target 1)
Displays the measured
figure. (Target 2)
3. Keep pressing POWER button to start continuous measurement up to 20 seconds. The internal display shows “distance” and
“fail to measure” indicator alternately.
Note: Laser irradiaton mark is blinking during the measurement.
Note: If you stop pressing the button, the continuous measuremen stops
Target focusing.
2. Aim at the target
.
Position the target at the center of the reticle
[Single measurement]
Failure to measure or
unable to measure distance.
Upward measurement.
Downward measurement.
Displays the measured figure.
[Continuous measurement]
4. After continuous measurement, the measure results are displayed for 8 seconds, then power turns off. If you press the POWER
button during power-on (while the internal display is lit), another measrement starts.
Miga podczas dokonywania pomiaru.
Measurement
1. Press the POWER button for power-on.
(Power turns off 8 seconds after the last
operation.)
Immediately after power-on.
(Initializing)
Stand-by.
3. Press POWER button once to start single measurement.
Measuring.
4. After measurement, “distance” or “fail to measure” indicator are displayed for 8 seconds, then power turns off. If you press the POWER
button during power-on (while the internal display is lit), another single measurement starts.
Failure to measure or
unable to measure distance.
Displays the measured
figure. (Target 1)
Displays the measured
figure. (Target 2)
3. Keep pressing POWER button to start continuous measurement up to 20 seconds. The internal display shows “distance” and
“fail to measure” indicator alternately.
Note: Laser irradiaton mark is blinking during the measurement.
Note: If you stop pressing the button, the continuous measuremen stops
Target focusing.
2. Aim at the target
.
Position the target at the center of the reticle
[Single measurement]
Failure to measure or
unable to measure distance.
Upward measurement.
Downward measurement.
Displays the measured figure.
[Continuous measurement]
4. After continuous measurement, the measure results are displayed for 8 seconds, then power turns off. If you press the POWER
button during power-on (while the internal display is lit), another measrement starts.