Belső kijelző működési leírás – Nikon Laser User Manual
Page 151
Ru
Se
Nl
Dk
Pl
Hu
Cz
Fi
No
En
De
Fr
Es
It
Ro
300
Ru
Se
Nl
Dk
Pl
Hu
Cz
Fi
No
En
De
Fr
Es
It
Ro
301
6. 『
』 Céltárgy elsőbbsége üzemmód
A. Első céltárgy elsőbbsége üzemmód
『
』 Akkor jelenik meg, ha az "Első céltárgy elsőbbsége"
üzemmódot beállította.
B. Távoli céltárgy elsőbbsége üzemmód
『
』 Akkor jelenik meg, ha a "Távoli céltárgy
elsőbbsége" üzemmódot beállította.
7. Aktív fényerő-szabályozós képkeresés
Az aktív fényerő-szabályzós képkereső leginkább
alátómezőben észleli a talaj fényviszonyait, és szükség esetén
automatikusan bekapcsolja a narancssárga LED világítást.
A narancssárga fény erősségét a műszer automatikusan a
fényviszonyoknak megfelelően állítja be.
Bár az LCD előállításához a legkorszerűbb technológiát
alkalmaztuk, a port nem lehet teljes mértékben eltávolítani. A
termék használatakor a szemlencsék erős nagyítása felnagyítja
az LCD-t, és azon hibaként por jelenhet meg. Ez azonban nem
befolyásolja a mérés pontosságát.
Vigyázat – az itt meghatározottaktól eltérő
ellenőrzési, beállítási, kivitelezési eljárások
alkalmazása veszélyes sugárterhelést eredményezhet
1. Helyezzen be egy elemet az elemrekeszbe. (lásd az "Elemek
cseréje" c. részt)
2. Gumi szemlencsekagyló
Szemüveges és nem szemüveges személyek is tudják használni
ezt a távolságmérőt anélkül, hogy a gumi szemlencsekagylót
csatlakoztatnák.
3. Dioptria beállítása
Állítsa be a dioptriát úgy, hogy tiszta képet kapjon az LCD-n.
Először ütközésig forgassa el balra a dioptriabeállító gyűrűt.
Ezután nézzen bele a Nikon Laser 1000A S készülékbe, és az LCD
bekapcsolásához nyomja meg a főkapcsolót. Jobbra forgassa el a
dioptriabeállító gyűrűt, amíg a kijelző fókuszba nem kerül.
Ha a dioptriát nem szabályozza be látásának megfelelően,
képtelen lesz a céltárgyat fókuszba állítani.
4. Mérés
Megjegyzés: Ha megnyomja és lenyomva tartja a POWER gombot,
a belső LCD panel megjeleníti az összes jelet. Miután
felengedi a POWER gombot, a gép az utoljára használt
beállítást mutatja. (Ha rövid ideig megnyomja,
majd felengedi a POWER gombot, az LCD panel
megjelenítheti az utoljára használt beállítást a teljes
jelkészlet kijelzése nélkül. Ez nem működési hiba vagy
egyéb probléma.)
Mérés előtt nézze át az olyan beállításokat, mint a mértékegység,
mérési/megjelenítési üzemmód és az elsőbbségi üzemmód.
◎ : Lásd a jelen kézikönyv megfelelő üzemmódra vonatkozó részeit a
beállításhoz.
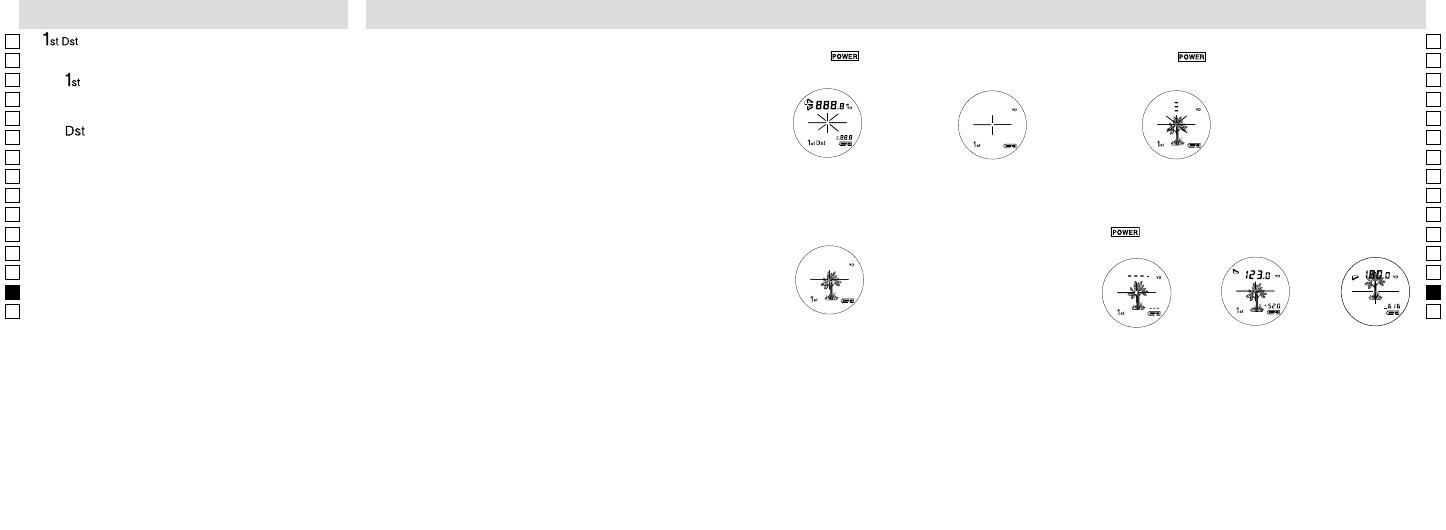
Belső kijelző
Működési leírás
Measurement
1. Press the POWER button for power-on.
(Power turns off 8 seconds after the last
operation.)
Immediately after power-on.
(Initializing)
Stand-by.
3. Press POWER button once to start single measurement.
Measuring.
4. After measurement, “distance” or “fail to measure” indicator are displayed for 8 seconds, then power turns off. If you press the POWER
button during power-on (while the internal display is lit), another single measurement starts.
Failure to measure or
unable to measure distance.
Displays the measured
figure. (Target 1)
Displays the measured
figure. (Target 2)
3. Keep pressing POWER button to start continuous measurement up to 20 seconds. The internal display shows “distance” and
“fail to measure” indicator alternately.
Note: Laser irradiaton mark is blinking during the measurement.
Note: If you stop pressing the button, the continuous measuremen stops
Target focusing.
2. Aim at the target
.
Position the target at the center of the reticle
[Single measurement]
Failure to measure or
unable to measure distance.
Upward measurement.
Downward measurement.
Displays the measured figure.
[Continuous measurement]
4. After continuous measurement, the measure results are displayed for 8 seconds, then power turns off. If you press the POWER
button during power-on (while the internal display is lit), another measrement starts.
1. Nyomja meg a
gombot a bekapcsoláshoz.
(A gép 8 másodperccel az utolsó művelet után kikapcsol.)
Közvetlenül a bekapcsolás
után. (Inicializálás)
Készenléti állapot
2. Irányítsa rá a gépet a céltárgyra.
Állítsa be a célt a hajszálkereszt közepére.
Céltárgy becélzása
3. Nyomja meg a
gombot egyszer, hogy elinduljon az egyszeri
mérés.
【Egyszeri mérés】
Mérés
Measurement
1. Press the POWER button for power-on.
(Power turns off 8 seconds after the last
operation.)
Immediately after power-on.
(Initializing)
Stand-by.
3. Press POWER button once to start single measurement.
Measuring.
4. After measurement, “distance” or “fail to measure” indicator are displayed for 8 seconds, then power turns off. If you press the POWER
button during power-on (while the internal display is lit), another single measurement starts.
Failure to measure or
unable to measure distance.
Displays the measured
figure. (Target 1)
Displays the measured
figure. (Target 2)
3. Keep pressing POWER button to start continuous measurement up to 20 seconds. The internal display shows “distance” and
“fail to measure” indicator alternately.
Note: Laser irradiaton mark is blinking during the measurement.
Note: If you stop pressing the button, the continuous measuremen stops
Target focusing.
2. Aim at the target
.
Position the target at the center of the reticle
[Single measurement]
Failure to measure or
unable to measure distance.
Upward measurement.
Downward measurement.
Displays the measured figure.
[Continuous measurement]
4. After continuous measurement, the measure results are displayed for 8 seconds, then power turns off. If you press the POWER
button during power-on (while the internal display is lit), another measrement starts.
4. Mérés után a "Távolság" vagy a "Hibás mérés" jelzések jelennek
meg 8 másodpercig, aztán a gép kikapcsol. Ha megnyomja a
gombot a bekapcsolás közben (míg a belső kijelző aktív),
egy új egyszeri mérés indul el.
Hibás a mérés
vagy nem lehet
távolságot mérni.
Mérés felfelé
Mérés lefelé
Megjelenik a mért alak.