Sumar operaţii, Measurement – Nikon Laser User Manual
Page 130
Ru
Se
Nl
Dk
Pl
Hu
Cz
Fi
No
En
De
Fr
Es
It
Ro
258
Ru
Se
Nl
Dk
Pl
Hu
Cz
Fi
No
En
De
Fr
Es
It
Ro
259
Sumar operaţii
Measurement
1. Press the POWER button for power-on.
(Power turns off 8 seconds after the last
operation.)
Immediately after power-on.
(Initializing)
Stand-by.
3. Press POWER button once to start single measurement.
Measuring.
4. After measurement, “distance” or “fail to measure” indicator are displayed for 8 seconds, then power turns off. If you press the POWER
button during power-on (while the internal display is lit), another single measurement starts.
Failure to measure or
unable to measure distance.
Displays the measured
figure. (Target 1)
Displays the measured
figure. (Target 2)
3. Keep pressing POWER button to start continuous measurement up to 20 seconds. The internal display shows “distance” and
“fail to measure” indicator alternately.
Note: Laser irradiaton mark is blinking during the measurement.
Note: If you stop pressing the button, the continuous measuremen stops
Target focusing.
2. Aim at the target
.
Position the target at the center of the reticle
[Single measurement]
Failure to measure or
unable to measure distance.
Upward measurement.
Downward measurement.
Displays the measured figure.
[Continuous measurement]
4. After continuous measurement, the measure results are displayed for 8 seconds, then power turns off. If you press the POWER
button during power-on (while the internal display is lit), another measrement starts.
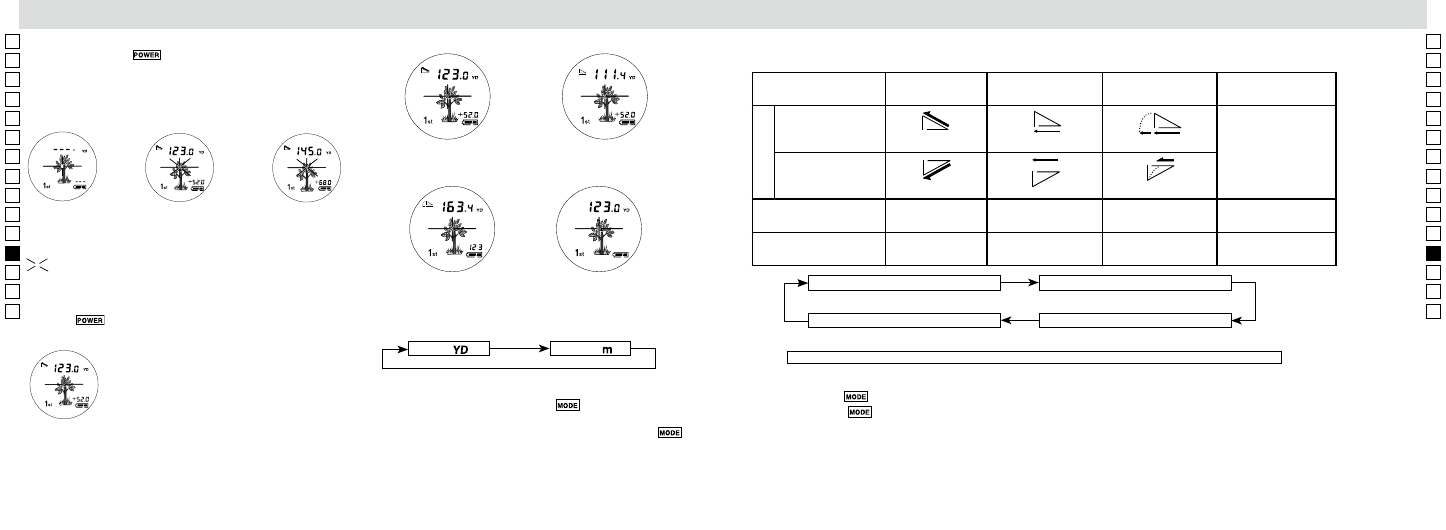
3. Ţineţi apăsat butonul
pentru a porni măsurarea continuă de
până la aprox. 5 secunde. Afişajul intern arată alternativ indicatorul
"distanţă" şi "eroare de măsurare".
Notă: Marcajul iradierii cu laser clipeşte în timpul măsurării.
Notă: Dacă vă opriţi din apăsarea butonului, măsurarea continuă se
opreşte.
【Măsurarea continuă】
Eroare de măsurare
sau imposibilitate de
a măsura distanţa.
Afişează figura
măsurată
(Ţinta 1)
Afişează figura
măsurată
(Ţinta 2)
5. Exemple de afişaj ale fiecărui mod
Modul distanţa
efectivă şi înălţimea
Modul distanţa orizontală şi
înălţimea
Modul golf
Modul distanţa efectivă
Metru
[
]
Yard
[
]
1.
Asiguraţi-vă că panoul LCD este pornit.
2.
Apăsaţi şi menţineţi apăsat butonul
pentru aproximativ
două secunde.
3.
Când unităţile din display s-au schimbat, eliberaţi butonul
.
4.
După ce s-a reglat unitatea de măsură, rezultatele vor fi
convertite şi afişate în unitatea de măsură selectată de dvs.
6. Comutare mod măsurare/display
(Reglarea implicită din fabrică este modul distanţă efectivă şi înălţime)
1. Asiguraţi-vă că panoul LCD este pornit.
2. Apăsaţi butonul
în decurs de 0,5 secunde.
3. Eliberaţi butonul
pentru a comuta modul.
4. Repetaţi paşii 2 şi 3 până când este afişat modul dorit.
5. Comutarea modului după măsurare converteşte rezultatele în noul mod.
6. După ce modul este fixat, măsurările sunt efectuate în noul mod.
Modul distanţă efectivă şi înălţime
Modul distanţă orizontală şi înălţime
Modul distanţă efectivă
Modul golf
Când măsuraţi o ţintă la un parcurs de golf, folosiţi, de exemplu,
prioritatea primei ţinte şi modul de măsurare continuă, pentru
măsurare uşoară. Când nu există obiecte între dvs. şi ţintă, cel mai mic
număr este distanţa până la ţinta vizată.
Prin apăsarea butonului MODE (MOD), modurile se vor schimba în ordinea indicată mai sus.
5. Selectarea unităţilor de măsură din afişaj (Reglarea implicită
din fabrică este yard.)
4. După măsurare, este afişată indicaţia "distanţă" sau "eroare de
măsurare" timp de 8 secunde, apoi aparatul se opreşte. Dacă apăsaţi
butonul
în timp ce aparatul este pornit (în timp ce afişajul
intern este aprins), porneşte o altă măsurare simplă.
Numele modurilor
Modul distanţă
efectivă şi înălţime
Modul distanţă
orizontală şi înălţime
Modul golf
Modul distanţă
efectivă
Privire în sus
Unghi (+)
În susul pantei
Fără simbol
Privire în jos
Unghi (-)
În josul pantei
Afişaj superior cu 7
segmente
Distanţa efectivă
Distanţa orizontală
Distanţă cu corecţie
în funcţie de pantă
Distanţa efectivă
Afişaj inferior cu 7
segmente
Înălţimea
Înălţimea
Distanţa efectivă
Fără afişare
Simbol
Measurement
1. Press the POWER button for power-on.
(Power turns off 8 seconds after the last
operation.)
Immediately after power-on.
(Initializing)
Stand-by.
3. Press POWER button once to start single measurement.
Measuring.
4. After measurement, “distance” or “fail to measure” indicator are displayed for 8 seconds, then power turns off. If you press the POWER
button during power-on (while the internal display is lit), another single measurement starts.
Failure to measure or
unable to measure distance.
Displays the measured
figure. (Target 1)
Displays the measured
figure. (Target 2)
3. Keep pressing POWER button to start continuous measurement up to 20 seconds. The internal display shows “distance” and
“fail to measure” indicator alternately.
Note: Laser irradiaton mark is blinking during the measurement.
Note: If you stop pressing the button, the continuous measuremen stops
Target focusing.
2. Aim at the target
.
Position the target at the center of the reticle
[Single measurement]
Failure to measure or
unable to measure distance.
Upward measurement.
Downward measurement.
Displays the measured figure.
[Continuous measurement]
4. After continuous measurement, the measure results are displayed for 8 seconds, then power turns off. If you press the POWER
button during power-on (while the internal display is lit), another measrement starts.
Clipeşte în timpul măsurărilor.
Measurement
1. Press the POWER button for power-on.
(Power turns off 8 seconds after the last
operation.)
Immediately after power-on.
(Initializing)
Stand-by.
3. Press POWER button once to start single measurement.
Measuring.
4. After measurement, “distance” or “fail to measure” indicator are displayed for 8 seconds, then power turns off. If you press the POWER
button during power-on (while the internal display is lit), another single measurement starts.
Failure to measure or
unable to measure distance.
Displays the measured
figure. (Target 1)
Displays the measured
figure. (Target 2)
3. Keep pressing POWER button to start continuous measurement up to 20 seconds. The internal display shows “distance” and
“fail to measure” indicator alternately.
Note: Laser irradiaton mark is blinking during the measurement.
Note: If you stop pressing the button, the continuous measuremen stops
Target focusing.
2. Aim at the target
.
Position the target at the center of the reticle
[Single measurement]
Failure to measure or
unable to measure distance.
Upward measurement.
Downward measurement.
Displays the measured figure.
[Continuous measurement]
4. After continuous measurement, the measure results are displayed for 8 seconds, then power turns off. If you press the POWER
button during power-on (while the internal display is lit), another measrement starts.