Intern display sammanfattning av användning – Nikon Laser User Manual
Page 85
Ru
Se
Nl
Dk
Pl
Hu
Cz
Fi
No
En
De
Fr
Es
It
Ro
168
Ru
Se
Nl
Dk
Pl
Hu
Cz
Fi
No
En
De
Fr
Es
It
Ro
169
6. 『
』 Målprioriteringsläge
A. Prioritetsinställning på första målet
『
』 Indikerar att prioritetsinställning på första målet är
inställt.
B. Prioritetsinställning på målet som är längst bort
『
』 Indikerar att prioritetsinställning på målet längst
bort är inställt.
7. Active Brightness Control Viewfinder
Active Brightness Control Viewfinder registrerar
ljusförhållandena på marknivå, huvudsakligen i
synfältet och slår vid behov automatiskt på den orange
bakgrundbelysningen.
Bakgrundsbelysningens ljusstyrka justeras automatiskt efter
ljusförhållandena.
Även om LCD-skärmen tillverkades med den allra senaste
teknologin är det omöjligt att helt eliminera damm. När den
här produkten används förstoras LCD-skärmen med den höga
förstoringen hos okularet och damm kan visas som en defekt.
Det kommer dock inte att påverka mätningens exakthet.
Försiktighet — användning av reglage eller
justeringar eller prestanda för andra procedurer än de
som anges i denna dokumentation kan leda till
exponering av farlig strålning.
1. Sätt i ett batteri i batterifacket. (Se "Byta batterier")
2. Ögonmussla av gummi
Både personer med glasögon och de utan kan använda
avståndsmätaren utan att sätta på ögonmusslan av gummi.
3. Dioptrijustering
Justera dioptrin för att få en tydlig bild på LCD-skärmen.
Vrid först dioptrijusteringsringen moturs tills den stoppar. Slå
därefter till strömmen för att aktivera LCD-skärmen när du
tittar genom Nikon Laser 1000A S. Vrid dioptrijusteringsringen
medurs tills bilden blir fokuserad.
Om dioptrin inte justeras efter din syn kan du få svårt att tydligt
fokusera på dina mål.
4. Mätning
Anmärkning: Genom att trycka in och hålla POWER intryckt visas
alla symboler på den interna LCD-displayen. När du
släpper upp POWER-knappen visas de senast använda
inställningarna. (Om du kort trycker ner POWER-knappen
och därefter tar bort ditt finger kan LCD-displayen visa de
senast använda inställningarna utan att visa alla symboler.
Detta är inte något fel eller problem.)
Kontrollera inställningarna, t.ex enhet, mätnings-/visningsläge och
prioritetsläge, före mätning.
◎ : Se relevant avsnitt för läget i denna manual för inställning.
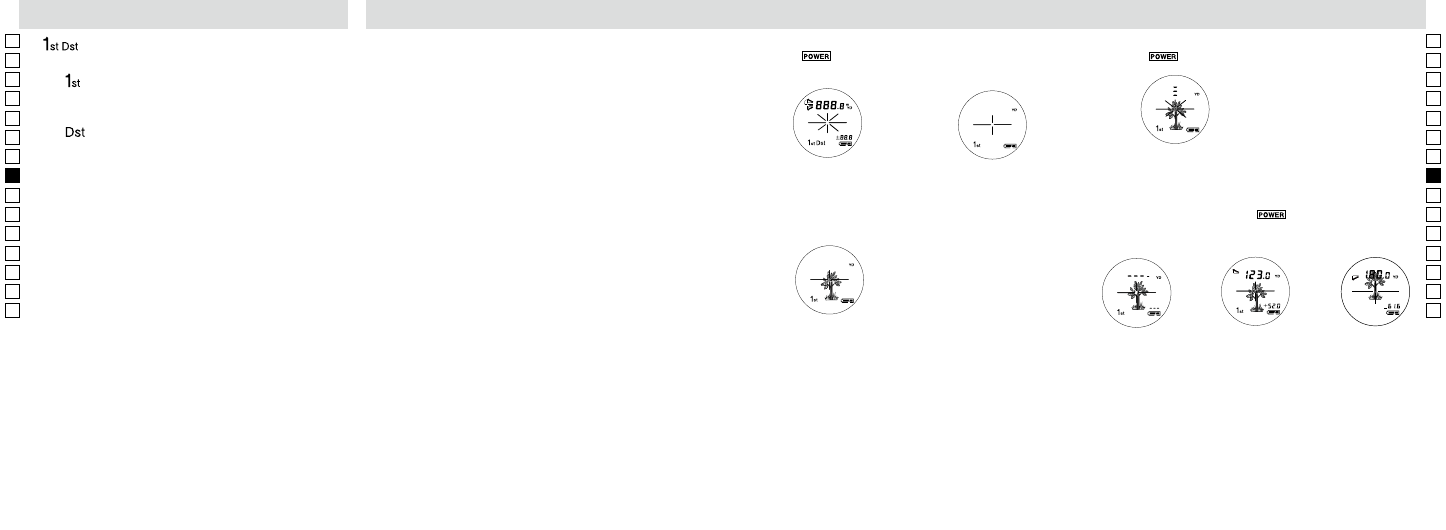
Intern display
Sammanfattning av användning
Measurement
1. Press the POWER button for power-on.
(Power turns off 8 seconds after the last
operation.)
Immediately after power-on.
(Initializing)
Stand-by.
3. Press POWER button once to start single measurement.
Measuring.
4. After measurement, “distance” or “fail to measure” indicator are displayed for 8 seconds, then power turns off. If you press the POWER
button during power-on (while the internal display is lit), another single measurement starts.
Failure to measure or
unable to measure distance.
Displays the measured
figure. (Target 1)
Displays the measured
figure. (Target 2)
3. Keep pressing POWER button to start continuous measurement up to 20 seconds. The internal display shows “distance” and
“fail to measure” indicator alternately.
Note: Laser irradiaton mark is blinking during the measurement.
Note: If you stop pressing the button, the continuous measuremen stops
Target focusing.
2. Aim at the target
.
Position the target at the center of the reticle
[Single measurement]
Failure to measure or
unable to measure distance.
Upward measurement.
Downward measurement.
Displays the measured figure.
[Continuous measurement]
4. After continuous measurement, the measure results are displayed for 8 seconds, then power turns off. If you press the POWER
button during power-on (while the internal display is lit), another measrement starts.
1. Tryck på
-knappen för att slå på avståndsmätaren.
(Strömmen stängs av 8 sekunder efter senaste aktiviteten.)
Direkt efter att strömmen slås
på. (Initierar)
Viloläge
2. Sikta mot målet.
Positionera målet mitt i hårkorset.
Insiktning
3. Tryck på
-knappen en gång för att start en enskild mätning.
【Enskild mätning】
Mätning
Measurement
1. Press the POWER button for power-on.
(Power turns off 8 seconds after the last
operation.)
Immediately after power-on.
(Initializing)
Stand-by.
3. Press POWER button once to start single measurement.
Measuring.
4. After measurement, “distance” or “fail to measure” indicator are displayed for 8 seconds, then power turns off. If you press the POWER
button during power-on (while the internal display is lit), another single measurement starts.
Failure to measure or
unable to measure distance.
Displays the measured
figure. (Target 1)
Displays the measured
figure. (Target 2)
3. Keep pressing POWER button to start continuous measurement up to 20 seconds. The internal display shows “distance” and
“fail to measure” indicator alternately.
Note: Laser irradiaton mark is blinking during the measurement.
Note: If you stop pressing the button, the continuous measuremen stops
Target focusing.
2. Aim at the target
.
Position the target at the center of the reticle
[Single measurement]
Failure to measure or
unable to measure distance.
Upward measurement.
Downward measurement.
Displays the measured figure.
[Continuous measurement]
4. After continuous measurement, the measure results are displayed for 8 seconds, then power turns off. If you press the POWER
button during power-on (while the internal display is lit), another measrement starts.
4. Efter mätningen visas indikatorn "distance" (Avstånd) eller "fail
to measure" (Misslyckad mätning) i åtta sekunder, sedan slås
strömmen av. Om du trycker på
-knappen när strömmen
slås på (medan den interna displayen är aktiv), startar en ny enskild
mätning.
Misslyckad mätning
eller kunde inte
mäta avstånd
Uppåtmätning
Nedåtmätning
Visar den uppmätta figuren.