Sammanfattning av användning, Measurement – Nikon Laser User Manual
Page 86
Ru
Se
Nl
Dk
Pl
Hu
Cz
Fi
No
En
De
Fr
Es
It
Ro
170
Ru
Se
Nl
Dk
Pl
Hu
Cz
Fi
No
En
De
Fr
Es
It
Ro
171
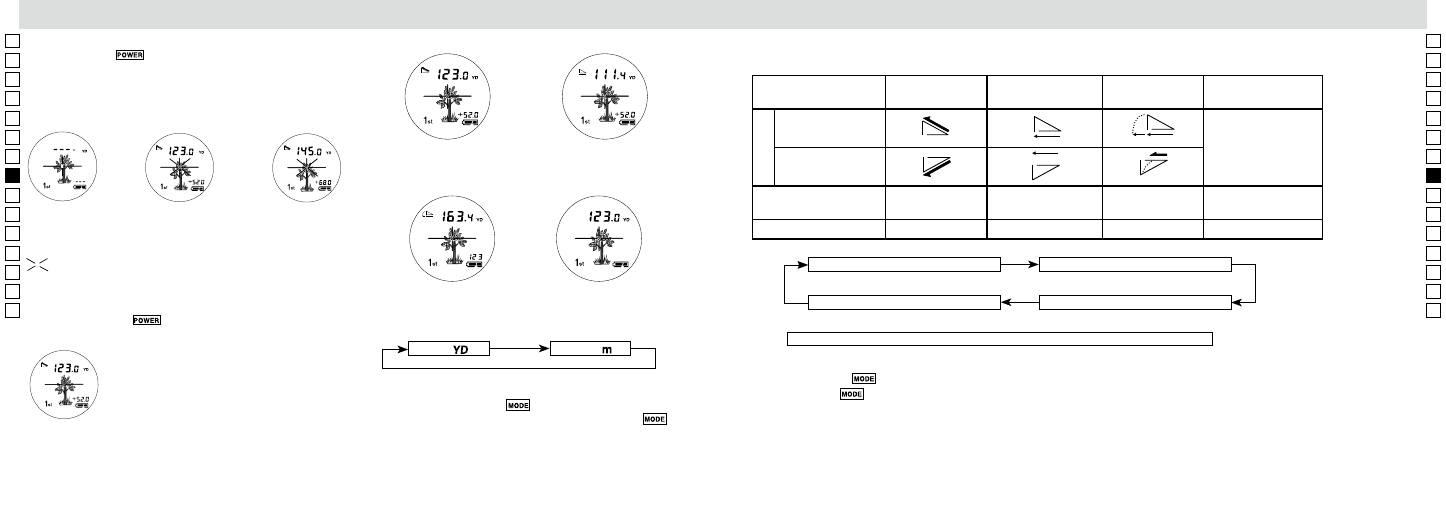
Sammanfattning av användning
Measurement
1. Press the POWER button for power-on.
(Power turns off 8 seconds after the last
operation.)
Immediately after power-on.
(Initializing)
Stand-by.
3. Press POWER button once to start single measurement.
Measuring.
4. After measurement, “distance” or “fail to measure” indicator are displayed for 8 seconds, then power turns off. If you press the POWER
button during power-on (while the internal display is lit), another single measurement starts.
Failure to measure or
unable to measure distance.
Displays the measured
figure. (Target 1)
Displays the measured
figure. (Target 2)
3. Keep pressing POWER button to start continuous measurement up to 20 seconds. The internal display shows “distance” and
“fail to measure” indicator alternately.
Note: Laser irradiaton mark is blinking during the measurement.
Note: If you stop pressing the button, the continuous measuremen stops
Target focusing.
2. Aim at the target
.
Position the target at the center of the reticle
[Single measurement]
Failure to measure or
unable to measure distance.
Upward measurement.
Downward measurement.
Displays the measured figure.
[Continuous measurement]
4. After continuous measurement, the measure results are displayed for 8 seconds, then power turns off. If you press the POWER
button during power-on (while the internal display is lit), another measrement starts.
3. Fortsätt trycka på
-knappen för att starta en kontinuerlig
mätning i ca 5 sekunder. Den interna displayen visar "distance"
(Avstånd) eller "fail to measure" (Misslyckad mätning).
Anmärkning: Laserstrålningsmärket blinkar under mätningen.
Anmärkning: Om du släpper knappen, avslutas den kontinuerliga
mätningen.
【Kontinuerlig mätning】
Misslyckad mätning
eller kunde inte
mäta avstånd
Visar den
uppmätta figuren.
(Mål 1)
Visar den
uppmätta figuren.
(Mål 2)
5. Exempel på alla olika lägen
Faktiskt avstånd och
höjd
Horisontellt avstånd och
höjd
Golfläge
Faktiskt avståndsläge
Meter
[
]
Yard
[
]
1.
Kontrollera att LCD-skärmen är på.
2.
Tryck in och håll knappen
intryckt i ungefär två sekunder.
3.
När visningsenheten har ändrats släpper du knappen
.
4.
När enheten har ställts in konverteras resultaten och visas i vald
mätenhet.
6. Växla mätnings-/visningslägen
(Fabriksinställningen är Faktiskt avstånd och Höjd)
1. Kontrollera att LCD-skärmen är på.
2. Tryck på knappen
inom 0,5 sekund.
3. Släpp knappen
för att växla läge.
4. Upprepa steg 2 och 3 tills att önskat läge visas.
5. Genom att växla läge efter mätningen konverteras resultaten till det nya läget.
6. När läget har ställts in utförs mätningen i det nya läget.
Faktiskt avstånd och Höjd
Horisontellt avstånd och Höjd
Faktiskt avstånd
Golf
Vid mätning av en flagga på en golfbana kan till exempel
Prioritetsinställning på första målet och kontinuerlig mätning
underlätta mätningen. Om det inte finns några föremål mellan dig och
flaggan är den lägsta siffran avståndet mellan dig och flaggan.
Genom att trycka på knappen MODE ändras lägena i den ordning som anges ovan.
5. Välja visningsenhet (Fabriksinställningen är yard.)
4. Efter mätningen visas indikatorn "distance" (Avstånd) eller "fail to
measure" (Misslyckad mätning) i åtta sekunder, sedan slås strömmen
av. Om du trycker på
-knappen när strömmen slås på (medan
den interna displayen är tänd), startar en ny enskild mätning.
Lägesnamn
Faktiskt avstånd
och Höjd
Horisontellt avstånd
och Höjd
Golf
Faktiskt avstånd
Uppåtvy (+) vinkel
Uppåtlutning
Ingen symbol
Nedåtvy (-) vinkel
Nedåtlutning
Övre fyrsiffrig display]:
Faktiskt avstånd
Horisontellt avstånd
Lutningsjusterat
avstånd
Faktiskt avstånd
Nedre sjusiffrig display
Höjd
Höjd
Faktiskt avstånd
Visar inget
Symbol
Measurement
1. Press the POWER button for power-on.
(Power turns off 8 seconds after the last
operation.)
Immediately after power-on.
(Initializing)
Stand-by.
3. Press POWER button once to start single measurement.
Measuring.
4. After measurement, “distance” or “fail to measure” indicator are displayed for 8 seconds, then power turns off. If you press the POWER
button during power-on (while the internal display is lit), another single measurement starts.
Failure to measure or
unable to measure distance.
Displays the measured
figure. (Target 1)
Displays the measured
figure. (Target 2)
3. Keep pressing POWER button to start continuous measurement up to 20 seconds. The internal display shows “distance” and
“fail to measure” indicator alternately.
Note: Laser irradiaton mark is blinking during the measurement.
Note: If you stop pressing the button, the continuous measuremen stops
Target focusing.
2. Aim at the target
.
Position the target at the center of the reticle
[Single measurement]
Failure to measure or
unable to measure distance.
Upward measurement.
Downward measurement.
Displays the measured figure.
[Continuous measurement]
4. After continuous measurement, the measure results are displayed for 8 seconds, then power turns off. If you press the POWER
button during power-on (while the internal display is lit), another measrement starts.
Blinkar medan en mätning utförs.
Measurement
1. Press the POWER button for power-on.
(Power turns off 8 seconds after the last
operation.)
Immediately after power-on.
(Initializing)
Stand-by.
3. Press POWER button once to start single measurement.
Measuring.
4. After measurement, “distance” or “fail to measure” indicator are displayed for 8 seconds, then power turns off. If you press the POWER
button during power-on (while the internal display is lit), another single measurement starts.
Failure to measure or
unable to measure distance.
Displays the measured
figure. (Target 1)
Displays the measured
figure. (Target 2)
3. Keep pressing POWER button to start continuous measurement up to 20 seconds. The internal display shows “distance” and
“fail to measure” indicator alternately.
Note: Laser irradiaton mark is blinking during the measurement.
Note: If you stop pressing the button, the continuous measuremen stops
Target focusing.
2. Aim at the target
.
Position the target at the center of the reticle
[Single measurement]
Failure to measure or
unable to measure distance.
Upward measurement.
Downward measurement.
Displays the measured figure.
[Continuous measurement]
4. After continuous measurement, the measure results are displayed for 8 seconds, then power turns off. If you press the POWER
button during power-on (while the internal display is lit), another measrement starts.