Működési leírás, Measurement – Nikon Laser User Manual
Page 152
Ru
Se
Nl
Dk
Pl
Hu
Cz
Fi
No
En
De
Fr
Es
It
Ro
302
Ru
Se
Nl
Dk
Pl
Hu
Cz
Fi
No
En
De
Fr
Es
It
Ro
303
Működési leírás
Measurement
1. Press the POWER button for power-on.
(Power turns off 8 seconds after the last
operation.)
Immediately after power-on.
(Initializing)
Stand-by.
3. Press POWER button once to start single measurement.
Measuring.
4. After measurement, “distance” or “fail to measure” indicator are displayed for 8 seconds, then power turns off. If you press the POWER
button during power-on (while the internal display is lit), another single measurement starts.
Failure to measure or
unable to measure distance.
Displays the measured
figure. (Target 1)
Displays the measured
figure. (Target 2)
3. Keep pressing POWER button to start continuous measurement up to 20 seconds. The internal display shows “distance” and
“fail to measure” indicator alternately.
Note: Laser irradiaton mark is blinking during the measurement.
Note: If you stop pressing the button, the continuous measuremen stops
Target focusing.
2. Aim at the target
.
Position the target at the center of the reticle
[Single measurement]
Failure to measure or
unable to measure distance.
Upward measurement.
Downward measurement.
Displays the measured figure.
[Continuous measurement]
4. After continuous measurement, the measure results are displayed for 8 seconds, then power turns off. If you press the POWER
button during power-on (while the internal display is lit), another measrement starts.
3. A folyamatos mérés elindításához tartsa lenyomva a
gombot
kb. 5 másodpercig. A belső kijelzőn a "Távolság" és "Hibás mérés"
kijelzések váltakoznak.
Megjegyzés: A mérés ideje alatt a lézersugárzás jele villog.
Megjegyzés: Ha nem nyomja tovább a gombot, a folyamatos mérés
leáll.
【Folyamatos mérés】
Hibás a mérés
vagy nem lehet
távolságot mérni.
Megjelenik a mért
alak.
(1. céltárgy)
Megjelenik a mért
alak.
(2. céltárgy)
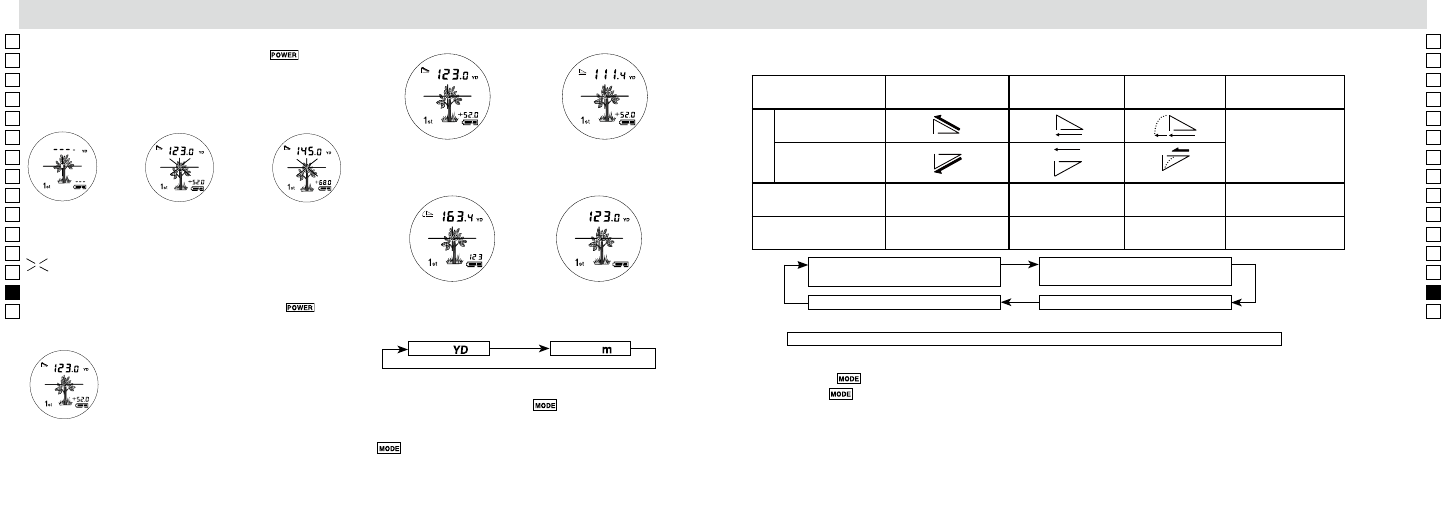
5. Példák bemutatása minden egyes üzemmódra
Aktuális távolság és
magasság üzemmód
Vízszintes távolság és
magasság üzemmód
Golf üzemmód
Aktuális távolság üzemmód
Méter
[
]
Yard
[
]
1.
Nézze meg, hogy az LCD panel be van-e kapcsolva.
2.
Nyomja le és tartsa lenyomva a
gombot körülbelül két
másodpercig.
3.
Amikor a kijelzett mértékegységet átkapcsolta, engedje el a
gombot.
4.
A mértékegység beállítása után a gép átalakítja az
eredményeket, és az Ön által kiválasztott módon jeleníti meg.
6. Váltás a mérés/kijelző üzemmódok között
(A gyári alapbeállítás a Tényleges távolság és magasság üzemmód)
1. Nézze meg, hogy az LCD panel be van-e kapcsolva.
2. Nyomja meg a
gombot 0,5 másodpercen belül.
3. Engedje fel a
g
ombot az üzemmódra kapcsoláshoz.
4. Ismételje a 2. és 3. lépéseket a kívánt üzemmód megjelenéséig.
5. Az üzemmódra akkor kapcsoljon át, miután a gép átalakította az eredményeket az új üzemmódhoz.
6. Miután beállította az üzemmódot, a gép a mérést az új üzemmódban végzi el.
Tényleges távolság és magasság
üzemmód
Vízszintes távolság és magasság
üzemmód
Tényleges távolság üzemmód
Golf üzemmód
Amikor például egy golfpályán a kitűzőzászló nyelét méri, a könnyű
mérés érdekében használja az Első céltárgy elsőbbsége és a
Folyamatos mérés üzemmódot. Amennyiben Ön és a kitűzőzászló nyél
között nincs akadály, a legkisebb szám mutatja a célba vett zászlónyél
távolságát.
A MODE gombot megnyomva az üzemmódok a fentiekben megadott sorrend szerint változnak.
5. A kijelzett mértékegység kiválasztása (A gyári alapbeállítás a
yard.)
4. Mérés után a "Távolság" vagy a "Hibás mérés" jelzések jelennek meg
8 másodpercig, aztán a gép kikapcsol. Ha megnyomja a
gombot a bekapcsolás közben (míg a belső kijelző világít), egy új
egyszeri mérés indul el.
Üzemmód nevek
Tényleges távolság és
magasság üzemmód
Vízszintes távolság és
magasság üzemmód
Golf üzemmód
Tényleges távolság
üzemmód
Felfelé néző (+) szög,
Emelkedő
Nincs jelzés
Lefelé néző (-) szög,
Lejtő
Felső, 7-szegmenses
kijelző
Tényleges távolság
Vízszintes távolság
Lejtéshez igazított
távolság
Tényleges távolság
Alsó, 7-szegmenses
kijelző
Magasság
Magasság
Tényleges távolság
Nincs kijelzés
Jel
Measurement
1. Press the POWER button for power-on.
(Power turns off 8 seconds after the last
operation.)
Immediately after power-on.
(Initializing)
Stand-by.
3. Press POWER button once to start single measurement.
Measuring.
4. After measurement, “distance” or “fail to measure” indicator are displayed for 8 seconds, then power turns off. If you press the POWER
button during power-on (while the internal display is lit), another single measurement starts.
Failure to measure or
unable to measure distance.
Displays the measured
figure. (Target 1)
Displays the measured
figure. (Target 2)
3. Keep pressing POWER button to start continuous measurement up to 20 seconds. The internal display shows “distance” and
“fail to measure” indicator alternately.
Note: Laser irradiaton mark is blinking during the measurement.
Note: If you stop pressing the button, the continuous measuremen stops
Target focusing.
2. Aim at the target
.
Position the target at the center of the reticle
[Single measurement]
Failure to measure or
unable to measure distance.
Upward measurement.
Downward measurement.
Displays the measured figure.
[Continuous measurement]
4. After continuous measurement, the measure results are displayed for 8 seconds, then power turns off. If you press the POWER
button during power-on (while the internal display is lit), another measrement starts.
A mérések kivitelezése közben villog.
Measurement
1. Press the POWER button for power-on.
(Power turns off 8 seconds after the last
operation.)
Immediately after power-on.
(Initializing)
Stand-by.
3. Press POWER button once to start single measurement.
Measuring.
4. After measurement, “distance” or “fail to measure” indicator are displayed for 8 seconds, then power turns off. If you press the POWER
button during power-on (while the internal display is lit), another single measurement starts.
Failure to measure or
unable to measure distance.
Displays the measured
figure. (Target 1)
Displays the measured
figure. (Target 2)
3. Keep pressing POWER button to start continuous measurement up to 20 seconds. The internal display shows “distance” and
“fail to measure” indicator alternately.
Note: Laser irradiaton mark is blinking during the measurement.
Note: If you stop pressing the button, the continuous measuremen stops
Target focusing.
2. Aim at the target
.
Position the target at the center of the reticle
[Single measurement]
Failure to measure or
unable to measure distance.
Upward measurement.
Downward measurement.
Displays the measured figure.
[Continuous measurement]
4. After continuous measurement, the measure results are displayed for 8 seconds, then power turns off. If you press the POWER
button during power-on (while the internal display is lit), another measrement starts.