Nikon Laser User Manual
Page 140
Ru
Se
Nl
Dk
Pl
Hu
Cz
Fi
No
En
De
Fr
Es
It
Ro
278
Ru
Se
Nl
Dk
Pl
Hu
Cz
Fi
No
En
De
Fr
Es
It
Ro
279
6. 『
』 Tryb priorytetu pierwszego planu
A. Tryb priorytetu pierwszego planu
『
』 Informuje o ustawieniu trybu priorytetu
pierwszego planu.
B. Tryb priorytetu drugiego planu
『
』 Informuje o ustawieniu trybu priorytetu drugiego
planu.
7. Aktywna kontrola jasności wizjera
Funkcja aktywnej kontroli jasności wizjera wykrywa
warunki oświetleniowe z uwzględnieniem pola widzenia
i, jeśli to konieczne, automatycznie włącza pomarańczowe
podświetlenie LED.
Jasność pomarańczowego podświetlenia regulowana jest
automatycznie, w zależności od warunków oświetleniowych.
Pomimo zastosowania podczas produkcji ekranu LCD
najbardziej zaawansowanych technologii kompletna eliminacja
kurzu nie jest możliwa. Podczas korzystania z tego produktu
obraz na ekranie LCD ulega powiększeniu przez soczewkę i
mogą zostać wyświetlone drobiny kurzu. Jednakże zjawisko to
nie ma wpływu na dokładność pomiaru.
Uwaga — korzystanie z elementów sterowania lub
regulacji, czy też wykonywanie procedur w sposób
inny, niż określony w niniejszym podręczniku, może
spowodować narażenie na niebezpieczne
promieniowanie
1. Włóż baterię do komory baterii. (Patrz „Wymiana baterii”)
2. Gumowa muszla oczna
Użytkownik może korzystać z dalmierza z użyciem wymiennej,
gumowej muszli ocznej.
3. Regulacja dioptrii
Przeprowadź regulację dioptrii, aby uzyskać wyraźny obraz na
ekranie LCD.
Najpierw obróć do końca pierścień regulacji dioptrii w kierunku
przeciwnym do ruchu wskazówek zegara. Następnie włącz
zasilanie, aby uaktywnić ekran LCD. Spoglądając w okular
dalmierza Nikon Laser 1000A S obracaj pierścień regulacji dioptrii
do momentu uzyskania ostrego obrazu.
Jeśli regulacja dioptrii nie zostanie przeprowadzona, ustawienie
wyraźnej ostrości na obiekcie może nie być możliwe.
4. Pomiar
Uwaga: Naciśnięcie i przytrzymanie przycisku POWER (Zasilanie)
powoduje wyświetlenie wszystkich symboli na wewnętrznym
ekranie LCD. Po zdjęciu palca z przycisku POWER (Zasilanie)
wyświetlone zostanie ostatnio wprowadzone ustawienie.
(Krótkie naciśnięcie i zwolnienie przycisku POWER (Zasilanie)
może spowodować wyświetlenie ostatnio wprowadzonego
ustawienia bez pozostałych symboli. Nie jest to błąd urządzenia.)
Przed dokonaniem pomiaru zatwierdź ustawienia, takie jak jednostka
miary, tryb pomiaru/wyświetlania i tryb priorytetu.
◎ : Informacje na temat wprowadzania ustawień znajdują się w
niniejszym podręczniku, w części poświęconej danemu trybowi.
Wyświetlacz wewnętrzny
Podsumowanie dotyczące obsługi
Measurement
1. Press the POWER button for power-on.
(Power turns off 8 seconds after the last
operation.)
Immediately after power-on.
(Initializing)
Stand-by.
3. Press POWER button once to start single measurement.
Measuring.
4. After measurement, “distance” or “fail to measure” indicator are displayed for 8 seconds, then power turns off. If you press the POWER
button during power-on (while the internal display is lit), another single measurement starts.
Failure to measure or
unable to measure distance.
Displays the measured
figure. (Target 1)
Displays the measured
figure. (Target 2)
3. Keep pressing POWER button to start continuous measurement up to 20 seconds. The internal display shows “distance” and
“fail to measure” indicator alternately.
Note: Laser irradiaton mark is blinking during the measurement.
Note: If you stop pressing the button, the continuous measuremen stops
Target focusing.
2. Aim at the target
.
Position the target at the center of the reticle
[Single measurement]
Failure to measure or
unable to measure distance.
Upward measurement.
Downward measurement.
Displays the measured figure.
[Continuous measurement]
4. After continuous measurement, the measure results are displayed for 8 seconds, then power turns off. If you press the POWER
button during power-on (while the internal display is lit), another measrement starts.
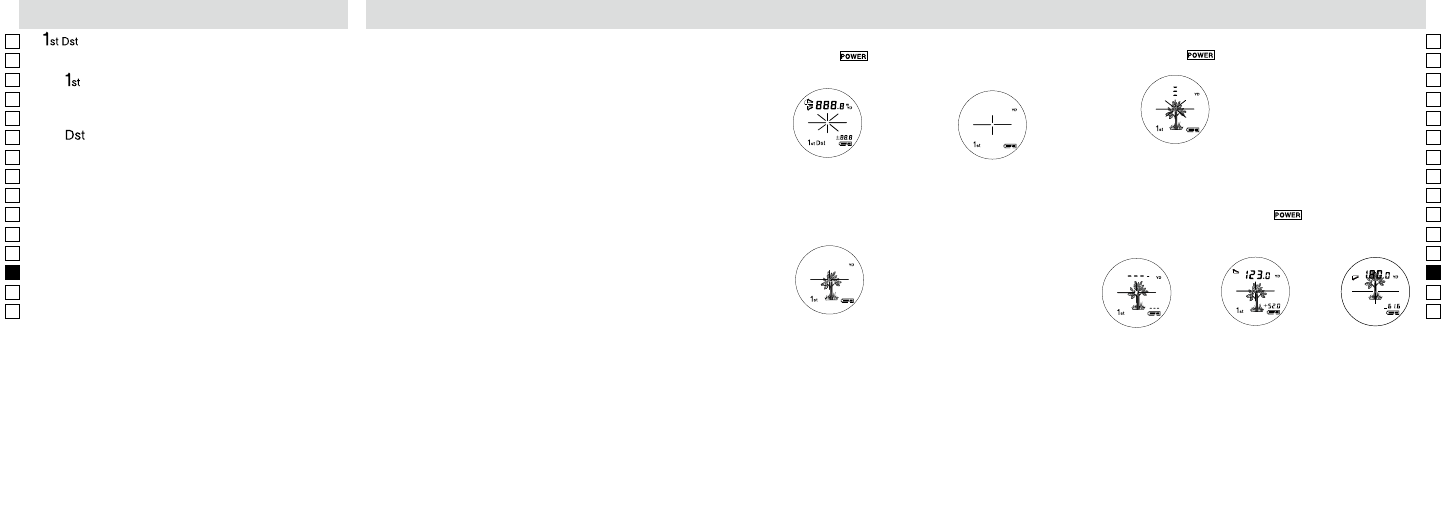
1. Naciśnij przycisk
w celu włączenia urządzenia.
(Zasilanie jest wyłączane po 8 sekundach od ostatniej operacji.)
Natychmiast po włączeniu
(Inicjalizacja)
Tryb czuwania
2. Skieruj na cel.
Ustaw cel na środku krzyża nitek.
Ustawianie na celu
3. Naciśnij przycisk
jeden raz, aby rozpocząć pojedynczy
pomiar.
【Pojedynczy pomiar】
Pomiar
Measurement
1. Press the POWER button for power-on.
(Power turns off 8 seconds after the last
operation.)
Immediately after power-on.
(Initializing)
Stand-by.
3. Press POWER button once to start single measurement.
Measuring.
4. After measurement, “distance” or “fail to measure” indicator are displayed for 8 seconds, then power turns off. If you press the POWER
button during power-on (while the internal display is lit), another single measurement starts.
Failure to measure or
unable to measure distance.
Displays the measured
figure. (Target 1)
Displays the measured
figure. (Target 2)
3. Keep pressing POWER button to start continuous measurement up to 20 seconds. The internal display shows “distance” and
“fail to measure” indicator alternately.
Note: Laser irradiaton mark is blinking during the measurement.
Note: If you stop pressing the button, the continuous measuremen stops
Target focusing.
2. Aim at the target
.
Position the target at the center of the reticle
[Single measurement]
Failure to measure or
unable to measure distance.
Upward measurement.
Downward measurement.
Displays the measured figure.
[Continuous measurement]
4. After continuous measurement, the measure results are displayed for 8 seconds, then power turns off. If you press the POWER
button during power-on (while the internal display is lit), another measrement starts.
4. Po wykonaniu pomiaru przez 8 sekund wyświetlany jest komunikat
„odległość” lub „błąd pomiaru”, a następnie zasilanie jest
wyłączane. Po naciśnięciu przycisku
podczas włączonego
zasilania (gdy wewnętrzny wyświetlacz jest aktywny), rozpoczyna
się kolejny pomiar pojedynczy.
Pomiar zakończony
niepowodzeniem
lub brak możliwości
dokonania pomiaru.
Pomiar w górę
Pomiar w dół
Wyświetlanie pomierzonej wartości.