Sammendrag om betjening, Measurement – Nikon Laser User Manual
Page 119
Ru
Se
Nl
Dk
Pl
Hu
Cz
Fi
No
En
De
Fr
Es
It
Ro
236
Ru
Se
Nl
Dk
Pl
Hu
Cz
Fi
No
En
De
Fr
Es
It
Ro
237
Sammendrag om betjening
Measurement
1. Press the POWER button for power-on.
(Power turns off 8 seconds after the last
operation.)
Immediately after power-on.
(Initializing)
Stand-by.
3. Press POWER button once to start single measurement.
Measuring.
4. After measurement, “distance” or “fail to measure” indicator are displayed for 8 seconds, then power turns off. If you press the POWER
button during power-on (while the internal display is lit), another single measurement starts.
Failure to measure or
unable to measure distance.
Displays the measured
figure. (Target 1)
Displays the measured
figure. (Target 2)
3. Keep pressing POWER button to start continuous measurement up to 20 seconds. The internal display shows “distance” and
“fail to measure” indicator alternately.
Note: Laser irradiaton mark is blinking during the measurement.
Note: If you stop pressing the button, the continuous measuremen stops
Target focusing.
2. Aim at the target
.
Position the target at the center of the reticle
[Single measurement]
Failure to measure or
unable to measure distance.
Upward measurement.
Downward measurement.
Displays the measured figure.
[Continuous measurement]
4. After continuous measurement, the measure results are displayed for 8 seconds, then power turns off. If you press the POWER
button during power-on (while the internal display is lit), another measrement starts.
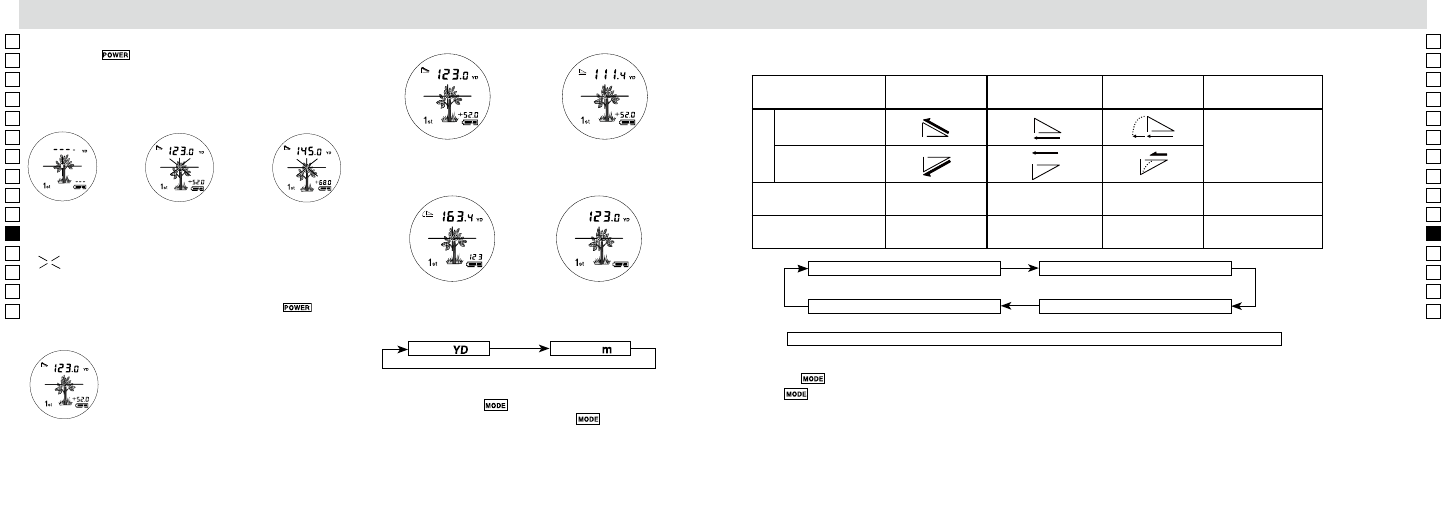
3. Hold knappen
nede for at begynde fortsat måling i op til
5 sekunder. Det interne display viser enten indikator for "afstand"
eller "måling mislykket".
Bemærk: Symbolet for laserudstråling blinker under målingen.
Bemærk: Hvis du ophører med at trykke på knappen, ophører den
fortsatte måling.
【Fortsat måling】
Kunne ikke måle
eller kunne ikke
måle afstand.
Viser det målte tal.
(Mål 1)
Viser det målte tal.
(Mål 2)
5. Eksempler på display for hver funktion
Funktion for aktuel
afstand og højde
Funktion for vandret
afstand og højde
Golfmetoden
Funktion for faktisk afstand
Meter
[
]
Yard
[
]
1.
Bekræft, at LCD-displayet er tændt.
2.
Tryk og hold nede på
-knappen i ca. to sekunder.
3.
Når visningsenheden har skiftet, slippes
-knappen.
4.
Når enheden er indstillet, bliver resultaterne konverterede og
vist i den målingsenhed, du har valgt.
6. Skift af målings/visningsfunktioner
(Standard fabriksindstilling er målefunktion for faktisk afstand og højde)
1. Bekræft, at LCD-displayet er tændt.
2. Tryk på
-knappen i 0,5 sekund.
3. Slip
-k
nappen for at skifte funktion.
4. Gentag trin 2 og 3, indtil den ønskede funktion vises.
5. Skift af funktion efter måling konverterer resultaterne til en ny funktion.
6. Efter at funktionen er indstillet, udføres målinger i den nye funktion.
Funktion for faktisk afstand og højde
Funktion for vandret afstand og højde
Funktion for faktisk afstand
Golfmetoden
Når du f.eks. måler en markørpind på en golfbane, kan du bruge
Prioritet til nærmeste motiv og Fortsat måling for en let måling.
Hvis der ikke er nogen genstande mellem dig og markørpinden, er
afstanden til markørpinden det mindste tal.
Ved tryk på knappen MODE, skifter funktioner i den rækkefølge, der er angivet ovenfor.
5. Valg af visningsenhed (fabriksindstillingen er yard.)
4. Efter målingen vises indikator for "afstand" eller "måling mislykket" i 8
sekunder, derefter slukkes. Hvis du trykker på knappen
, mens
apparatet er tændt (mens internt display er tændt), begynder en
anden enkel måling.
Benævnelser for
funktioner
Funktion for faktisk
afstand og højde
Funktion for vandret
afstand og højde
Golfmetoden
Funktion for faktisk
afstand
Set opad (+) vinkel
opad hældning
Intet symbol
Set nedad (-) vinkel
nedad hældning
Øverste 7-segment
visning
Faktisk afstand
Vandret afstand
Hældningsjusteret
afstand
Faktisk afstand
Nederste 7-segment
visning
Højde
Højde
Faktisk afstand
Ingen visning
Symbol
Measurement
1. Press the POWER button for power-on.
(Power turns off 8 seconds after the last
operation.)
Immediately after power-on.
(Initializing)
Stand-by.
3. Press POWER button once to start single measurement.
Measuring.
4. After measurement, “distance” or “fail to measure” indicator are displayed for 8 seconds, then power turns off. If you press the POWER
button during power-on (while the internal display is lit), another single measurement starts.
Failure to measure or
unable to measure distance.
Displays the measured
figure. (Target 1)
Displays the measured
figure. (Target 2)
3. Keep pressing POWER button to start continuous measurement up to 20 seconds. The internal display shows “distance” and
“fail to measure” indicator alternately.
Note: Laser irradiaton mark is blinking during the measurement.
Note: If you stop pressing the button, the continuous measuremen stops
Target focusing.
2. Aim at the target
.
Position the target at the center of the reticle
[Single measurement]
Failure to measure or
unable to measure distance.
Upward measurement.
Downward measurement.
Displays the measured figure.
[Continuous measurement]
4. After continuous measurement, the measure results are displayed for 8 seconds, then power turns off. If you press the POWER
button during power-on (while the internal display is lit), another measrement starts.
Blinker, mens der udføres målinger.
Measurement
1. Press the POWER button for power-on.
(Power turns off 8 seconds after the last
operation.)
Immediately after power-on.
(Initializing)
Stand-by.
3. Press POWER button once to start single measurement.
Measuring.
4. After measurement, “distance” or “fail to measure” indicator are displayed for 8 seconds, then power turns off. If you press the POWER
button during power-on (while the internal display is lit), another single measurement starts.
Failure to measure or
unable to measure distance.
Displays the measured
figure. (Target 1)
Displays the measured
figure. (Target 2)
3. Keep pressing POWER button to start continuous measurement up to 20 seconds. The internal display shows “distance” and
“fail to measure” indicator alternately.
Note: Laser irradiaton mark is blinking during the measurement.
Note: If you stop pressing the button, the continuous measuremen stops
Target focusing.
2. Aim at the target
.
Position the target at the center of the reticle
[Single measurement]
Failure to measure or
unable to measure distance.
Upward measurement.
Downward measurement.
Displays the measured figure.
[Continuous measurement]
4. After continuous measurement, the measure results are displayed for 8 seconds, then power turns off. If you press the POWER
button during power-on (while the internal display is lit), another measrement starts.